Tips on Recreating "The Nice Guys" Movie Logo using the Blend Tool in Adobe Illustrator

I noticed the logo for the new film "The Nice Guys" in the movie trailer for the film and on posters that I started seeing around town, and was instantly a fan of the illustration. It is a movie logo that works well both in animation and print materials, on dark or light colors, and can be executed in one solid color; all staples of a great identity mark. Whenever I see really nice, geometrically even logo designs, I am always thinking about how some of the math could be automated in Adobe illustrator, without having to eyeball distances, line thicknesses, and other details, and without pulling up the calculator app.

This got me thinking about Adobe illustrator's blend tool, a favorite tool of mine but one that is often overlooked. With the blend tool, you can interpolate shapes, colors, line thickness, and more. 

adobe-illustrator-blend-tool-specific-steps

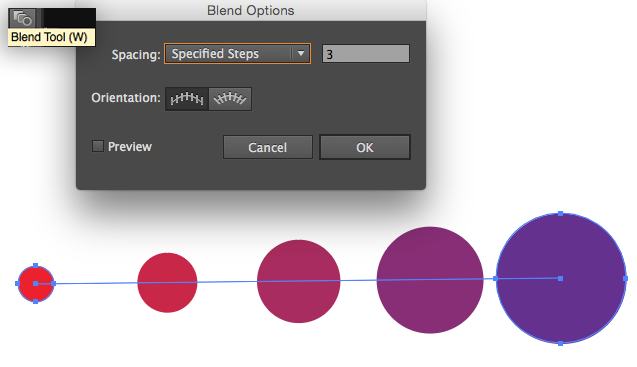
By using this technique on rounded arcs and lines, you can interpolate both the spacing of the intermediate lines, and the color gradation. You could even use Adobe illustrator's blend tool to interpolate the thickness between different lines. This makes recreating a lot of the letters like the "n" "c" and even the outlines between the "g" much easier. The great part is that the original elements are still editable, and the blended steps will automatically update if you make changes.

adobe-illustrator-blended-outlines

While I love my illustrator technical tips, I did not come up with the Nice Guys logo, and I completely back the idea that coming up with a great logo is MUCH more than the technical side of executing it. But once you have an idea and get to the execution phase, these Adobe illustrator tips can help greatly with your geometry straight! I haven't figured out yet who created the original logo, but if you know, let me know in the comments and I'll link to them for credit!

Want more info on New Features of Creative Cloud 2015? Learn more about:

• New Layer Styles in Photoshop CC 2015

• Quick Export to PNG and updates to Save for Web

• New 3D Filter to create bump maps and normal maps for 3D

• Working with Creative Cloud Libraries in Photoshop and other Adobe Apps


Like this tutorial? Consider becoming a Patron at Patreon.com/SeanFrangella to get additional benefits such as project files and more! 

To get weekly Motion Graphics, VFX, and 3D animation tutorials be sure to subscribe to the show on YouTube!


Create Captain America's Shield in 3D using Cinema 4D

I'm always looking for new ideas for tutorials from my favorite movies and films, and with the release of Captain America: Civil War, I had the idea to see how accurately I could create a 3D model for Captain America's shield in Cinema 4D. In this tutorial I get into how to build out 3D model, and as an added bonus this week, I am giving the 3D model away if you follow me on Facebook or Twitter. Just follow me on either site and hit me up with a message, and I'll send you a download link to get the 3D model for FREE!

captain-america-3d-shield

Want to see more Marvel inspired tutorials? Check out the next one on how to recreate the Avengers: Age of Ultron title using After Effects!


Like this tutorial? Consider becoming a Patron at Patreon.com/SeanFrangella to get additional benefits such as project files and more! 

To get weekly Motion Graphics, VFX, and 3D animation tutorials be sure to subscribe to the show on YouTube!


Convert Videos to Animated GIFs using Photoshop CC

Animated GIFs are BACK! With the prominence of Social Networks such as Twitter, Facebook, and whatever Snapchat is for, having auto-playing animated GIFs are a great option for grabbing attention as users quickly scroll through page content. If you have a video clip, you can easily convert it to n looping, web-ready animated GIF using Photoshop CC. Didn't know you can work with videos in Photoshop? No worries, there are a couple quick and easy steps to converting a video clip to an animated GIF. Check out the video to learn this Photoshop Quick Tip!


Want more info on New Features in Photoshop CC 2015? Learn more about:

• New Layer Styles in Photoshop CC 2015

• Quick Export to PNG and updates to Save for Web

• New 3D Filter to create bump maps and normal maps for 3D

• Working with Creative Cloud Libraries in Photoshop and other Adobe Apps

Like this tutorial? Consider becoming a Patron at Patreon.com/SeanFrangella to get additional benefits such as project files and more! 

To get weekly Motion Graphics, VFX, and 3D animation tutorials be sure to subscribe to the show on YouTube!


Game of Throne VFX Tutorial - Emulate the Blue Tint Film Look

An iconic look to the scenes in Game of Thrones taking place in Winterfell or involving the nights watch is the blue tint look. Using Adobe After Effects and the Lumetri color grading effect, you can recreate this stylized film look. In addition to the film look, you can also recreate the CG snow look in After Effects using Trapcode Particular.

Want to get the project file for this tutorial? You can purchase it in the online store for just a couple dollars!

To learn more about recreating the CG snow, check out the other part of this tutorial:

Game Of Thrones VFX Tutorial - Recreate CG Snow


Like this tutorial? Consider becoming a Patron at Patreon.com/SeanFrangella to get additional benefits such as project files and more! 

To get weekly Motion Graphics, VFX, and 3D animation tutorials be sure to subscribe to the show on YouTube!


Game of Thrones VFX Tutorial - Recreate CG Snow

A very powerful use of Trapcode Particular in After Effects is recreating volumetric, believable snow and snowstorms. This technique is frequently seen in Game of Thrones, when the scenes are taking place in Winterfell or involving the night's watch. In this tutorial, learn how to quickly recreate the CG snow look in a close-up shot using Trapcode Particular 2.5. This tutorial also covers new updates for Particular 2.5.

Want to get the project file for this tutorial? You can purchase it in the online store for just a couple dollars!

In addition to the CG snow, recreating this look involves creating the blue tint color grade. To learn about how to do that using the Lumetri Effect in After Effects, check out the other part of this tutorial here:

Game Of Throne VFX Tutorial - Emulate The Blue Tint Film Look


Like this tutorial? Consider becoming a Patron at Patreon.com/SeanFrangella to get additional benefits such as project files and more! 

To get weekly Motion Graphics, VFX, and 3D animation tutorials be sure to subscribe to the show on YouTube!


Intro to 3D in Photoshop CC and Adobe Fuse - Live Presentation at Ascend Training

In this live event recorded at Ascend Training, I give an overview on how to transition from Graphic Design apps like Photoshop into working in 3D. Transitioning into 3D animation can seem like a big leap, but there are gradual steps you can follow to make it less intimidating. I get into starting in Photoshop's 3D environment to  create a basic 3D logo, as well as working with Adobe Fuse, a new 3D character creation app that integrates with  through Adobe CC Libraries.

Adobe Fuse is a new 3D character creator app, part of Adobe Creative Cloud. With it you can build out a custom 3D character using an intelligent UI, and then either bring your newly created character into Photoshop CC, or upload it to Mixamo's where you can add MoCap data and Download workable 3D files in a variety of formats.

Want to get a more in-depth look at Adobe Fuse

Learn what Adobe Fuse is, and how to bring Characters from Fuse into Photoshop CC

Learn how to bring Adobe Fuse Characters in Cinema 4D

Take a closer look at how to Assemble a Character

Learn how to Customize and Model a 3D Character in Fuse

See how you can add and Edit Clothing in Adobe Fuse

Learn about editing Textures for Fuse Characters in Photoshop


Like this tutorial? Consider becoming a Patron at Patreon.com/SeanFrangella to get additional benefits such as project files and more! 

To get weekly Motion Graphics, VFX, and 3D animation tutorials be sure to subscribe to the show on YouTube!


Adobe Creative Graphic Design on Twitch.TV - Tips and Tricks for Logo Design in Adobe illustrator

In this live recording of Creative Graphic Design on Adobe's Twitch Live Stream, Adobe's Paul Trani and I discuss process, tips, and tricks for creating a logo using Adobe Illustrator. We talk about different techniques for how to iterate on creating a logo, technical tips on working in illustrator, how to utilize Adobe CC Libraries, and more!

Midway through the show, we decide to make the logo design a competition and let the Twitch Chat members vote on the winner. Also, Paul's mouse dies.

You can also now follow me on Twitch for live videos tutorials, Q&A sessions, and the occasional Fallout 4 webcast at Twitch.tv/SeanFrangella

Want more info on New Features of Creative Cloud 2015? Learn more about:

• New Layer Styles in Photoshop CC 2015

• Quick Export to PNG and updates to Save for Web

• New 3D Filter to create bump maps and normal maps for 3D

• Working with Creative Cloud Libraries in Photoshop and other Adobe Apps


Like this tutorial? Consider becoming a Patron at Patreon.com/SeanFrangella to get additional benefits such as project files and more! 

To get weekly Motion Graphics, VFX, and 3D animation tutorials be sure to subscribe to the show on YouTube!


Adobe Creative Graphic Design on Twitch.TV - Creating a 3D Logo in Photoshop 3D or Cinema 4D

I had the pleasure of popping in on Adobe's Twitch channel over at Twitch.tv/Adobe, where I talked with Adobe's Paul Trani about the different options for taking a 3D logo from illustrator and creating a 3D image out of it. We talk about the differences between 3D in Photoshop and a full 3D package such as Cinema 4D. In the first half of this live stream recording, Paul gets into some fun ways you can bring a vector logo from Illustrator into Photoshop, and in the second portion I get into cracking opening Cinema 4D or Cinema 4D Lite (included in After Effects CC) to create a 3D logo out of the "Creativity 360" illustration that we started with.

Whether you're completely new to working in 3D animation in either Photoshop or Cinema 4D, or a seasoned pro, this live show is packed with tons of tips for working in 3D.

Here is a still render of what we worked up during the live show:

When in doubt, add a bunch of colorful glows around the edges. Instant pop!

When in doubt, add a bunch of colorful glows around the edges. Instant pop!

You can also now follow me on Twitch for live videos tutorials, Q&A sessions, and the occasional Fallout 4 webcast at Twitch.tv/SeanFrangella


Like this tutorial? Consider becoming a Patron at Patreon.com/SeanFrangella to get additional benefits such as project files and more! 

To get weekly Motion Graphics, VFX, and 3D animation tutorials be sure to subscribe to the show on YouTube!


How to use Photoshop to edit the materials of 3D Characters created in Adobe Fuse

After you've assembled a 3D character in Adobe Fuse, then worked on customizing the character, and added clothing to your character, you can also edit and customize the Materials once you bring the 3D character into Photoshop. By customizing the textures, you can adjust materials found on the clothing, as well as swap out the textures, change the colors, and more. If you want to completely customize an existing material, you can dig into the asset folder of Adobe Fuse and open up an image materials in Photoshop CC.

Adobe Fuse is a new 3D character creator app, part of Adobe Creative Cloud. With it you can build out a custom 3D character using an intelligent UI, and then either bring your newly created character into Photoshop CC, or upload it to Mixamo's where you can add MoCap data and Download workable 3D files in a variety of formats.

Want to get a more in-depth look at Adobe Fuse

Learn what Adobe Fuse is, and how to bring Characters from Fuse into Photoshop CC

Learn how to bring Adobe Fuse Characters in Cinema 4D

Take a closer look at how to Assemble a Character

Learn how to Customize and Model a 3D Character in Fuse

See how you can add and Edit Clothing in Adobe Fuse


Like this tutorial? Consider becoming a Patron at Patreon.com/SeanFrangella to get additional benefits such as project files and more! 

To get weekly Motion Graphics, VFX, and 3D animation tutorials be sure to subscribe to the show on YouTube!


Use Cinema 4D Lite MoGraph Effectors to Animate 3D Titles in After Effects

One of the  best parts of working into Cinema 4D and Cinema 4D Lite is working with Mograph and Effectors. With C4D Lite, packaged FREE with After Effects CC, you get access to the Fracture object, and two Effectors: Plain, and Random. A lot of people overlook these objects because you have to register Cinema 4D Lite to get them to turn on. You know that window that pops up every time you start Cinema 4D Lite? Stop closing it and activate! This will give you access to the Mograph Effectors, which open up a HUGE amount of animation possibilities.

By Using MoGraph Fracture object, you can break apart text (or any extruded object) into separate objects using "explode objects + connect." This might look like it doesn't do anything at first, but once you start adding Effectors to the Fracture objects, you'll see the magic! This lets you animate position, scale, and rotation of each letter separately, and use strength or falloff to animate the letters in.

In Part 1 of this tutorial, I went over how to get the 3D text set up in Cinema 4D Lite and get the materials going. Check out Part 1 here.

Want to learn how to do this using MoText in the full Studio version of Cinema 4D? Check that out in this post here!

Looking for more Cinema 4D Lite tutorials?
 

Learn how to Create a 3D extruded logo in Cinema 4D or Cinema 4D Lite.

Then learn how to Work with Materials and Reflectance textures in Cinema 4D.

Next learn about 3D Lighting and HDRI Sky images in Cinema 4D.

And then learn about Creating Animation, working with Keyframes, and the Cinema 4D Timeline.


Like this tutorial? Consider becoming a Patron at Patreon.com/SeanFrangella to get additional benefits such as project files and more! 

To get weekly Motion Graphics, VFX, and 3D animation tutorials be sure to subscribe to the show on YouTube!


Create 3D Titles in After Effects CC using Cinema 4D Lite

Looking to create 3D text in After Effects? Put that text tool away kids, and crack open Cinema 4D Lite! Starting with the first version After Effects CC in 2013, Cinema 4D Lite is packaged FREE with AE. One of the biggest uses of Cinema 4D is how easily you can create professional 3D animation titles, with real 3D properties like shadows and reflections. 

In this tutorial, I get into how to get started with Cinema 4D Lite by creating 3D text titles. I also get into how the connection between C4D Lite and After Effects works, by utilizing the Cineware bridge. I also talk about setting up basic 3D materials, and how you can add all types of AE effects to Cinema 4D projects, like adjustment layers, background solids, and anything your After Effects heart desires!

In part 2 of this tutorial, we'll talk about adding MoGraph Effectors to the 3D text, in order to create letter-by-letter text animation. Check out Part 2 here.

Want to learn how to do this using MoText in the full Studio version of Cinema 4D? Check that out in this post here!

Looking for more Cinema 4D Lite tutorials?
 

Learn how to Create a 3D extruded logo in Cinema 4D or Cinema 4D Lite.

Then learn how to Work with Materials and Reflectance textures in Cinema 4D.

Next learn about 3D Lighting and HDRI Sky images in Cinema 4D.

And then learn about Creating Animation, working with Keyframes, and the Cinema 4D Timeline.


Like this tutorial? Consider becoming a Patron at Patreon.com/SeanFrangella to get additional benefits such as project files and more! 

To get weekly Motion Graphics, VFX, and 3D animation tutorials be sure to subscribe to the show on YouTube!


Create Letter-by-Letter Text Animations in Cinema 4D using MoGraph, MoText, and Effectors

In Cinema 4D, you can use MoGraph and Effectors to do all sorts of cool animation. The MoGraph and Cloner system is one of the biggest unique features of working in Cinema 4D. In this 3D Animation tutorial, I go over how to use MoGraph Effectors on MoText objects, in order to create letter-by-letter Text animations. I've gotten a couple questions lately on how I put together the intro sequence for my Tutorials, and this tutorial gets into just that!

This tutorial covers the process of applying MoGraph Effectors to MoText, as well as setting up the Effector Properties, animating strength, and adjusting and animating the falloff. Digging into the falloff settings for each Effector is really where you can push what you can do with MoGraph Effectors and create modular, re-useable animation systems.

To learn about setting up the custom materials on the Text Caps, check out this tutorial.

Be sure to also learn about the second part of this process of linking Optical Flares to Cinema 4D Animations in After Effects using Cineware.

To set up the letter-by-letter animation, first go to MoGraph > Effector, and choose an effector. If you do this with the MoText selected in Cinema 4D, it will automatically be applied to the letters of the text.

Look at alllll those fancy effectors.

Look at alllll those fancy effectors.

If you added the Effector to the scene without the MoText object selected, you can grab the Effector and drag it into "Letters."

On the Effector under "Parameters," you can adjust position, scale, and rotation. This will adjust the properties of each letter individually. If you want to adjust the scale uniformly, be sure to check "uniform scale."

I don't even want to know what happens if you don't check "uniform scale." I wouldn't chance it.

I don't even want to know what happens if you don't check "uniform scale." I wouldn't chance it.

After adjusting Parameters, if you go to the Effector Tab, you can animate the strength on and off. You can also go beyond 100%, or below 0% to create overshoot and follow through.

Ohhhh, so that's why we're doing all this.

Ohhhh, so that's why we're doing all this.

Adjusting the strength is great and all, but animating the falloff in the Falloff Tab is when things really get interesting. If you go to the Falloff Tab and change it from Infinite to Sphere, you can then move, scale, and just the shape of the falloff to create the animation. Now you don't even need to bother with the strength!

You can animate with a Torus, but now we're just getting crazy.

You can animate with a Torus, but now we're just getting crazy.

Check it out from different views. Taking a look from the top, you can see how moving and scaling the falloff affects groups of letters. Because the falloff is gradual, the letters will smoothly animate as you move and scale the falloff. 

Now we're definitely in the Matrix. 

Now we're definitely in the Matrix. 

Here's where the magic happens. If you invert the falloff by checking the invert button, now you can animate the sphere from out of frame onto the letters, and they will sequentially animate. 

There's always one tiny checkbox that makes all the difference!

There's always one tiny checkbox that makes all the difference!

If you change scale to a value of -1, the letters will also scale into existence. 

Check out this awesome screenshot where you can't see anything.

Check out this awesome screenshot where you can't see anything.

To create the animation, you can set a keyframe on the Position Coordinates with the spherical falloff over to the left, and 30 or 45 frames later set another keyframe with the falloff covering the letters.

Now we're talking, animation time!

Now we're talking, animation time!

Like this tutorial? Consider becoming a Patron at Patreon.com/SeanFrangella to get additional benefits such as project files and more! 

To get weekly Motion Graphics, VFX, and 3D animation tutorials be sure to subscribe to the show on YouTube!


Create Looping Animations in Cinema 4D using the Animation Track Properties

Looking to create looping animations in Cinema 4D, and end up just copying the keyframes over and over? Well no more! If you're familiar with After Effects Expressions, you can loop animations using the loopOut expression. If you're looking to do something similar in Cinema 4D, you might want to just create a bunch of copied keyframes, or look to writing some crazy Xpresso scripts to handle the looping. But by using the animation track properties in the attributes window, you can loop animations a set number of times using the Oscillate setting in the Track Properties, under attributes.

This technique can be utilized in both the full Studio version of Cinema 4D, as well as the After Effects version, Cinema 4D Lite.

Want to learn more about Cinema 4D Lite to get off the ground in 3D?
 

Learn how to Create a 3D extruded logo in Cinema 4D or Cinema 4D Lite.

Then learn how to Work with Materials and Reflectance textures in Cinema 4D.

Next learn about 3D Lighting and HDRI Sky images in Cinema 4D.

And then learn about Creating Animation, working with Keyframes, and the Cinema 4D Timeline.

To get started with this technique of creating looping animations in Cinema 4D, all you need to do is create 2 keyframes. Here we have the top and bottom points of a sphere animating vertically, in order to create the bouncing look.

Look at that smooooth curve.

Look at that smooooth curve.

With the full Cinema 4D timeline open (accessible via Window > Timeline), when you click on the track, it'll open up the Track Properties under attributes. This is where you can adjust what happens before and after the two keyframes.

Houston, we have looping!

Houston, we have looping!

By changing the "After" dropdown to "Oscillate," the animation will repeat. This way all you have to adjust is that one animation curve, and it will change the entire animation. If you want it to loop infinitely, you can change the number of repetitions. Now that's a nice loop!

When will it end?!?!?! Oh, after 99 times.

When will it end?!?!?! Oh, after 99 times.

If you want to go further with this technique, you can add additional keyframes and loop keyframe animations beyond two. After adding in an additional keyframe in the center, as an example, it will loop the full set. Getting a bit deeper into f-Curve animations in the Cinema 4D timeline, you can hold SHIFT to adjust online one side of the tangent, ALT/OPTION to adjust only the VALUE, and COMMAND to adjust only what is happening over TIME.

BoooooOOOOooo. Urns.

BoooooOOOOooo. Urns.


Like this tutorial? Consider becoming a Patron at Patreon.com/SeanFrangella to get additional benefits such as project files and more! 

To get weekly Motion Graphics, VFX, and 3D animation tutorials be sure to subscribe to the show on YouTube!


Import a Maya 3D Object into Element 3D V2 as an OBJ Model

If you are working with Element 3D V2 in After Effects for your 3D workflow, you might want to bring in a 3D object built in Maya. To do this, you first need to export the Maya scene as an OBJ model. Simple enough, right? That'll only bring the Maya object into Element 3D as one big object with the same texture. Great if you just want to slap one material on an object and move a 3D After Effects camera around it, but not great if you want assign different materials to different parts of the 3D object, or want to animate individual parts separately.

If you want to have different materials on different parts of the object, you'll have to do some additional set-up work in Maya to assign different materials to different parts of the object. This way, Element 3D will read the different materials as markers for different parts of the object. You can then assign new materials to each part of the 3D model in Element 3D. By doing this, with a new feature of Element 3D V2, you can also create animation on each individual piece by using Auxiliary or AUX Channels. To learn how to import 3D objects from Maya into Element 3D V2, check out the video above.

New to Element 3D? 

Start with How to create a 3D Logo with Shadows & Reflections!

Learn about the Top new Features of Element 3D V2!

Learn about how to use Cinema 4D Animations in Element 3D V2 in this video

And my shortcut tips and tricks for Element 3D V2 in this video!

Want to Motion Track a 3D Object using Element 3D? Learn how in this video!


For a step-by-step breakdown of the process of bringing a Maya 3D Object into Element 3D V2, you first need to turn on OBJ export in the Maya plug-ins manager, which is in Windows > Settings/Preferences > Plug-ins Manager. You then want to scroll down and check on "OBJexport.Bundle"

Check 'em both on and hit REFRESH!

Check 'em both on and hit REFRESH!

The next step is to export the Maya 3D Object as an OBJ, by going to File > Export all, and making sure you select "OBJexport" from the "Files of Type" drop-down.

Don't forget to change it to OBJ!

Don't forget to change it to OBJ!

Next, back in After Effects, within the scene settings for Element 3D V2, you'll want to hit the Import button and locate the OBJ Model.

That is one slick chair.

That is one slick chair.

This will bring in the 3D object as one big object and material. If you want to be able to assign different Element 3D V2 Materials to different parts of the object, you'll have to jump back over to Maya and do a bit of additional work. To allow Element 3D to read different parts of the 3D OBJ model as different materials, all you need to do is assign a new material to each piece of the object, by right clicking and selecting "Assign New Material."

Right-click like a champ.

Right-click like a champ.

It doesn't matter what color the material is, just that each part is a different material. I usually throw on a bunch of bright colors in Maya for reference, and end  with a crazy rainbow colored 3D Model in Maya that looks something like this:

Wow, that is colorful!

Wow, that is colorful!

This way, when you bring the 3D Object back into Element 3D V2 as an OBJ Model, each piece will be separate. This will allow you to assign new materials to each piece.

Colorful and shiny, and now usable in Element 3D!

Colorful and shiny, and now usable in Element 3D!

This process can also be used to animate each piece separately, by creating a duplicate of just one piece, and assigning it to an Auxiliary or AUX Channel. This setting is new to Element 3D V2, so be sure to update!

That is so many channels!

That is so many channels!

Then, after you've assigned different pieces to different AUX channels, you can animate position, scale, and rotation separately on the Element 3D effect, under Group > Aux Channels. This new system of groups with Aux channels massively grows the type of specific animation you can do in Element 3D V2.

So many animation possibilities!

So many animation possibilities!


Like this tutorial? Consider becoming a Patron at Patreon.com/SeanFrangella to get additional benefits such as project files and more! 

To get weekly Motion Graphics, VFX, and 3D animation tutorials be sure to subscribe to the show on YouTube!


Create a 3D write-on Animation by combining Element 3D with the new Saber plug-in

In my previous After Effects tutorial, I talked about how to Combine the new Saber plug-in with Element 3D text layers. In this new tutorial, I wanted to take that a bit further, and get into how to use saber to drive the animation of an Element 3D layer, to create a cool glowing write-on effect. I'm always trying to build everything as clean as possible, so we'll talk about how to create this full animation using only one set of keyframes.

New to Element 3D? 

Start with How to create a 3D Logo with Shadows & Reflections!

Learn about the Top new Features of Element 3D V2!

Learn about how to use Cinema 4D Animations in Element 3D V2 in this video

And my shortcut tips and tricks for Element 3D V2 in this video!

Want to Motion Track a 3D Object using Element 3D? Learn how in this video!


Like this tutorial? Consider becoming a Patron at Patreon.com/SeanFrangella to get additional benefits such as project files and more! 

To get weekly Motion Graphics, VFX, and 3D animation tutorials be sure to subscribe to the show on YouTube!


How to Combine New SABER Plug-in with Element 3D V2 Text Animations

When the new After Effects plug-in "Saber" was released by Video Copilot, I was excited to immediately dive in and see what this thing could do. One of the features Andrew Kramer showed in his kickoff video was the possibility of aligning Saber with Element 3D. He didn't get into the set-up though, so I wanted to take a crack at how to set this up and share it with everyone! 

In this video I'll go over how to link up Element 3D V2 and Saber to one single text layer, and how to set everything up so it will all align together, even when you start moving a camera around. This technique is also fully non-destructive to both elements, so the great part is that you could change the text to something completely new when you're done, and both the Element 3D and Saber layers will immediately update. Neat, right?!

New to Element 3D? 

Start with How to create a 3D Logo with Shadows & Reflections!

Learn about the Top new Features of Element 3D V2!

Learn about how to use Cinema 4D Animations in Element 3D V2 in this video

And my shortcut tips and tricks for Element 3D V2 in this video!

Want to Motion Track a 3D Object using Element 3D? Learn how in this video!


Like this tutorial? Consider becoming a Patron at Patreon.com/SeanFrangella to get additional benefits such as project files and more! 

To get weekly Motion Graphics, VFX, and 3D animation tutorials be sure to subscribe to the show on YouTube!


How to Extract Elements from Footage with the RotoBrush & Refine Edge Tool in After Effects CC

Sometimes you want to composite elements into the background of a shot, but a character is in the foreground, and you need the VFX elements to go between the character and the background. Or you have a really tricky shot where you need to isolate and extract one element from a shot, but didn't have a green screen handy.

Using the RotoBrush and Refine Edge tool in After Effects CC, you can mask out elements of a shot over time. Frame-by-frame masking and rotoscoping you say? Not in my workflow, grandpa! The rotobrush lets you quickly paint the element that you want to retain, and After Effects will use this data over time to handle the movement. The more information you give the RotoBrush tool the better, but it'll still be much faster than the painful process of frame-by-frame roto work. With the Refine Edge Tool, new to After Effects CC, you can now adjust the edges of the element even further, to account for tricky shots like hair.

Looking for more After Effects Tracking, Compositing, and Visual Effects Tutorials?

Learn about working with the After Effects 2D Tracker

Check out how to track Matte Paintings using the 3D Camera Tracker

Learn How to Track & Composite a 3D Object in Cinema 4D & After Effects


Like this tutorial? Consider becoming a Patron at Patreon.com/SeanFrangella to get additional benefits such as project files and more! 

To get weekly Motion Graphics, VFX, and 3D animation tutorials be sure to subscribe to the show on YouTube!


Top 5 Customization Tips & Preferences in After Effects CC

One of the cool updates to After Effects CC 2015 is the new Blue UI. In addition to changing the blue even further, you can further customize many elements of After Effects CC. Did you know that you can change all of the default layer colors in the timeline, or create a solid that defaults to the current position of the playhead in the timeline? Learn this and other After Effects CC customization tips in the video above.

My Top 5 After Effects CC customization Tips are:
• Create new layers at Current Time
• More Colorful layers and Masks
• Stacked Panels and new Workspace options
• Dashed grids and grid-lines
• An even BRIGHTER Blue UI


Like this tutorial? Consider becoming a Patron at Patreon.com/SeanFrangella to get additional benefits such as project files and more! 

To get weekly Motion Graphics, VFX, and 3D animation tutorials be sure to subscribe to the show on YouTube!


How to Link Optical Flares to Element 3D Animations in After Effects

One of the major benefits to working with Element 3D in After Effects is that it works directly in the 3D Space of After Effects. This means that when you add an After Effects camera, BOOM, you can orbit around your 3D object. This also helps to be able to link up Element 3D scenes with additional plug-ins, like another Video Copilot plug-in, Optical Flares. In this video, learn how to link up Element 3D V2 with Optical Flares, and have everything move and animate together.

New to Element 3D? 

Start with How to create a 3D Logo with Shadows & Reflections!

Learn about the Top new Features of Element 3D V2!

Learn about how to use Cinema 4D Animations in Element 3D V2 in this video

And my shortcut tips and tricks for Element 3D V2 in this video!

Want to Motion Track a 3D Object using Element 3D? Learn how in this video!


Like this tutorial? Consider becoming a Patron at Patreon.com/SeanFrangella to get additional benefits such as project files and more! 

To get weekly Motion Graphics, VFX, and 3D animation tutorials be sure to subscribe to the show on YouTube!


How to link Optical Flares to Cinema 4D Animations in After Effects

One of the the best things about the newer integration between Cinema 4D and After Effects CC is the Cineware integration, which allows you to bring Cinema 4D or Cinema 4D Lite files into After Effects directly, without needing to render them out. Additionally, you can use Cineware to extract elements out of Cinema 4D and bring them into After Effects, and have everything perfectly line up. 

In this video, we'll talk about taking an animated logo from Cinema 4D into After Effects, and use Cineware to link up Video Copilot's Optical Flares plug-in, and have everything work in alignment. We'll also talk about using Cineware to rip out a depth pass, in order to occlude certain parts of a scene.

Want to learn more about Cinema 4D Lite to get off the ground in 3D?

Learn how to Create a 3D extruded logo in Cinema 4D or Cinema 4D Lite.

Then learn how to Work with Materials and Reflectance textures in Cinema 4D.

Next learn about 3D Lighting and HDRI Sky images in Cinema 4D.

And then learn about Creating Animation, working with Keyframes, and the Cinema 4D Timeline.

Finally, learn some Fancy post-production effects like linking Optical Flares to Cinema 4D Animations.


Like this tutorial? Consider becoming a Patron at Patreon.com/SeanFrangella to get additional benefits such as project files and more! 

To get weekly Motion Graphics, VFX, and 3D animation tutorials be sure to subscribe to the show on YouTube!