3D Modeling

Create Facebook 3D Posts using 3D Objects from Cinema 4D

In this tutorial, learn how to create 3D Facebook Posts with 3D objects exported from Cinema 4D. By creating 3D posts on Facebook, users are able to move and rotate an object in full 3D.

When using Cinema 4D, to start, export your 3D object as an OBJ. Once you have an OBJ and the accompanying MTL file, you need to convert those to the GLB file format, which is what Facebook currently uses for 3D posts.

To convert the OBJ to a GLB file, use this website: http://52.4.31.236/convertmodel.html

Check out Facebook’s developer tutorials on 3D posts here: https://developers.facebook.com/docs/...


Want to make Lighting & Reflections in Cinema 4D a snap?

Take a look at 360° Environment Maps Pro for Cinema 4D & Cinema 4D Lite to quickly and easily add lighting and rendering options to your scene. You can also save over 25% on bundle packs!


Looking to create 3D photos using portrait mode on your iPhone and Adobe Photoshop? Check out this quick video below!

To see more features of Cinema 4D, be sure to check out new features in Cinema 4D R18.

• Top 5 MoGraph updates and new Effectors for R18
• Voronoi Fracture, a New MoGraph Feature
• Inverted Ambient Occlusion
• Working with the new Thinfilm Shader
• How to use the new Parallax Bump Map Feature
• Using the new Shadow Catcher for 3D Compositing
• Working with the new Substance Materials Workflow

Like this tutorial? Consider becoming a Patron at Patreon.com/SeanFrangella to get additional benefits such as project files and more! 

To get weekly Motion Graphics, VFX, and 3D animation tutorials be sure to subscribe to the show on YouTube!


Cinema 4D R18 - Top 5 MoGraph Updates & New Features

One of the biggest updates to Cinema 4D R18 is all of the new MoGraph updates. These include the new Voronoi Fracture object, as well as the hexagon cloner setting, the push-apart effector and other effectors, new cloner features such as Scaling and Weight-Painting, and more! The new MoGraph updates are going to greatly improvement working with animation for R18, so be sure to check out the video to learn all about the Top 5 MoGraph updates, and check out the additional video on the new Voronoi Fracture Object. And check out the renders below to get an idea of what you can do with the new Mograph Tools for Cinema 4D R18!

The Hexagon Cloner setting combined with the Variation Shader

The Voronoi Fracture feature applied to extruded 3D text

The Hexagon Cloner setting combined with the Variation Shader

The Voronoi Fracture feature combined with Inverted Ambient Occlusion

Want to make Lighting & Reflections in Cinema 4D a snap?

Take a look at 360° Environment Maps Pro for Cinema 4D & Cinema 4D Lite to quickly and easily add lighting and rendering options to your scene. You can also save over 25% on bundle packs!

To take a deeper look at new features in Cinema 4D R18, be sure to check out some of these additional articles focusing on other updates and new features for R18:

• Top 5 New Features of R18
• Voronoi Fracture, a New MoGraph Feature
• Inverted Ambient Occlusion
• Working with the new Thinfilm Shader
• How to use the new Parallax Bump Map Feature
• Using the new Shadow Catcher for 3D Compositing
• Working with the new Substance Materials Workflow

Get an overview of each R18 MoGraph update individually in the videos below

Like this tutorial? Consider becoming a Patron at Patreon.com/SeanFrangella to get additional benefits such as project files and more! 

To get weekly Motion Graphics, VFX, and 3D animation tutorials be sure to subscribe to the show on YouTube!


Cinema 4D R18 - Working with the New Thinfilm Shader

The new Thinfilm shader is a new really colorful addition to materials in Cinema 4D R18. This new shader setting allows you to simulate a thin film on top of a material, which can result in a rainbow oil look, or soap bubbles when created with a transparent material.

The ThinFilm shader can be added with just a few steps, so check out the video above to learn the process to set it up, and be sure to take a look at the screenshots below for some examples on how the new ThinFilm shader can create amazing artwork in Cinema 4D R18.

Completely transparent thinFilm shaders applied to MetaBall Objects

ThinFilm Shader applied on top of a reflective material, combined with Voronoi Fracture

Want to make Lighting & Reflections in Cinema 4D a snap?

Take a look at 360° Environment Maps Pro for Cinema 4D & Cinema 4D Lite to quickly and easily add lighting and rendering options to your scene. You can also save over 25% on bundle packs!

To take a deeper look at new features in Cinema 4D R18, be sure to check out some of these additional articles focusing on other updates and new features for R18:

• Top 5 New Features of R18
• MoGraph updates and new Effectors for R18
• Voronoi Fracture, a New MoGraph Feature
• Inverted Ambient Occlusion
• How to use the new Parallax Bump Map Feature
• Using the new Shadow Catcher for 3D Compositing
• Working with the new Substance Materials Workflow

Like this tutorial? Consider becoming a Patron at Patreon.com/SeanFrangella to get additional benefits such as project files and more! 

To get weekly Motion Graphics, VFX, and 3D animation tutorials be sure to subscribe to the show on YouTube!


Cinema 4D R18 - How to use the new Parallax Bump Map Feature

Using bump maps in Cinema 4D Materials can be a great way create the illusion of bumps and roughness on a surface, without actually changing the geometry and therefore increasing the object's complexity. To achieve a fully believable render, you could use a displacement material and distort the geometry, however this can greatly increase render times. 

With the new Parallax Bump Map feature of Cinema 4D R18, you can create the illusion of height and depth depth in bump maps, without greatly increasing render time, as the original geometry is not actually distorted. Parallax bump maps are a great way to use materials to achieve create the illusion of displaced height and depth, without increasing render time.


Want to make Lighting & Reflections in Cinema 4D a snap?

Take a look at 360° Environment Maps Pro for Cinema 4D & Cinema 4D Lite to quickly and easily add lighting and rendering options to your scene. You can also save over 25% on bundle packs!

To take a deeper look at new features in Cinema 4D R18, be sure to check out some of these additional articles focusing on other updates and new features for R18:

• Top 5 New Features of R18
• MoGraph updates and new Effectors for R18
• Voronoi Fracture, a New MoGraph Feature
• Inverted Ambient Occlusion
• Working with the new Thinfilm Shader
• Using the new Shadow Catcher for 3D Compositing
Working with the new Substance Materials Workflow

Like this tutorial? Consider becoming a Patron at Patreon.com/SeanFrangella to get additional benefits such as project files and more! 

To get weekly Motion Graphics, VFX, and 3D animation tutorials be sure to subscribe to the show on YouTube!


Cinema 4D R18 - Working with the New Substance workflow for Materials

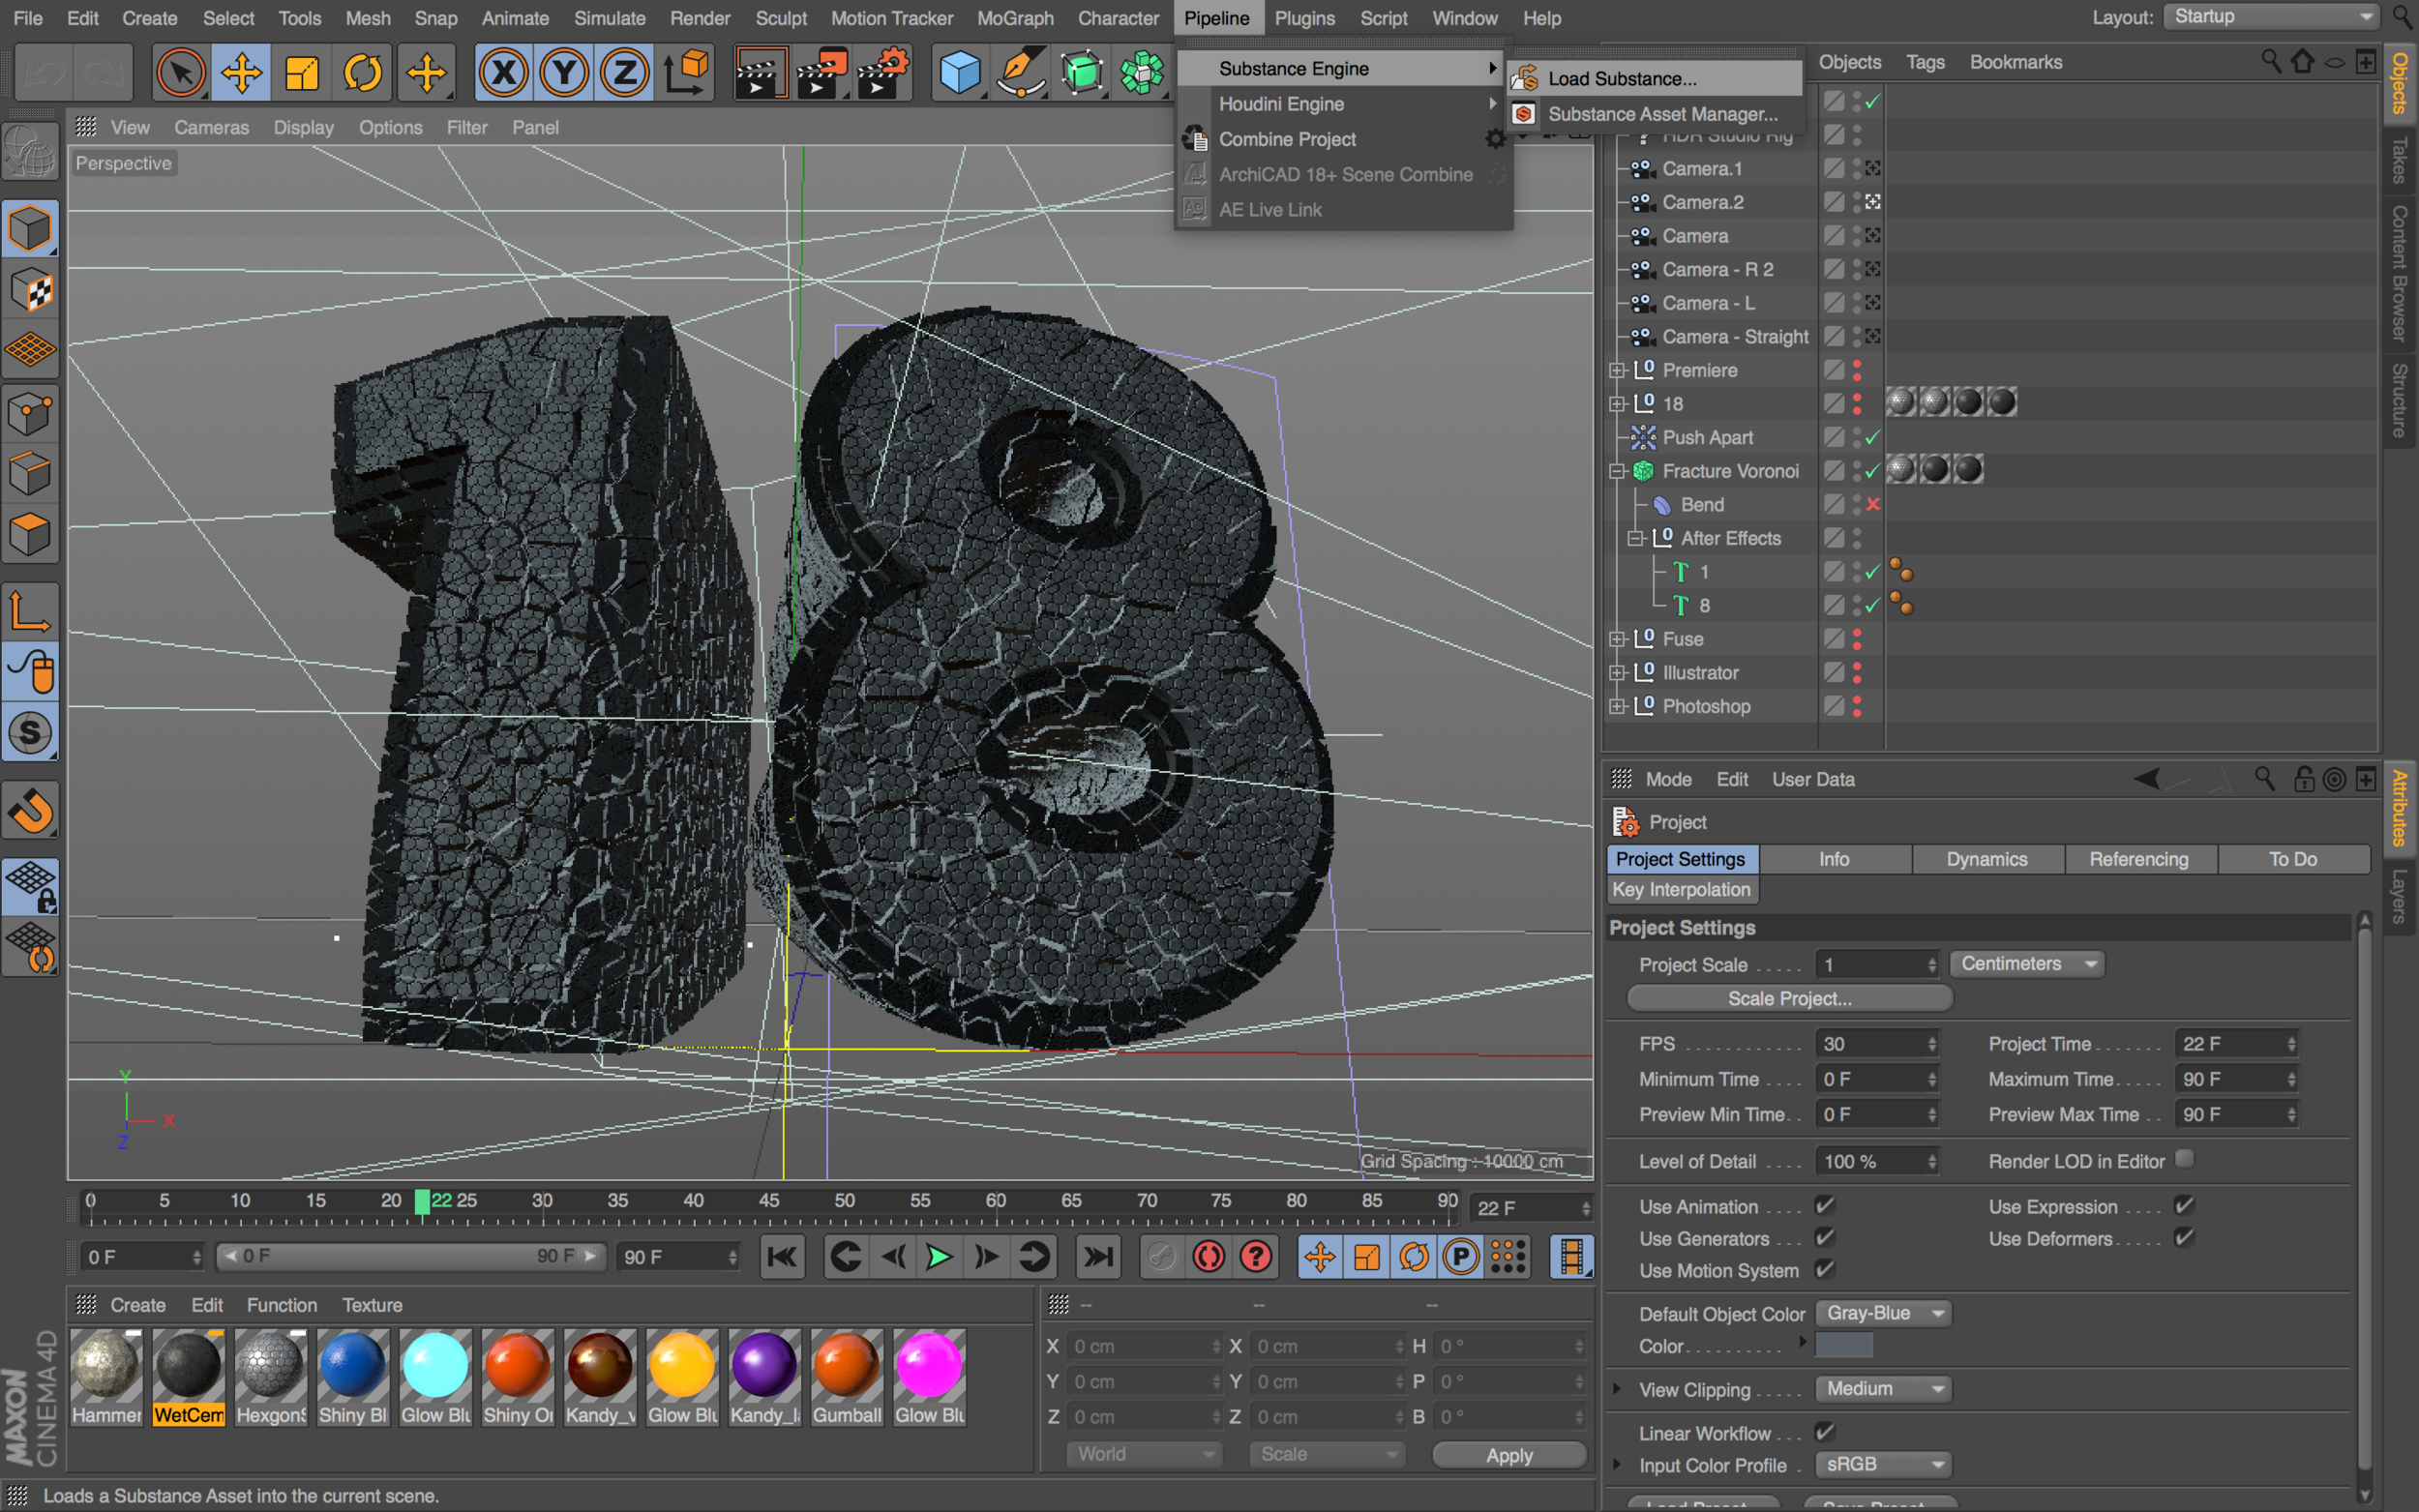
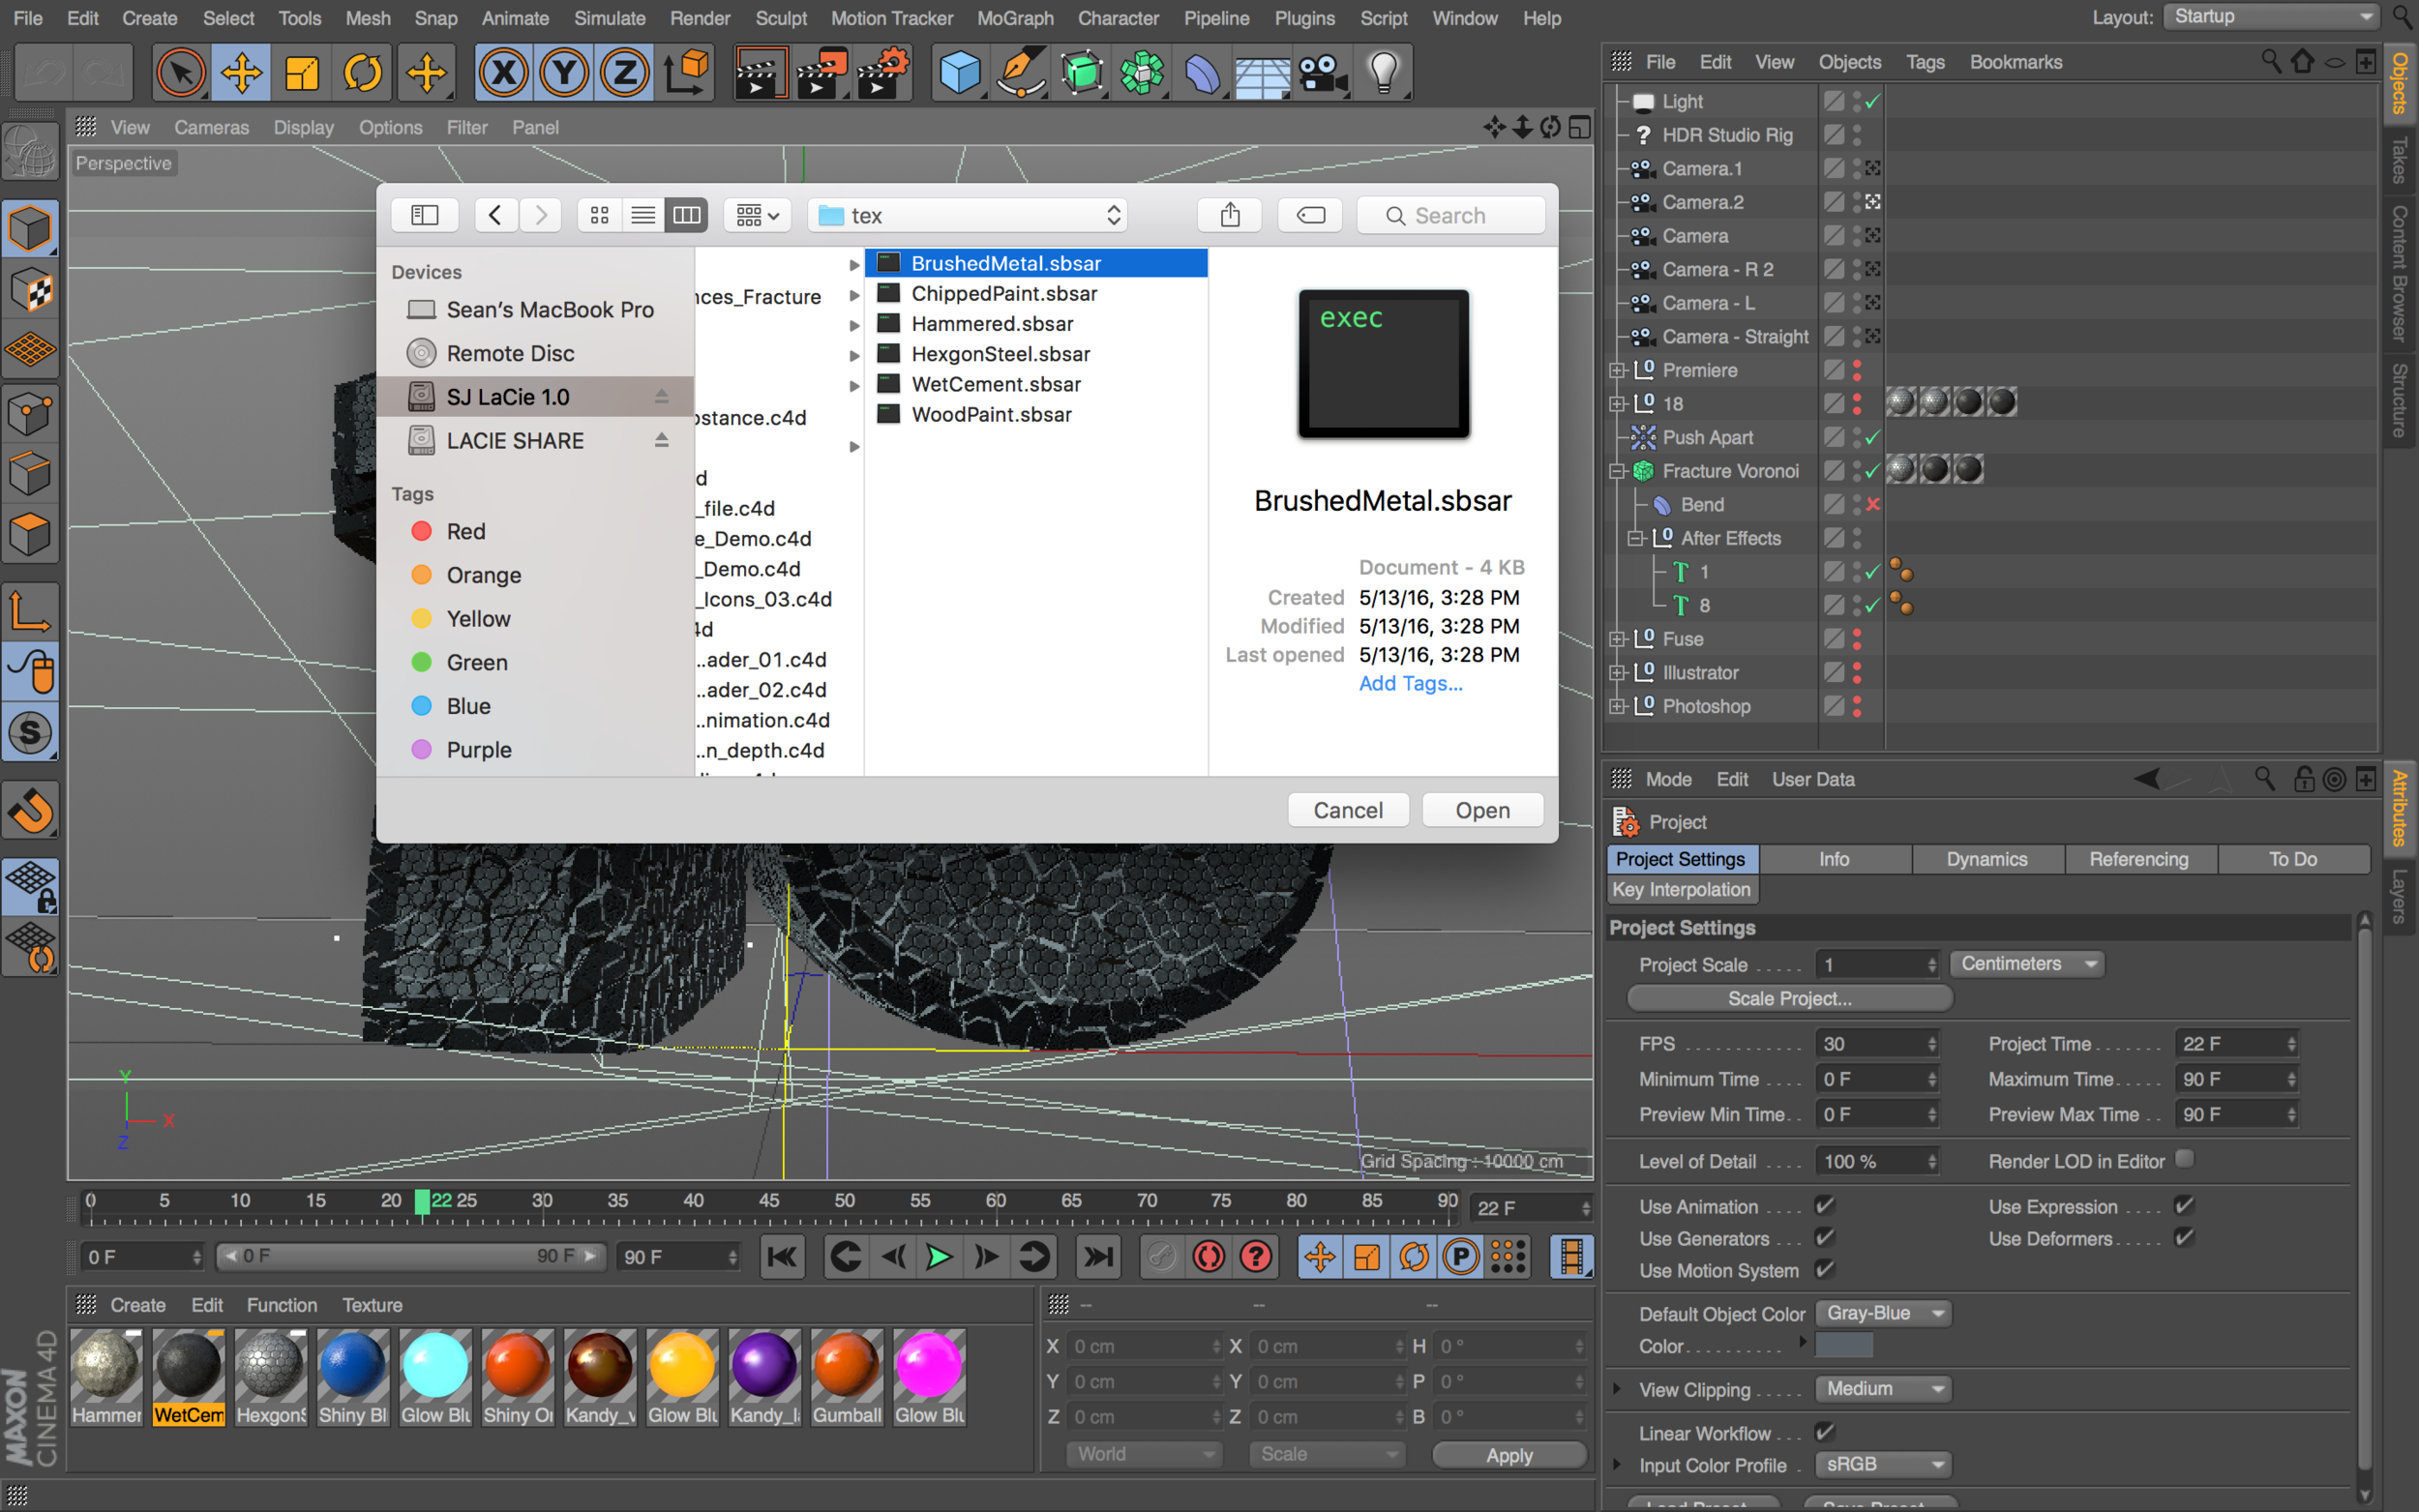
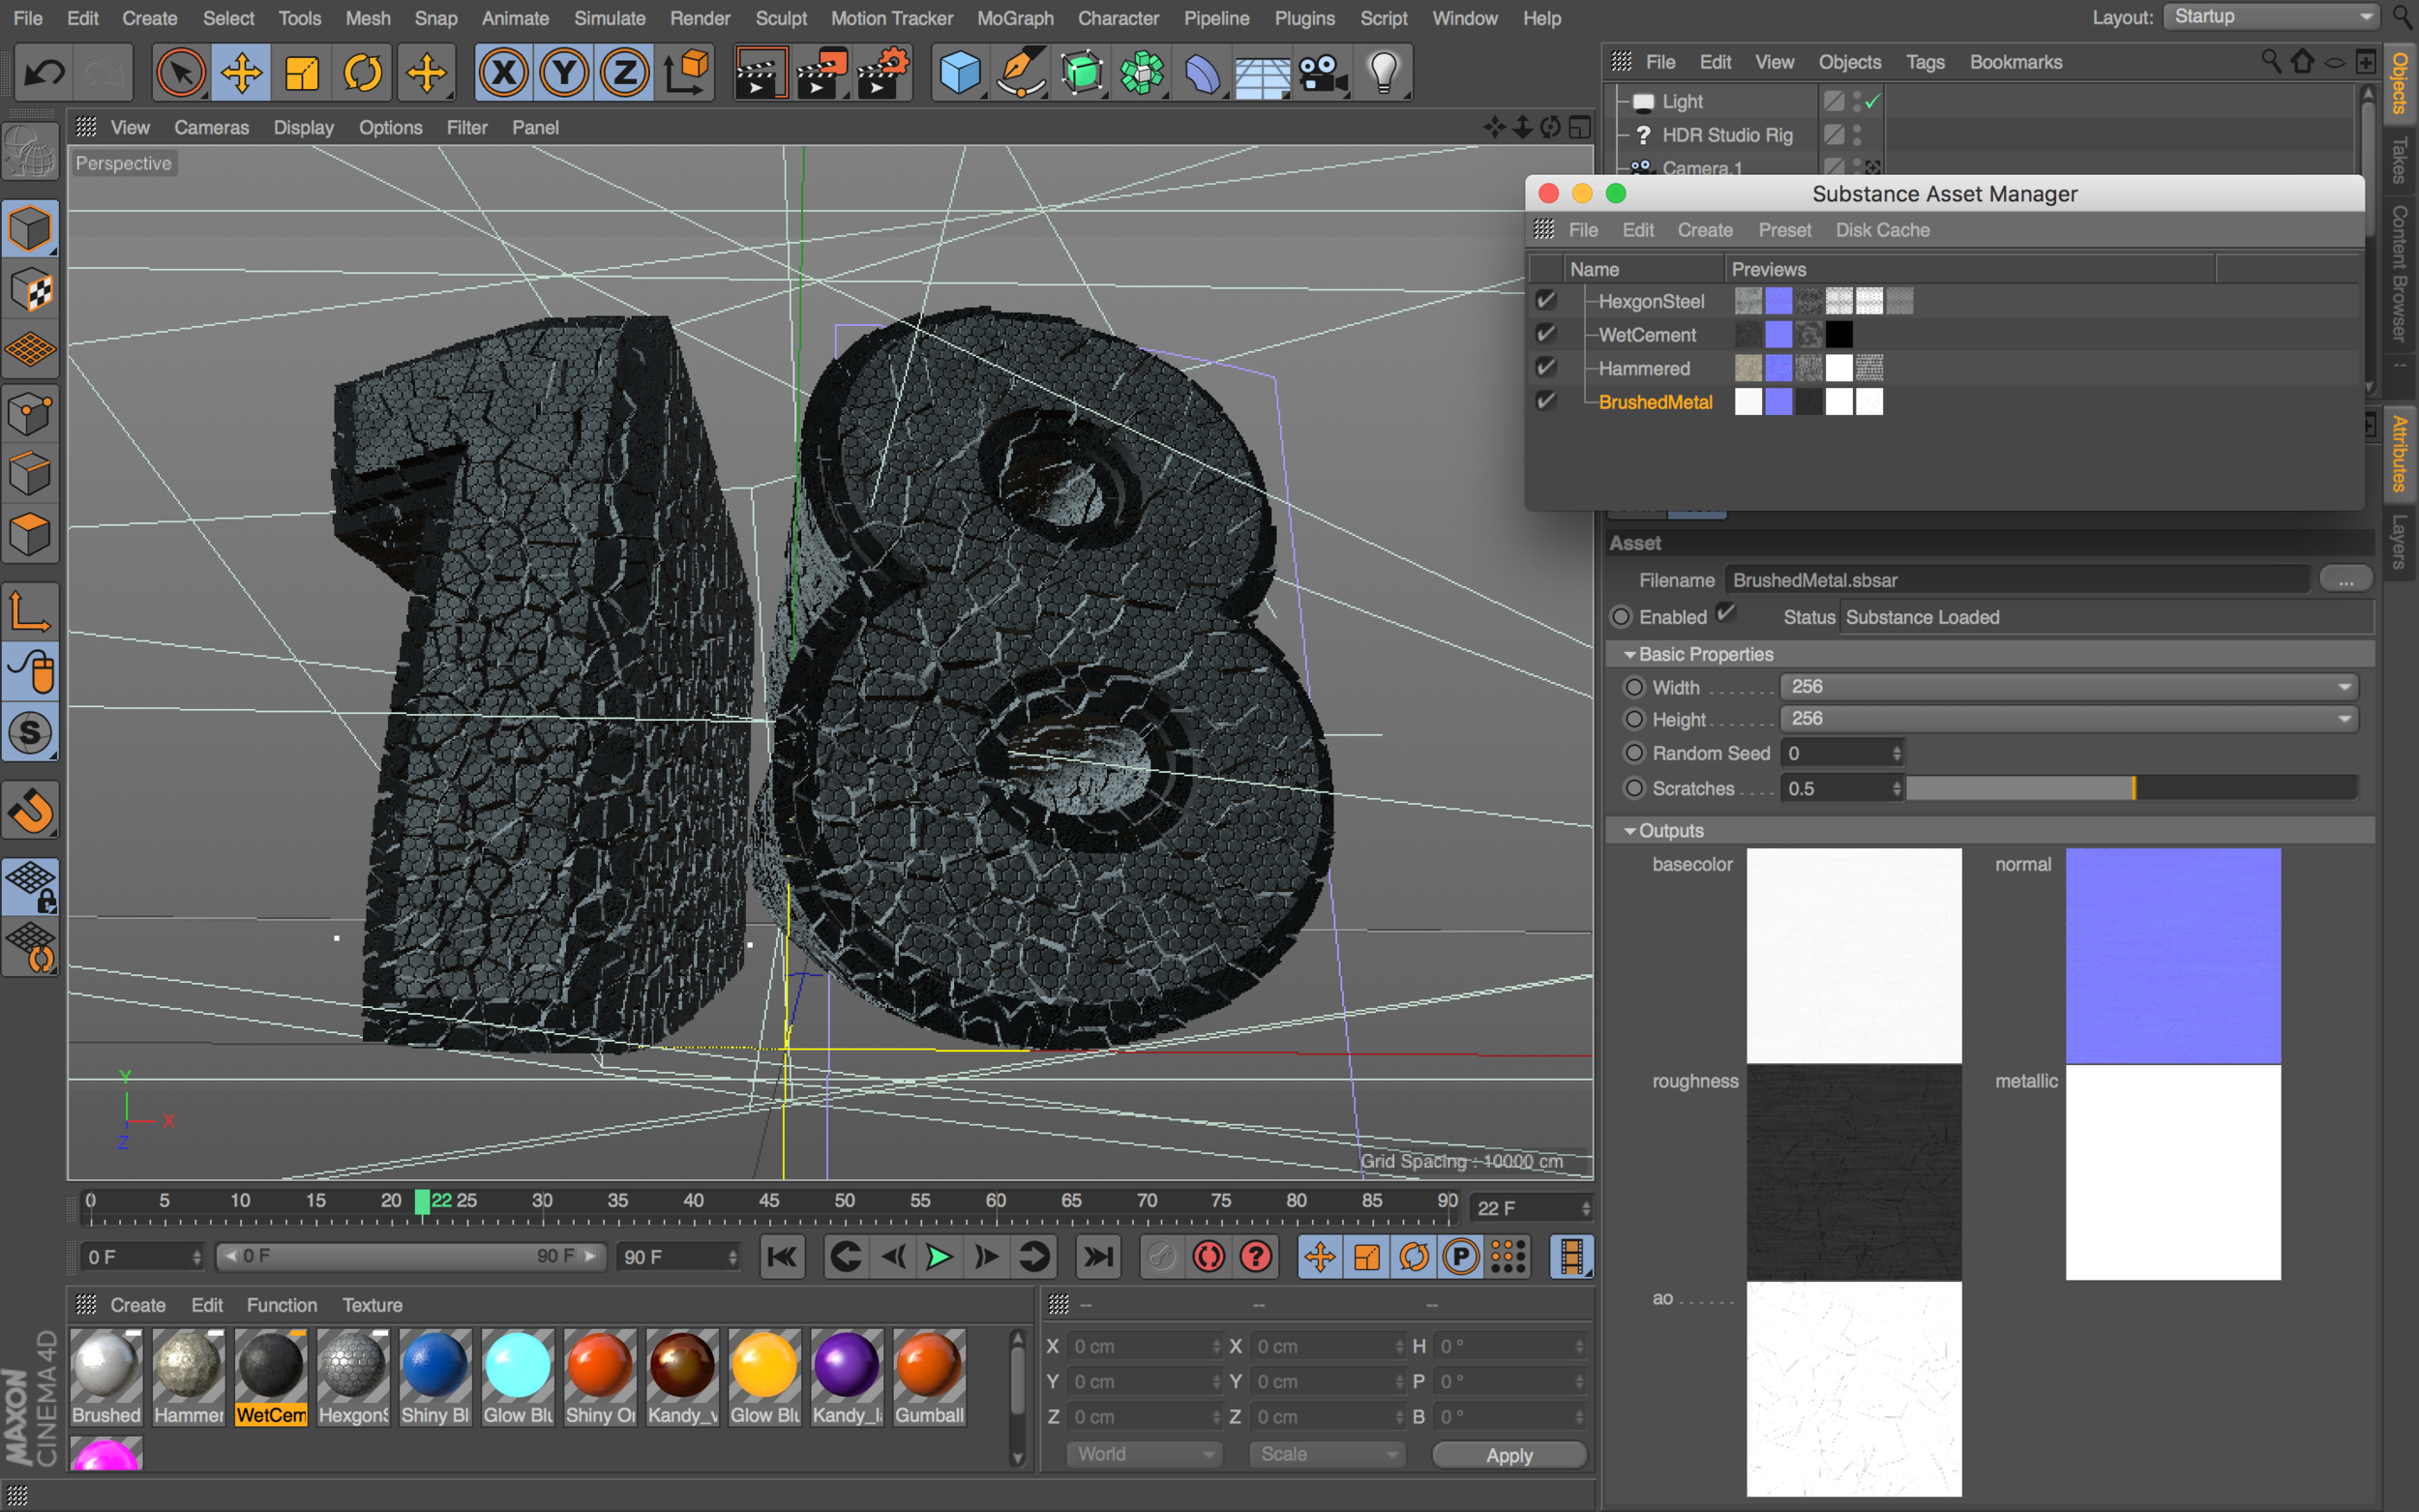
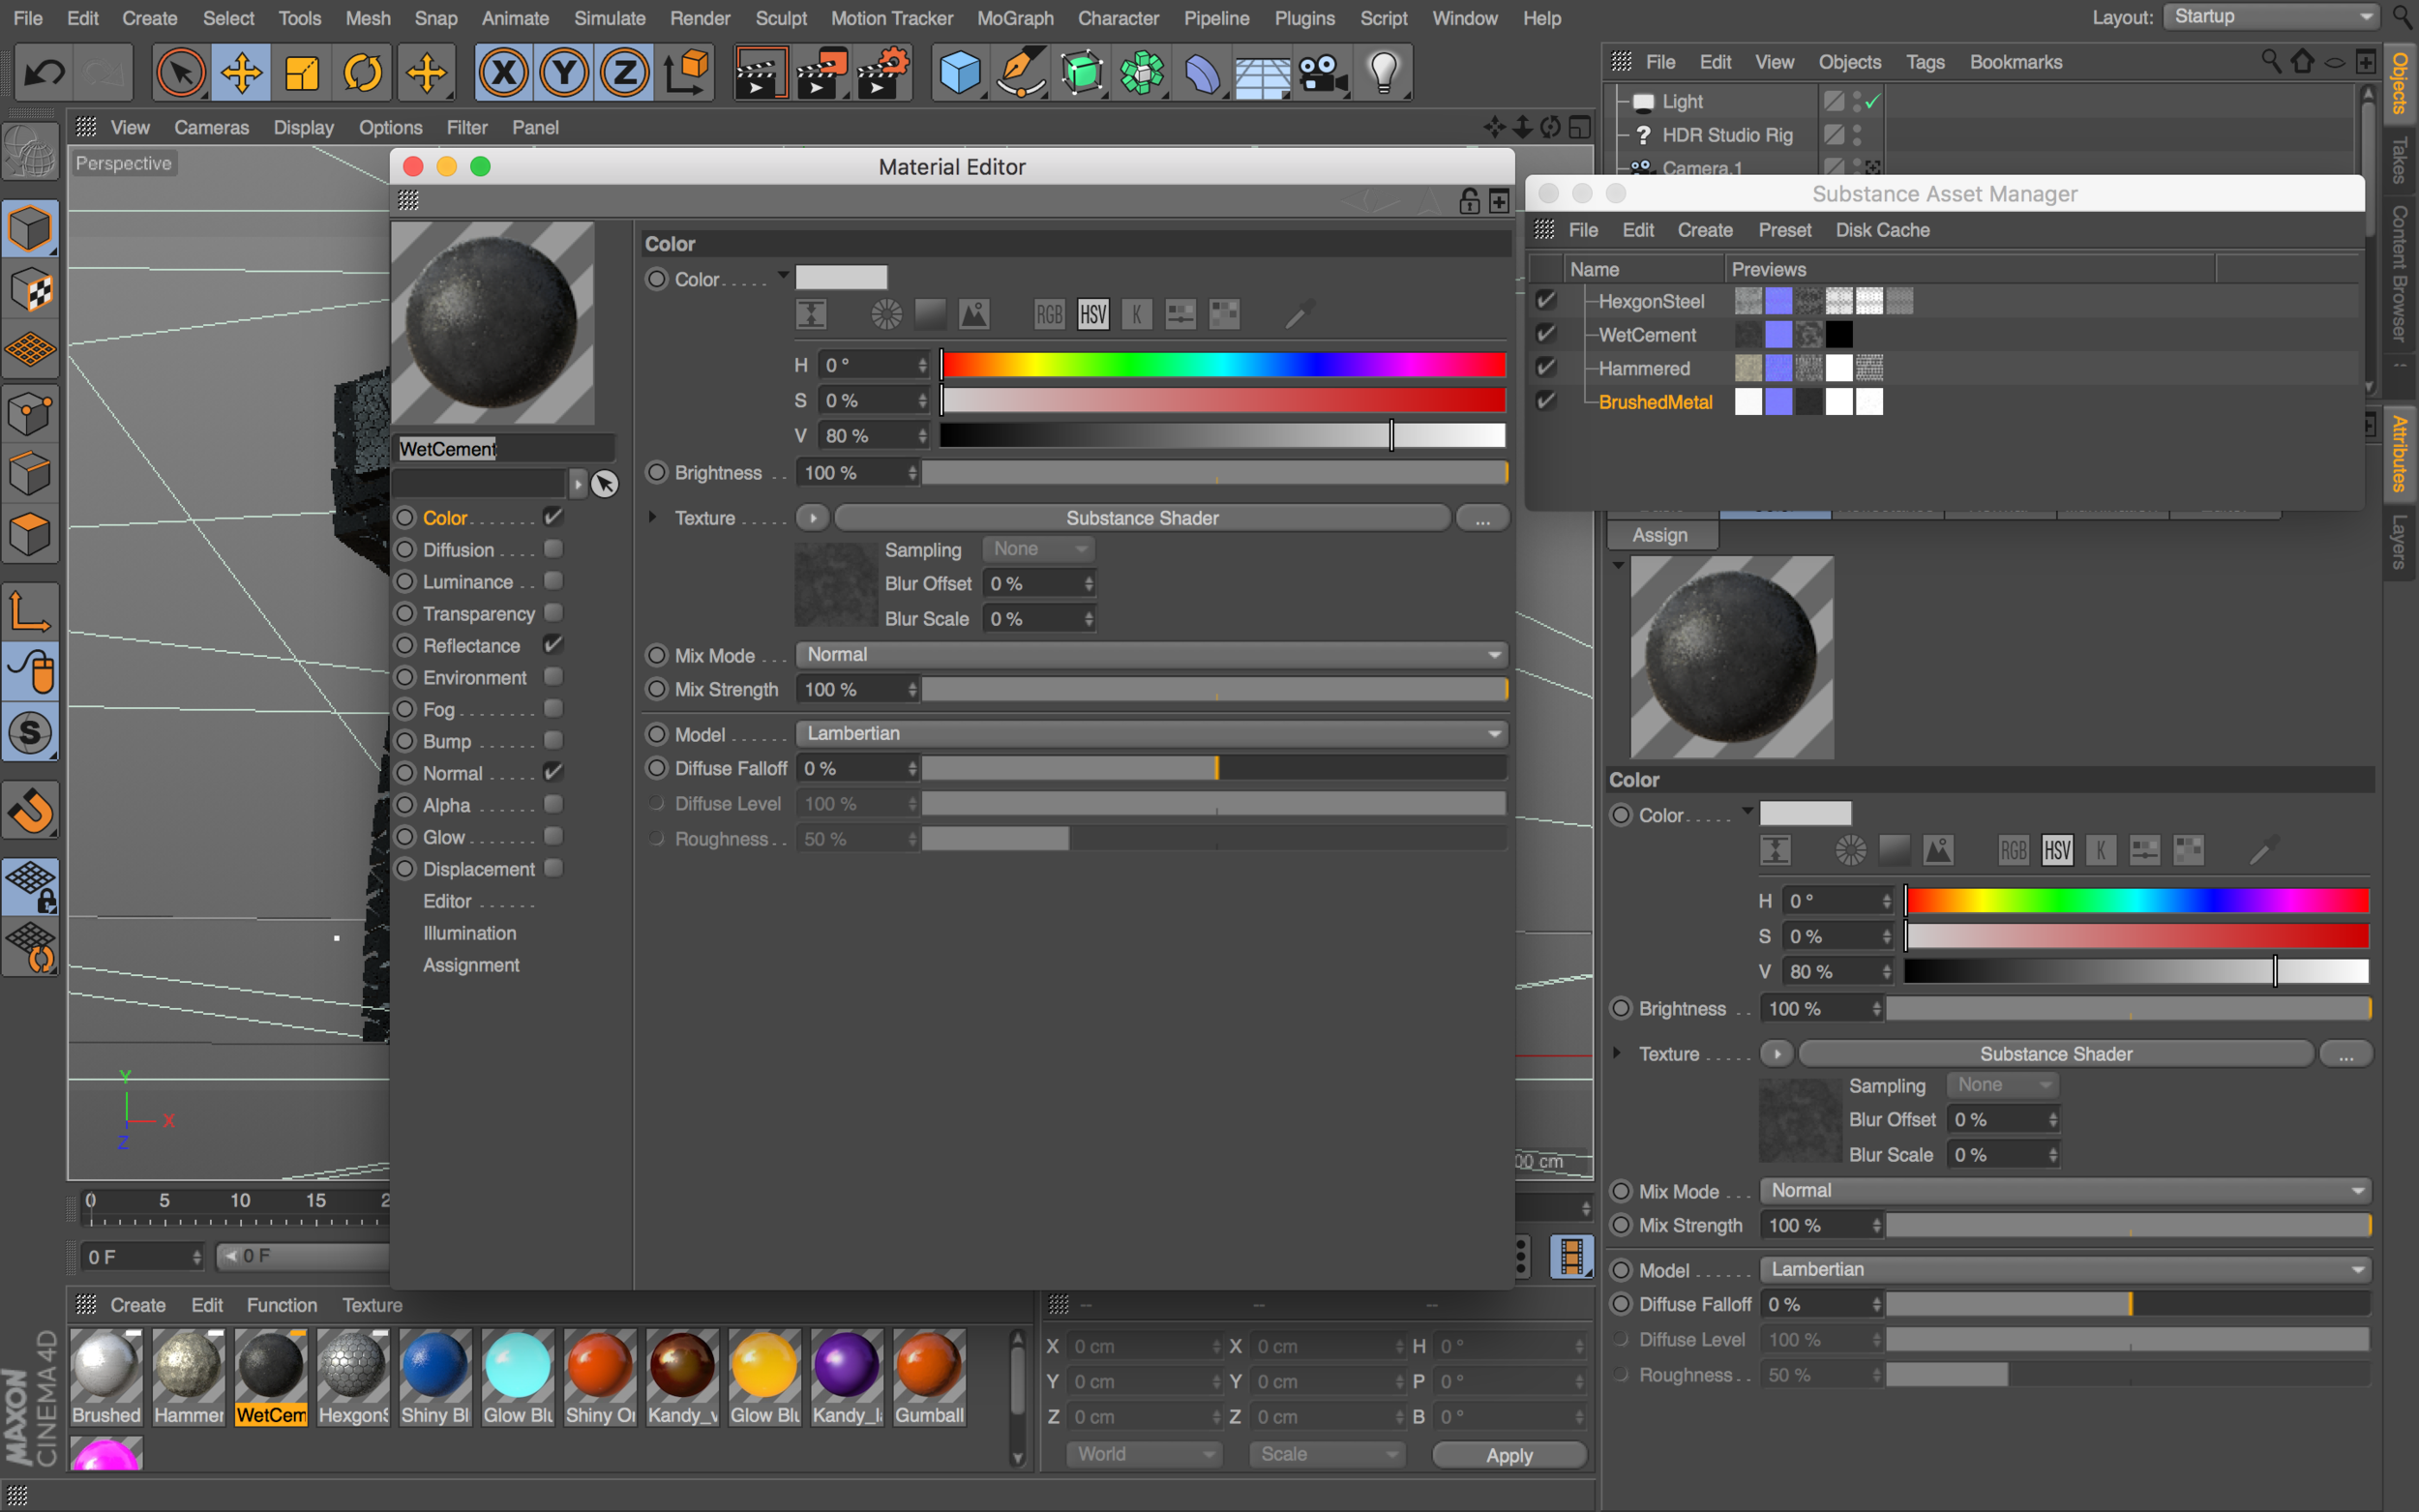
If you are a user of Substance Materials by Allegorithmic, or want to take advantage of a library of really great 3D materials, there is now a direct pipeline to get Substance Materials into Cinema 4D R18. By using substance materials, you can create new materials or download existing materials from Substance Share, and easily integrate them into your Cinema 4D R18 projects. All you have to do go to the menu Pipeline > Substance Engine > Load Substance and locate a Substance .sbsar file. That's it, and then you'll have Substance Materials available directly in Cinema 4D R18 using the new Workflow. 

Substance Materials used in combination with the new MoGraph Voronoi Fracture Tool

Substance Materials used on different parts of 3D extruded text and caps

Substance Materials used on different parts of 3D extruded text and caps

Want to make Lighting & Reflections in Cinema 4D a snap?

Take a look at 360° Environment Maps Pro for Cinema 4D & Cinema 4D Lite to quickly and easily add lighting and rendering options to your scene. You can also save over 25% on bundle packs!

To take a deeper look at new features in Cinema 4D R18, be sure to check out some of these additional articles focusing on other updates and new features for R18:

• Top 5 New Features of R18
• MoGraph updates and new Effectors for R18
• Voronoi Fracture, a New MoGraph Feature
• Inverted Ambient Occlusion
• Working with the new Thinfilm Shader
• How to use the new Parallax Bump Map Feature
• Using the new Shadow Catcher for 3D Compositing

Like this tutorial? Consider becoming a Patron at Patreon.com/SeanFrangella to get additional benefits such as project files and more! 

To get weekly Motion Graphics, VFX, and 3D animation tutorials be sure to subscribe to the show on YouTube!


Intro to 3D in Photoshop CC and Adobe Fuse - Live Presentation at Ascend Training

In this live event recorded at Ascend Training, I give an overview on how to transition from Graphic Design apps like Photoshop into working in 3D. Transitioning into 3D animation can seem like a big leap, but there are gradual steps you can follow to make it less intimidating. I get into starting in Photoshop's 3D environment to  create a basic 3D logo, as well as working with Adobe Fuse, a new 3D character creation app that integrates with  through Adobe CC Libraries.

Adobe Fuse is a new 3D character creator app, part of Adobe Creative Cloud. With it you can build out a custom 3D character using an intelligent UI, and then either bring your newly created character into Photoshop CC, or upload it to Mixamo's where you can add MoCap data and Download workable 3D files in a variety of formats.

Want to get a more in-depth look at Adobe Fuse

Learn what Adobe Fuse is, and how to bring Characters from Fuse into Photoshop CC

Learn how to bring Adobe Fuse Characters in Cinema 4D

Take a closer look at how to Assemble a Character

Learn how to Customize and Model a 3D Character in Fuse

See how you can add and Edit Clothing in Adobe Fuse

Learn about editing Textures for Fuse Characters in Photoshop


Like this tutorial? Consider becoming a Patron at Patreon.com/SeanFrangella to get additional benefits such as project files and more! 

To get weekly Motion Graphics, VFX, and 3D animation tutorials be sure to subscribe to the show on YouTube!


Adobe Creative Graphic Design on Twitch.TV - Creating a 3D Logo in Photoshop 3D or Cinema 4D

I had the pleasure of popping in on Adobe's Twitch channel over at Twitch.tv/Adobe, where I talked with Adobe's Paul Trani about the different options for taking a 3D logo from illustrator and creating a 3D image out of it. We talk about the differences between 3D in Photoshop and a full 3D package such as Cinema 4D. In the first half of this live stream recording, Paul gets into some fun ways you can bring a vector logo from Illustrator into Photoshop, and in the second portion I get into cracking opening Cinema 4D or Cinema 4D Lite (included in After Effects CC) to create a 3D logo out of the "Creativity 360" illustration that we started with.

Whether you're completely new to working in 3D animation in either Photoshop or Cinema 4D, or a seasoned pro, this live show is packed with tons of tips for working in 3D.

Here is a still render of what we worked up during the live show:

When in doubt, add a bunch of colorful glows around the edges. Instant pop!

When in doubt, add a bunch of colorful glows around the edges. Instant pop!

You can also now follow me on Twitch for live videos tutorials, Q&A sessions, and the occasional Fallout 4 webcast at Twitch.tv/SeanFrangella


Like this tutorial? Consider becoming a Patron at Patreon.com/SeanFrangella to get additional benefits such as project files and more! 

To get weekly Motion Graphics, VFX, and 3D animation tutorials be sure to subscribe to the show on YouTube!


How to use Photoshop to edit the materials of 3D Characters created in Adobe Fuse

After you've assembled a 3D character in Adobe Fuse, then worked on customizing the character, and added clothing to your character, you can also edit and customize the Materials once you bring the 3D character into Photoshop. By customizing the textures, you can adjust materials found on the clothing, as well as swap out the textures, change the colors, and more. If you want to completely customize an existing material, you can dig into the asset folder of Adobe Fuse and open up an image materials in Photoshop CC.

Adobe Fuse is a new 3D character creator app, part of Adobe Creative Cloud. With it you can build out a custom 3D character using an intelligent UI, and then either bring your newly created character into Photoshop CC, or upload it to Mixamo's where you can add MoCap data and Download workable 3D files in a variety of formats.

Want to get a more in-depth look at Adobe Fuse

Learn what Adobe Fuse is, and how to bring Characters from Fuse into Photoshop CC

Learn how to bring Adobe Fuse Characters in Cinema 4D

Take a closer look at how to Assemble a Character

Learn how to Customize and Model a 3D Character in Fuse

See how you can add and Edit Clothing in Adobe Fuse


Like this tutorial? Consider becoming a Patron at Patreon.com/SeanFrangella to get additional benefits such as project files and more! 

To get weekly Motion Graphics, VFX, and 3D animation tutorials be sure to subscribe to the show on YouTube!


Intro to 3D Lighting, Shadows, and HDR Sky Images in Cinema 4D

Creating a 3D logo in Cinema 4D Lite and then adding custom Materials is great and all, but what does it matter if there are no lights in your scene to light anything? 3D lighting can drastically impact how your scene appears, the same way that manipulating the lighting on a film set can completely change the look, tone, and mood of a scene. 

In this Cinema 4D Lite tutorial, learn about the basics of working with 3D lights and shadows. Next, learn how to work with the Sky image to create environment reflections that will appear throughout your scene. You'll be a professional 3D gaffer in no time!

Want to learn more about Cinema 4D Lite to get off the ground in 3D?

Learn how to Create a 3D extruded logo in Cinema 4D or Cinema 4D Lite.

Then learn how to Work with Materials and Reflectance textures in Cinema 4D.

Next learn about 3D Lighting and HDRI Sky images in Cinema 4D.

And then learn about Creating Animation, working with Keyframes, and the Cinema 4D Timeline.

Finally, learn some Fancy post-production effects like linking Optical Flares to Cinema 4D Animations.


Like this tutorial? Consider becoming a Patron at Patreon.com/SeanFrangella to get additional benefits such as project files and more! 

To get weekly Motion Graphics, VFX, and 3D animation tutorials be sure to subscribe to the show on YouTube!


Intro to Cinema 4D Materials - Working with Reflections & Reflectance Materials

Creating custom materials in Cinema 4D or Cinema 4D Lite can be a very powerful way to drastically change how your 3D scenes appear. There have been some major updates to how materials and reflectance works starting in Cinema 4D R16, so whether you're completely new to materials, or familiar with Materials in Cinema 4D and want to know where the hell the Reflection tab went, you'll be up to speed in no time on how 3D materials work in Cinema 4D.

In this video, I'll cover how to make a quick reflective material using the legacy settings, and then get into how the new layered Reflectance system works starting in Cinema 4D Lite R16.

Want to learn more about Cinema 4D Lite to get off the ground in 3D?

Learn how to Create a 3D extruded logo in Cinema 4D or Cinema 4D Lite.

Then learn how to Work with Materials and Reflectance textures in Cinema 4D.

Next learn about 3D Lighting and HDRI Sky images in Cinema 4D.

And then learn about Creating Animation, working with Keyframes, and the Cinema 4D Timeline.

Finally, learn some Fancy post-production effects like linking Optical Flares to Cinema 4D Animations.

Like this tutorial? Consider becoming a Patron at Patreon.com/SeanFrangella to get additional benefits such as project files and more! 


Like this tutorial? Consider becoming a Patron at Patreon.com/SeanFrangella to get additional benefits such as project files and more! 

To get weekly Motion Graphics, VFX, and 3D animation tutorials be sure to subscribe to the show on YouTube!


How to Create a 3D Extruded Logo in Cinema 4D or Cinema 4D Lite

Completely new to working in 3D using Cinema 4D, or looking to create a 3D animation using a logo? One of Cinema 4D's most powerful features is how quick and easy it can be to create a nice looking 3D logo from an existing logo. In this 5 part series, learn about getting started with Cinema 4D using Cinema 4D Lite, packaged for free with After Effects CC. In this first part we'll talk about bringing your logo from illustrator into Cinema 4D, creating the 3D geometry, and building out the 3D logo in a smart way.

Want to learn more about Cinema 4D Lite to get off the ground in 3D?
 

Learn how to Create a 3D extruded logo in Cinema 4D or Cinema 4D Lite.

Then learn how to Work with Materials and Reflectance textures in Cinema 4D.

Next learn about 3D Lighting and HDRI Sky images in Cinema 4D.

And then learn about Creating Animation, working with Keyframes, and the Cinema 4D Timeline.

Finally, learn some Fancy post-production effects like linking Optical Flares to Cinema 4D Animations.


Like this tutorial? Consider becoming a Patron at Patreon.com/SeanFrangella to get additional benefits such as project files and more! 

To get weekly Motion Graphics, VFX, and 3D animation tutorials be sure to subscribe to the show on YouTube!


Getting Started in Adobe Fuse - Editing and Customizing Textures

After you've assembled a 3D character in Adobe Fuse, then worked on customizing the character, and added clothing to your character, the final step is to customize the textures on your character. By customizing the textures, you can adjust materials found on the clothing, as well as swap out the textures, change the colors, and more. If you want to completely customize an existing material, you can dig into the asset folder of Adobe Fuse and open up an image materials in Photoshop CC.

If you want to learn how to edit the textures in Photoshop after you've brought the 3D character into Photoshop from Fuse, watch this video!

Adobe Fuse is a new 3D character creator app, part of Adobe Creative Cloud. With it you can build out a custom 3D character using an intelligent UI, and then either bring your newly created character into Photoshop CC, or upload it to Mixamo's where you can add MoCap data and Download workable 3D files in a variety of formats.

Want to get a more in-depth look at Adobe Fuse

Learn what Adobe Fuse is, and how to bring Characters from Fuse into Photoshop CC

Learn how to bring Adobe Fuse Characters in Cinema 4D

Take a closer look at how to Assemble a Character

Learn how to Customize and Model a 3D Character in Fuse

See how you can add and Edit Clothing in Adobe Fuse

Learn about editing and customizing Textures in Fuse


Like this tutorial? Consider becoming a Patron at Patreon.com/SeanFrangella to get additional benefits such as project files and more! 

To get weekly Motion Graphics, VFX, and 3D animation tutorials be sure to subscribe to the show on YouTube!


Getting Started in Adobe Fuse - Adding and Modifying Clothing

After you've assembled a 3D character in Adobe Fuse and worked on customizing the character, the next step is to add clothing. The clothing system in Adobe Fuse allows you to select different clothing options, which will automatically snap to your character, without having to deal with manually adjusting geometry. Got a character with huge hair and want to drop a helmet on? No problem, Adobe Fuse will automatically make the adjustments for you.

Adobe Fuse is a new 3D character creator app, part of Adobe Creative Cloud. With it you can build out a custom 3D character using an intelligent UI, and then either bring your newly created character into Photoshop CC, or upload it to Mixamo's where you can add MoCap data and Download workable 3D files in a variety of formats.

Want to get a more in-depth look at Adobe Fuse

Learn what Adobe Fuse is, and how to bring Characters from Fuse into Photoshop CC

Learn how to bring Adobe Fuse Characters in Cinema 4D

Take a closer look at how to Assemble a Character

Learn how to Customize and Model a 3D Character in Fuse

See how you can add and Edit Clothing in Adobe Fuse

Learn about editing Textures for Fuse Characters in Photoshop


Like this tutorial? Consider becoming a Patron at Patreon.com/SeanFrangella to get additional benefits such as project files and more! 

To get weekly Motion Graphics, VFX, and 3D animation tutorials be sure to subscribe to the show on YouTube!


Getting Started in Adobe Fuse - How to Customize & Model a 3D Character

After you've assembled your 3D Character in Adobe Fuse, the next step is to customize your character. While customizing your character, you can use sliders to adjust tons of small features on your character, including facial features.

Adobe Fuse is a new 3D character creator app, part of Adobe Creative Cloud. With it you can build out a custom 3D character using an intelligent UI, and then either bring your newly created character into Photoshop CC, or upload it to Mixamo's where you can add MoCap data and Download workable 3D files in a variety of formats.

Want to get a more in-depth look at Adobe Fuse

Learn what Adobe Fuse is, and how to bring Characters from Fuse into Photoshop CC

Learn how to bring Adobe Fuse Characters in Cinema 4D

Take a closer look at how to Assemble a Character

Learn how to Customize and Model a 3D Character in Fuse

See how you can add and Edit Clothing in Adobe Fuse

Learn about editing Textures for Fuse Characters in Photoshop


Like this tutorial? Consider becoming a Patron at Patreon.com/SeanFrangella to get additional benefits such as project files and more! 

To get weekly Motion Graphics, VFX, and 3D animation tutorials be sure to subscribe to the show on YouTube!


Getting Started in Adobe Fuse - How to Assemble a Character

The first step in getting started with Adobe Fuse is assembling a character. When assembling a character, you can select from a variety of body parts and options to mix and match 3D elements and build out a new character. You can also use sliders or pull, pinch, and twist elements in the live UI to further refine your 3D character.

Adobe Fuse is a new 3D character creator app, part of Adobe Creative Cloud. With it you can build out a custom 3D character using an intelligent UI, and then either bring your newly created character into Photoshop CC, or upload it to Mixamo's where you can add MoCap data and Download workable 3D files in a variety of formats.

Want to get a more in-depth look at Adobe Fuse

Learn what Adobe Fuse is, and how to bring Characters from Fuse into Photoshop CC

Learn how to bring Adobe Fuse Characters in Cinema 4D

Take a closer look at how to Assemble a Character

Learn how to Customize and Model a 3D Character in Fuse

See how you can add and Edit Clothing in Adobe Fuse

Learn about editing Textures for Fuse Characters in Photoshop


Like this tutorial? Consider becoming a Patron at Patreon.com/SeanFrangella to get additional benefits such as project files and more! 

To get weekly Motion Graphics, VFX, and 3D animation tutorials be sure to subscribe to the show on YouTube!


How to send 3D Characters from Adobe Fuse to Cinema 4D

When I first got a look at Adobe Fuse, one of my first big questions was - how do you get this into Cinema 4D or After Effects? After you've created a custom 3D character in Adobe Fuse, the other option besides adding it to your CC Library is to upload it to Mixamo.com. This process lets you add your newly minted 3D character to Mixamo's web app, where it'll auto-rig it, and let you add a variety of Motion Capture animations. Once you have a couple MoCap animations added to your character, you can download it in a variety of formats, such as .fbx or .dae. From there you can open it up in Cinema 4D, and take it from there!

Adobe Fuse is a new 3D character creator app, part of Adobe Creative Cloud. With it you can build out a custom 3D character using an intelligent UI, and then either bring your newly created character into Photoshop CC, or upload it to Mixamo's where you can add MoCap data and Download workable 3D files in a variety of formats.

Want to get a more in-depth look at Adobe Fuse

Learn what Adobe Fuse is, and how to bring Characters from Fuse into Photoshop CC

Learn how to bring Adobe Fuse Characters in Cinema 4D

Take a closer look at how to Assemble a Character

Learn how to Customize and Model a 3D Character in Fuse

See how you can add and Edit Clothing in Adobe Fuse

Learn about editing Textures for Fuse Characters in Photoshop


Like this tutorial? Consider becoming a Patron at Patreon.com/SeanFrangella to get additional benefits such as project files and more! 

To get weekly Motion Graphics, VFX, and 3D animation tutorials be sure to subscribe to the show on YouTube!


How to Create the MLB World Series Trophy in Cinema 4D with MoGraph Effectors

Let's face it - the Cubs are not going to win the World Series. I'm not saying the White Sox are going to do any better any time soon, just being real. Now that that is out of the way, I recently had a project where I needed to model the World Series trophy in Cinema 4D. Creating one 3D flag is simple enough, and I knew I could manually build out the ring of flags, but I wanted to see if I could come up with a smarter way to design it by using only one flag and repeating it using MoGraph Cloners. I was able to get the ring design for the World Series trophy by adjusting the cloner falloff. Learn how it is done in the video above!

Want to learn more about Cinema 4D R17? Be sure to check out these videos:
Rebuilt Pen Tool for R17
NEW Variation Shader
Working with the New Takes System
• Updates to the MetaBall Object
• 3D Motion Tracking Updates for R17
• New Lens Distortion Tools
Easier SketchUp Import
Updated Color Chooser
NEW Book Generator

Like this tutorial? Consider becoming a Patron at Patreon.com/SeanFrangella to get additional benefits such as project files and more! 

To get weekly Motion Graphics, VFX, and 3D animation tutorials be sure to subscribe to the show on YouTube!


Cinema 4D R17 - Working with the new Book Generator

Some of the funnest things that always comes with new releases of Cinema 4D are the editable, modular objects packed into the Content Browser. One of those new to Cinema 4D R17 is the Book Generator. With the new Book Generator in Cinema 4D R17, you can quickly and easily drop books onto shelves, change and randomize the types of books, position, textures, and even what bookends to use. If you are doing interior design or visualization, this will speed up your workflow a ton!

There are so many new features in Cinema 4D R17, I put together several more videos taking a deeper look at new features. Check out these additional topics for more coverage of Cinema 4D R17!

Rebuilt Pen Tool for R17
NEW Variation Shader
Working with the New Takes System
• Updates to the MetaBall Object
• 3D Motion Tracking Updates for R17
• New Lens Distortion Tools
Easier SketchUp Import
Updated Color Chooser
NEW Book Generator

Like this tutorial? Consider becoming a Patron at Patreon.com/SeanFrangella to get additional benefits such as project files and more! 

To get weekly Motion Graphics, VFX, and 3D animation tutorials be sure to subscribe to the show on YouTube!


Cinema 4D R17 - New Pen Tool Features and Updates

There've been some major updates the pen tool in Cinema 4D R17. I've been a long time user of Adobe illustrator, and for years I've been doing a lot of my vector work in illustrator and bringing it into Cinema 4D, just because of my familiarity with the illustrator shortcuts and tools.

The updates to the Pen Tool in Cinema 4D R17 bring the tools up to the standard set in illustrator, and beyond with some additional functions and techniques. This includes the new C4D R17 Pen Tool, Smooth Tool, Arc Tool, and add/subtract options, all new to Cinema 4D R17. This video also covers 3D modeling tips and tricks in Cinema 4D R17.

There are so many new features in Cinema 4D R17, I put together several more videos taking a deeper look at new features. Check out these additional topics for more coverage of Cinema 4D R17!

Rebuilt Pen Tool for R17
NEW Variation Shader
Working with the New Takes System
• Updates to the MetaBall Object
• 3D Motion Tracking Updates for R17
• New Lens Distortion Tools
Easier SketchUp Import
Updated Color Chooser
NEW Book Generator


Like this tutorial? Consider becoming a Patron at Patreon.com/SeanFrangella to get additional benefits such as project files and more! 

To get weekly Motion Graphics, VFX, and 3D animation tutorials be sure to subscribe to the show on YouTube!


Recreate the Minions 3D Title in Cinema 4D

The 3D title for the new Minions movie is minimal and clean, but has some really nice effects and details. In this Cinema 4D video, I'll go over how to recreate the look of the Minions title in Cinema 4D, starting from scratch! 

This includes creating 3D title text in Cinema 4D, texturing tips, lighting and rendering, and how to a C4D camera as well as global illumination render settings to further refine the 3D minions logo in Cinema 4D. This Cinema 4D logo tutorial also covers tips on adding custom textures to caps.

Like this tutorial? Consider becoming a Patron at Patreon.com/SeanFrangella to get additional benefits such as project files and more! 

To get weekly Motion Graphics, VFX, and 3D animation tutorials be sure to subscribe to the show on YouTube!