Cinema 4D

CINEMA 4D R21 - TOP 5 NEW FEATURES

Cinema 4D R21 releases in 2019 with some great new features that greatly build on C4D features used for motion graphics, Visual Effects, and more.

The new version of Cinema 4D includes updates to the subscription model of purchasing, a modernized and updated UI, new bevels, force fields for update Mograph and dynamics animation, and much more! Check out the video above to learn about my Top 5 new features in Cinema 4D R21!

Prefer quicker, shorter tutorials on each feature?
Check out these videos!


Want to make Lighting & Reflections in Cinema 4D a snap?

Take a look at 360° Environment Maps Pro for Cinema 4D & Cinema 4D Lite to quickly and easily add lighting and rendering options to your scene. You can also save over 25% on bundle packs!

To see more new features in Cinema 4D, be sure to check out new features in Cinema 4D R19.

And don’t forget to learn about all the new features and updates from Cinema 4D R18.

• Top 5 MoGraph updates and new Effectors for R18
• Voronoi Fracture, a New MoGraph Feature
• Inverted Ambient Occlusion
• Working with the new Thinfilm Shader
• How to use the new Parallax Bump Map Feature
• Using the new Shadow Catcher for 3D Compositing
• Working with the new Substance Materials Workflow

Like this tutorial? Consider becoming a Patron at Patreon.com/SeanFrangella to get additional benefits such as project files and more! 

To get weekly Motion Graphics, VFX, and 3D animation tutorials be sure to subscribe to the show on YouTube!


Create Facebook 3D Posts using 3D Objects from Cinema 4D

In this tutorial, learn how to create 3D Facebook Posts with 3D objects exported from Cinema 4D. By creating 3D posts on Facebook, users are able to move and rotate an object in full 3D.

When using Cinema 4D, to start, export your 3D object as an OBJ. Once you have an OBJ and the accompanying MTL file, you need to convert those to the GLB file format, which is what Facebook currently uses for 3D posts.

To convert the OBJ to a GLB file, use this website: http://52.4.31.236/convertmodel.html

Check out Facebook’s developer tutorials on 3D posts here: https://developers.facebook.com/docs/...


Want to make Lighting & Reflections in Cinema 4D a snap?

Take a look at 360° Environment Maps Pro for Cinema 4D & Cinema 4D Lite to quickly and easily add lighting and rendering options to your scene. You can also save over 25% on bundle packs!


Looking to create 3D photos using portrait mode on your iPhone and Adobe Photoshop? Check out this quick video below!

To see more features of Cinema 4D, be sure to check out new features in Cinema 4D R18.

• Top 5 MoGraph updates and new Effectors for R18
• Voronoi Fracture, a New MoGraph Feature
• Inverted Ambient Occlusion
• Working with the new Thinfilm Shader
• How to use the new Parallax Bump Map Feature
• Using the new Shadow Catcher for 3D Compositing
• Working with the new Substance Materials Workflow

Like this tutorial? Consider becoming a Patron at Patreon.com/SeanFrangella to get additional benefits such as project files and more! 

To get weekly Motion Graphics, VFX, and 3D animation tutorials be sure to subscribe to the show on YouTube!


CINEMA 4D R19 - TOP 5 NEW FEATURES

Cinema 4D R19 releases in 2017 with some great new features that greatly build on C4D features used for motion graphics, Visual Effects, and 360 Virtual Reality rendering.

This includes major updates to the Voronoi Fracture, a spherical camera for creating 360 VR scenes, scene reconstruction for help with 3D motion tracking, and more! Check out the video above to learn about my Top 5 new features in Cinema 4D R19!

Fracture 2.0 - Gluing fractured pieces

Viewing Depth of Field in the Viewport!

Scene Reconstruction for 3D Tracking helps you composite 3D elements into live action footage

Custom falloff and gluing for Voronoi Fracture in R19

Adjusting falloff for glued fracture pieces

Using a Spherical Camera for 360 VR Renders

The new Sound Effector creating some Musical Mograph Animation

Voronoi Fracturing combined with MoGraph and Dynamics


Want to make Lighting & Reflections in Cinema 4D a snap?

Take a look at 360° Environment Maps Pro for Cinema 4D & Cinema 4D Lite to quickly and easily add lighting and rendering options to your scene. You can also save over 25% on bundle packs!

To see more new features in Cinema 4D, be sure to check out new features in Cinema 4D R18.

• Top 5 MoGraph updates and new Effectors for R18
• Voronoi Fracture, a New MoGraph Feature
• Inverted Ambient Occlusion
• Working with the new Thinfilm Shader
• How to use the new Parallax Bump Map Feature
• Using the new Shadow Catcher for 3D Compositing
• Working with the new Substance Materials Workflow

Like this tutorial? Consider becoming a Patron at Patreon.com/SeanFrangella to get additional benefits such as project files and more! 

To get weekly Motion Graphics, VFX, and 3D animation tutorials be sure to subscribe to the show on YouTube!


3D wireframe animations with Cinema 4D & After Effects

In this Cinema 4D & After Effects CC 2017 Tutorial, learn how to create 3D wireframe animations, beginning with Cinema 4D R18 and adding effects in After Effects. By using this technique you can create the 3d wireframe look seen in film and on TV, and create your own 3D object animations with Cinema 4D and After Effects. This technique also utilizes new techniques for After Effects CC 2017 as well as working with Cinema 4D R18 Studio. This After Effects CC 2017 tutorial is also a great stepping stone to get into 3D animation and motion graphics for After Effects users.

Get Cinema 4D products used in this tutorial:

Want learn more about 3D animation in After Effects? Check out these other tutorials

Use Element 3D V2 in After Effects to create a 3D Logo

Create a 3D extruded logo in After Effects with Cinema 4D Lite


Like this tutorial? Consider becoming a Patron at Patreon.com/SeanFrangella to get additional benefits such as project files and more! 

To get weekly Motion Graphics, VFX, and 3D animation tutorials be sure to subscribe to the show on YouTube!

Looking for the next Tutorial to watch?

Check out the Top 5 Features of Element 3D V2 for After Effects!

Learn about the new 3D Character Creator app, Adobe Fuse!

Learn about the Top 5 new features of Cinema 4D R17!

Learn the Top 5 After Effects Expressions!

Learn how to Recreate the Agengers: Age of Ultron 3D Title Animation!

See how to Combine Element 3D with the new Saber Plug-in!

Learn about the Top 5 Hidden Features of Illustrator CC!

See how to bring Animated 3D Characters into Element 3D!

To check out new features added to Cinema 4D R16!

Check out the Top 5 Tips for Better Camera Animation in After Effects!

Cinema 4D R18 - Top 5 New Features

One of the most exciting times of the year for working in the 3D graphics industry is the release of new software and getting to play around with all of the new features. With the update to Cinema 4D R18, there are a ton of fun new features to dive into, including a massive amount of MoGraph updates, the new Voronoi Fracture, the Thinfilm ShaderInverted Ambient OcclusionParallax Bump Mapping, and more! Check out the video above to get a quick rundown of some of the top new features, and be sure to get a deeper look at each new feature in the additional R18 articles below.

The new Thinfilm Shader applied to a cloner inside a MetaBall Object

The new Honeycomb Array Cloner applied to 3D objects textured with a Variation Shader

The Voronoi Fracture applied to 3D skulls, with a ThinFilm Shader added to a Reflectance material

The new Push-Apart Effector applied to 3D text in a Voronoi Fracture, rendered using Substance Materials


Want to make Lighting & Reflections in Cinema 4D a snap?

Take a look at 360° Environment Maps Pro for Cinema 4D & Cinema 4D Lite to quickly and easily add lighting and rendering options to your scene. You can also save over 25% on bundle packs!

To take a deeper look at new features in Cinema 4D R18, be sure to check out some of these additional articles focusing on other updates and new features for R18:

• Top 5 MoGraph updates and new Effectors for R18
• Voronoi Fracture, a New MoGraph Feature
• Inverted Ambient Occlusion
• Working with the new Thinfilm Shader
• How to use the new Parallax Bump Map Feature
• Using the new Shadow Catcher for 3D Compositing
• Working with the new Substance Materials Workflow

Like this tutorial? Consider becoming a Patron at Patreon.com/SeanFrangella to get additional benefits such as project files and more! 

To get weekly Motion Graphics, VFX, and 3D animation tutorials be sure to subscribe to the show on YouTube!


Cinema 4D R18 - Top 5 MoGraph Updates & New Features

One of the biggest updates to Cinema 4D R18 is all of the new MoGraph updates. These include the new Voronoi Fracture object, as well as the hexagon cloner setting, the push-apart effector and other effectors, new cloner features such as Scaling and Weight-Painting, and more! The new MoGraph updates are going to greatly improvement working with animation for R18, so be sure to check out the video to learn all about the Top 5 MoGraph updates, and check out the additional video on the new Voronoi Fracture Object. And check out the renders below to get an idea of what you can do with the new Mograph Tools for Cinema 4D R18!

The Hexagon Cloner setting combined with the Variation Shader

The Voronoi Fracture feature applied to extruded 3D text

The Hexagon Cloner setting combined with the Variation Shader

The Voronoi Fracture feature combined with Inverted Ambient Occlusion

Want to make Lighting & Reflections in Cinema 4D a snap?

Take a look at 360° Environment Maps Pro for Cinema 4D & Cinema 4D Lite to quickly and easily add lighting and rendering options to your scene. You can also save over 25% on bundle packs!

To take a deeper look at new features in Cinema 4D R18, be sure to check out some of these additional articles focusing on other updates and new features for R18:

• Top 5 New Features of R18
• Voronoi Fracture, a New MoGraph Feature
• Inverted Ambient Occlusion
• Working with the new Thinfilm Shader
• How to use the new Parallax Bump Map Feature
• Using the new Shadow Catcher for 3D Compositing
• Working with the new Substance Materials Workflow

Get an overview of each R18 MoGraph update individually in the videos below

Like this tutorial? Consider becoming a Patron at Patreon.com/SeanFrangella to get additional benefits such as project files and more! 

To get weekly Motion Graphics, VFX, and 3D animation tutorials be sure to subscribe to the show on YouTube!


Cinema 4D R18 - Voronoi Fracture, New MoGraph Feature

With the new Voronoi Fracture, you can fracture and break apart 3D objects, all in Cinema 4D R18, without the need for any external plug-ins. With the Voronoi Fracture, you can break objects into thousands of pieces, then use R18 MoGraph Effectors to displace, disperse, and animate the pieces. You can even apply the Voronoi Fracture to hierarchies of 3D objects, such as 3D extruded text with multiple materials. Check out the video above to learn all about this new feature, and take a look at the renders below to see the Voronoi Fracture used in combination with other updates to R18!

Voronoi Fracture applied to extruded 3D text with different Cap & Bevel Materials

Voronoi Fracture animated using R18 MoGraph Effectors with a smooth falloff

Voronoi Fracture with a Thinfilm Shader Material, rendered with Inverted AO

Fractured pieces randomized with a random effector and the new push-apart effector

Want to make Lighting & Reflections in Cinema 4D a snap?

Take a look at 360° Environment Maps Pro for Cinema 4D & Cinema 4D Lite to quickly and easily add lighting and rendering options to your scene. You can also save over 25% on bundle packs!

To take a deeper look at new features in Cinema 4D R18, be sure to check out some of these additional articles focusing on other updates and new features for R18:

• Top 5 New Features of R18
• MoGraph updates and new Effectors for R18
• Inverted Ambient Occlusion
• Working with the new Thinfilm Shader
• How to use the new Parallax Bump Map Feature
• Using the new Shadow Catcher for 3D Compositing
• Working with the new Substance Materials Workflow

Like this tutorial? Consider becoming a Patron at Patreon.com/SeanFrangella to get additional benefits such as project files and more! 

To get weekly Motion Graphics, VFX, and 3D animation tutorials be sure to subscribe to the show on YouTube!


Cinema 4D R18 - Working with the New Thinfilm Shader

The new Thinfilm shader is a new really colorful addition to materials in Cinema 4D R18. This new shader setting allows you to simulate a thin film on top of a material, which can result in a rainbow oil look, or soap bubbles when created with a transparent material.

The ThinFilm shader can be added with just a few steps, so check out the video above to learn the process to set it up, and be sure to take a look at the screenshots below for some examples on how the new ThinFilm shader can create amazing artwork in Cinema 4D R18.

Completely transparent thinFilm shaders applied to MetaBall Objects

ThinFilm Shader applied on top of a reflective material, combined with Voronoi Fracture

Want to make Lighting & Reflections in Cinema 4D a snap?

Take a look at 360° Environment Maps Pro for Cinema 4D & Cinema 4D Lite to quickly and easily add lighting and rendering options to your scene. You can also save over 25% on bundle packs!

To take a deeper look at new features in Cinema 4D R18, be sure to check out some of these additional articles focusing on other updates and new features for R18:

• Top 5 New Features of R18
• MoGraph updates and new Effectors for R18
• Voronoi Fracture, a New MoGraph Feature
• Inverted Ambient Occlusion
• How to use the new Parallax Bump Map Feature
• Using the new Shadow Catcher for 3D Compositing
• Working with the new Substance Materials Workflow

Like this tutorial? Consider becoming a Patron at Patreon.com/SeanFrangella to get additional benefits such as project files and more! 

To get weekly Motion Graphics, VFX, and 3D animation tutorials be sure to subscribe to the show on YouTube!


Cinema 4D R18 - Shadow Catcher, a new Material for 3D Compositing

When doing full 3D compositing with Cinema 4D, one of the trickiest things to achieve is casting shadows from 3D objects onto a background plate, in order to create the illusion that 3D objects are sitting on the surface and casting correct shadows. In the past, I've created other videos on how to achieve this, including using a Multi-Pass workflow with a separate pass for shadows, as well as Using the Composite Background in the Compositing Tag to achieve this result. The new Shadow Catcher in Cinema 4D R18 introduces another workflow to achieve this result.

The shadow catcher in C4D R18 is a new shader option in the materials manager. Once created, you can apply it to a ground plane, so when you render a 3D scene, shadows will be rendered on an alpha channel. You can also use the R18 Shadow Catcher to catch reflections. By using this method, 3D renders and footage can be composited together in Photoshop or After Effects, with shadows present in the Cinema 4D render.


Want to make Lighting & Reflections in Cinema 4D a snap?

Take a look at 360° Environment Maps Pro for Cinema 4D & Cinema 4D Lite to quickly and easily add lighting and rendering options to your scene. You can also save over 25% on bundle packs!

To take a deeper look at new features in Cinema 4D R18, be sure to check out some of these additional articles focusing on other updates and new features for R18:

• Top 5 New Features of R18
MoGraph updates and new Effectors for R18
• Voronoi Fracture, a New MoGraph Feature
• Inverted Ambient Occlusion
• Working with the new Thinfilm Shader
• How to use the new Parallax Bump Map Feature
• Using the Substance Materials Workflow

Like this tutorial? Consider becoming a Patron at Patreon.com/SeanFrangella to get additional benefits such as project files and more! 

To get weekly Motion Graphics, VFX, and 3D animation tutorials be sure to subscribe to the show on YouTube!


Cinema 4D R18 - Inverted Ambient Occlusion

With the new Inverted Ambient Occlusion setting in Cinema 4D R18, you can take a simple concept and get wildly different results. In the render settings, when you turn on Ambient Occlusion to get more realistic shadows, there is now a checkbox for "Invert Direction," which will push AO shadows inside of objects, instead of creating contact shadows outside of objects. This can be useful for mimicking sub-surface scattering without blowing up render time, and also to create some pretty unique results when you tweak the color and render settings.

Pink inverse AO combined with the new MoGraph Voronoi Fracture

Purple inverse AO combined with the new MoGraph Voronoi Fracture

Want to make Lighting & Reflections in Cinema 4D a snap?

Take a look at 360° Environment Maps Pro for Cinema 4D & Cinema 4D Lite to quickly and easily add lighting and rendering options to your scene. You can also save over 25% on bundle packs!

To take a deeper look at new features in Cinema 4D R18, be sure to check out some of these additional articles focusing on other updates and new features for R18:

• Top 5 New Features of R18
• MoGraph updates and new Effectors for R18
• Voronoi Fracture, a New MoGraph Feature
• Working with the new Thinfilm Shader
• How to use the new Parallax Bump Map Feature
• Using the new Shadow Catcher for 3D Compositing
• Working with the new Substance Materials Workflow

Like this tutorial? Consider becoming a Patron at Patreon.com/SeanFrangella to get additional benefits such as project files and more! 

To get weekly Motion Graphics, VFX, and 3D animation tutorials be sure to subscribe to the show on YouTube!


Cinema 4D R18 - How to use the new Parallax Bump Map Feature

Using bump maps in Cinema 4D Materials can be a great way create the illusion of bumps and roughness on a surface, without actually changing the geometry and therefore increasing the object's complexity. To achieve a fully believable render, you could use a displacement material and distort the geometry, however this can greatly increase render times. 

With the new Parallax Bump Map feature of Cinema 4D R18, you can create the illusion of height and depth depth in bump maps, without greatly increasing render time, as the original geometry is not actually distorted. Parallax bump maps are a great way to use materials to achieve create the illusion of displaced height and depth, without increasing render time.


Want to make Lighting & Reflections in Cinema 4D a snap?

Take a look at 360° Environment Maps Pro for Cinema 4D & Cinema 4D Lite to quickly and easily add lighting and rendering options to your scene. You can also save over 25% on bundle packs!

To take a deeper look at new features in Cinema 4D R18, be sure to check out some of these additional articles focusing on other updates and new features for R18:

• Top 5 New Features of R18
• MoGraph updates and new Effectors for R18
• Voronoi Fracture, a New MoGraph Feature
• Inverted Ambient Occlusion
• Working with the new Thinfilm Shader
• Using the new Shadow Catcher for 3D Compositing
Working with the new Substance Materials Workflow

Like this tutorial? Consider becoming a Patron at Patreon.com/SeanFrangella to get additional benefits such as project files and more! 

To get weekly Motion Graphics, VFX, and 3D animation tutorials be sure to subscribe to the show on YouTube!


Cinema 4D R18 - Working with the New Substance workflow for Materials

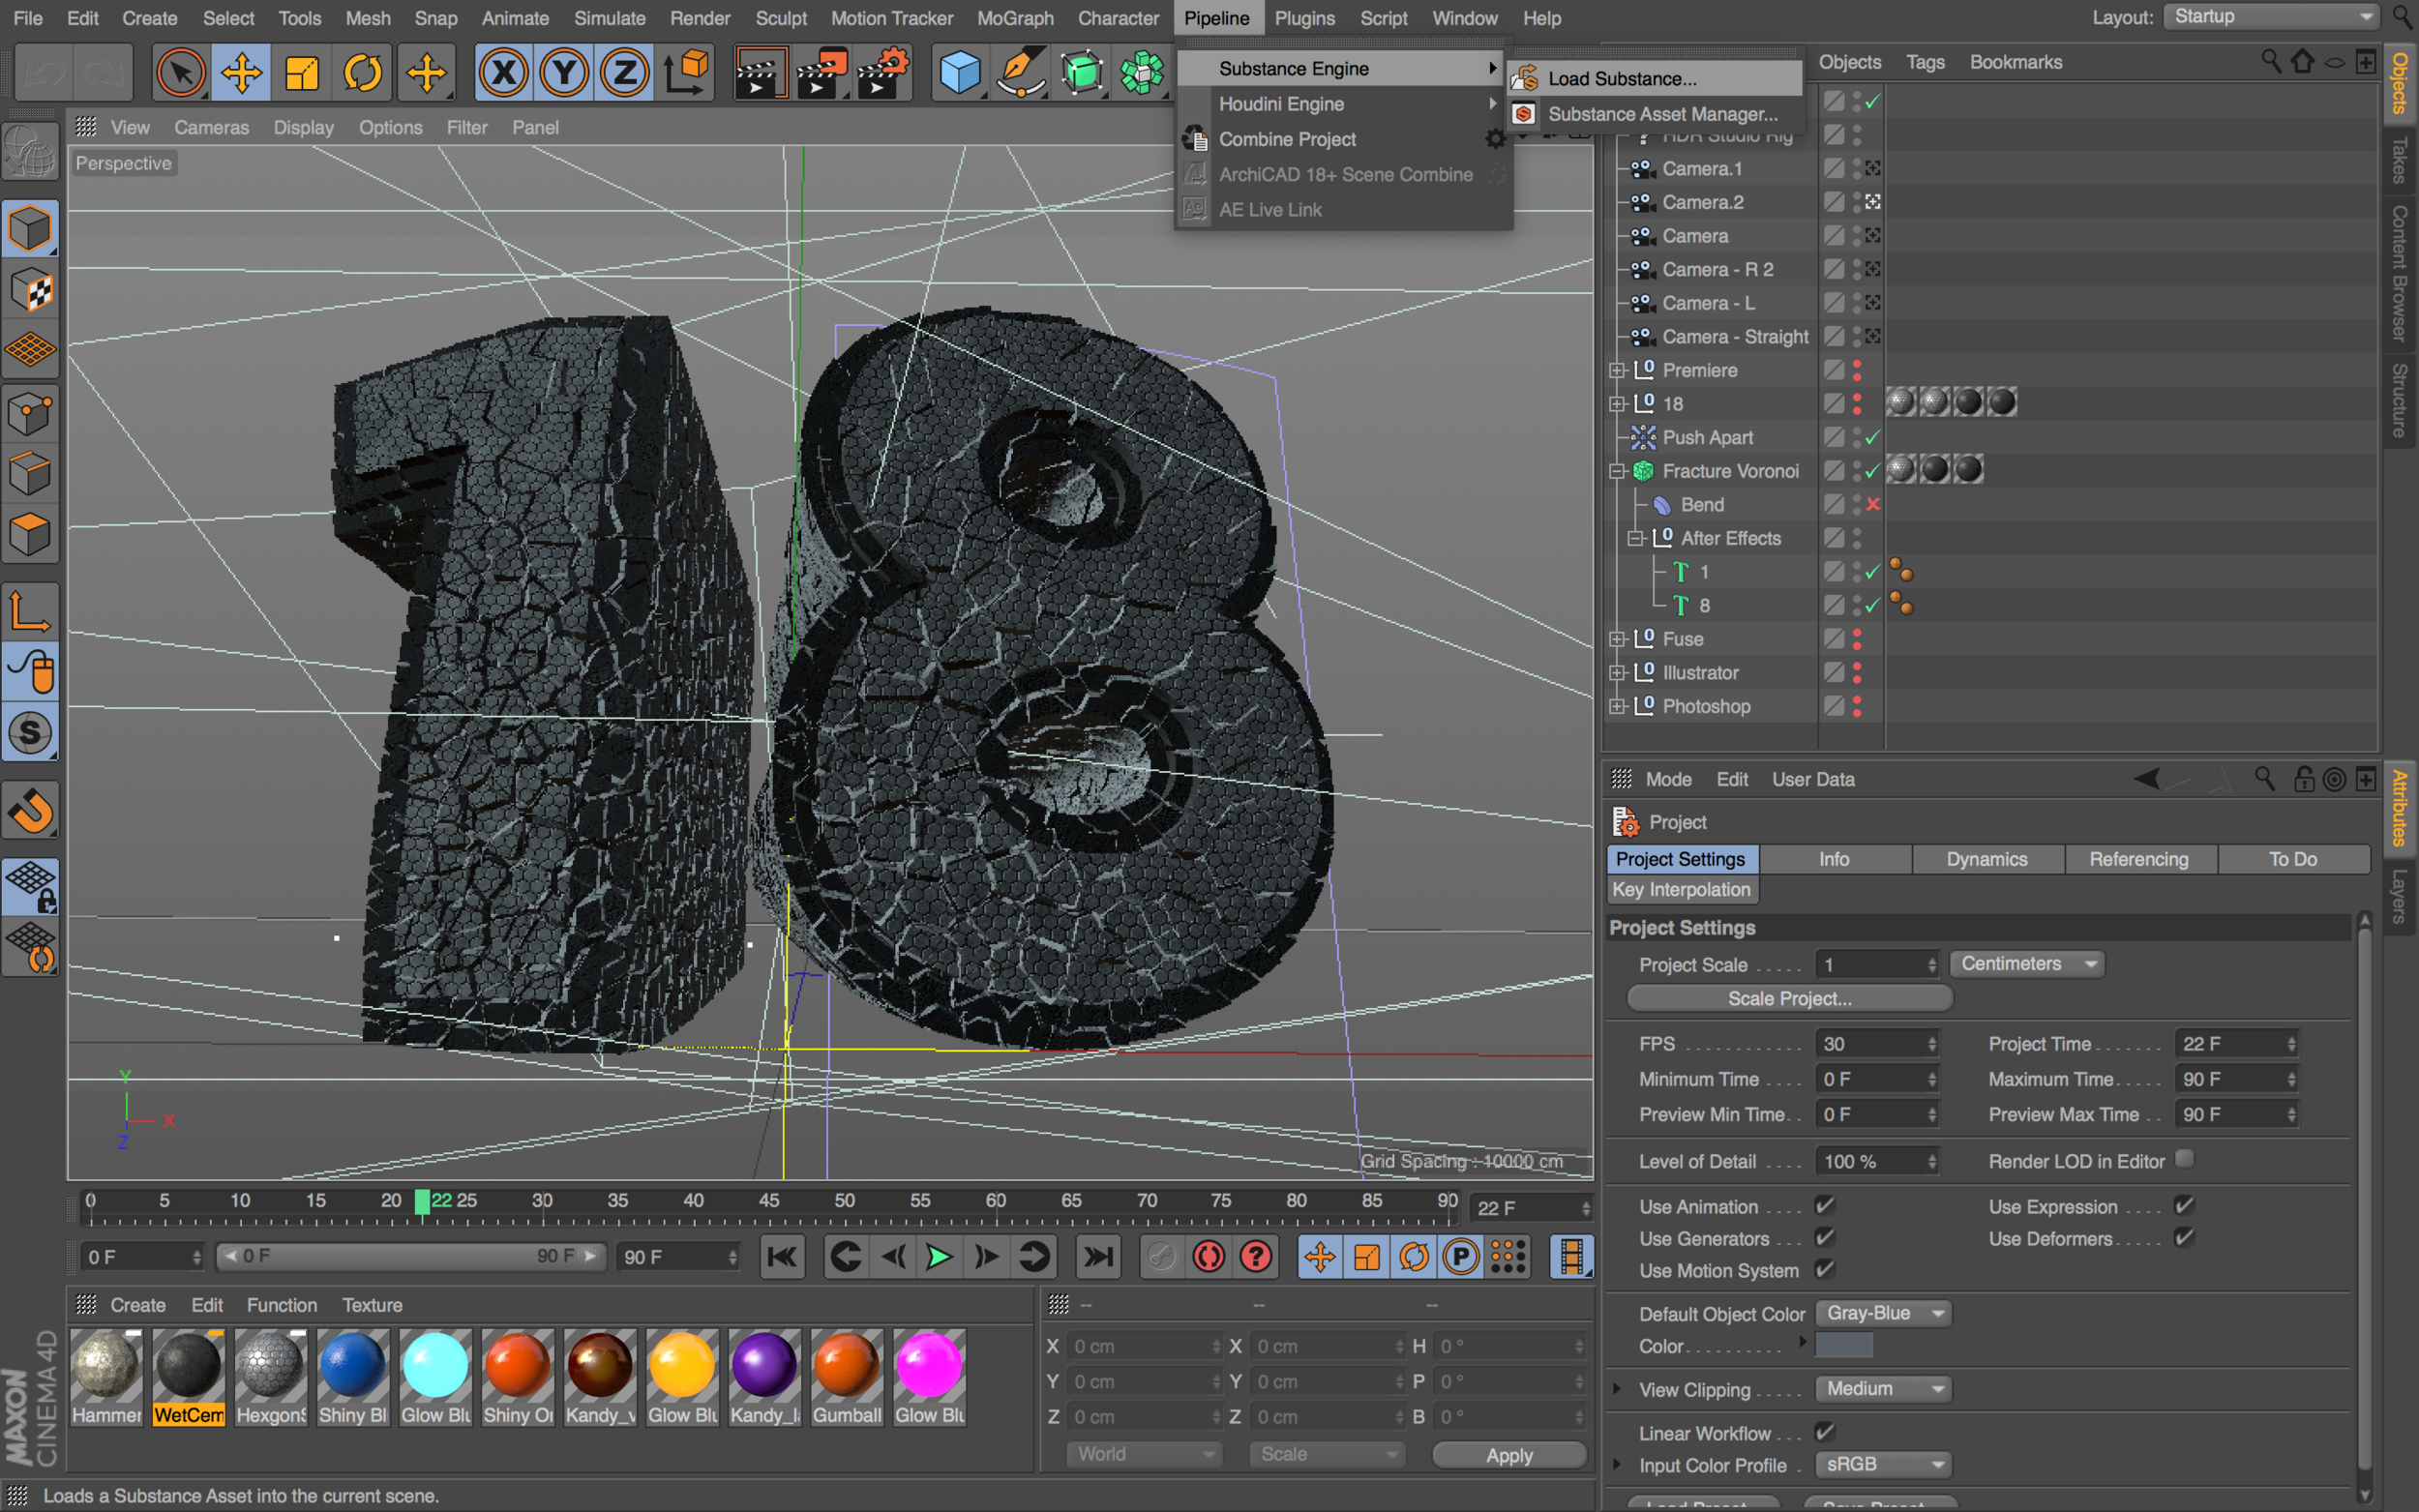
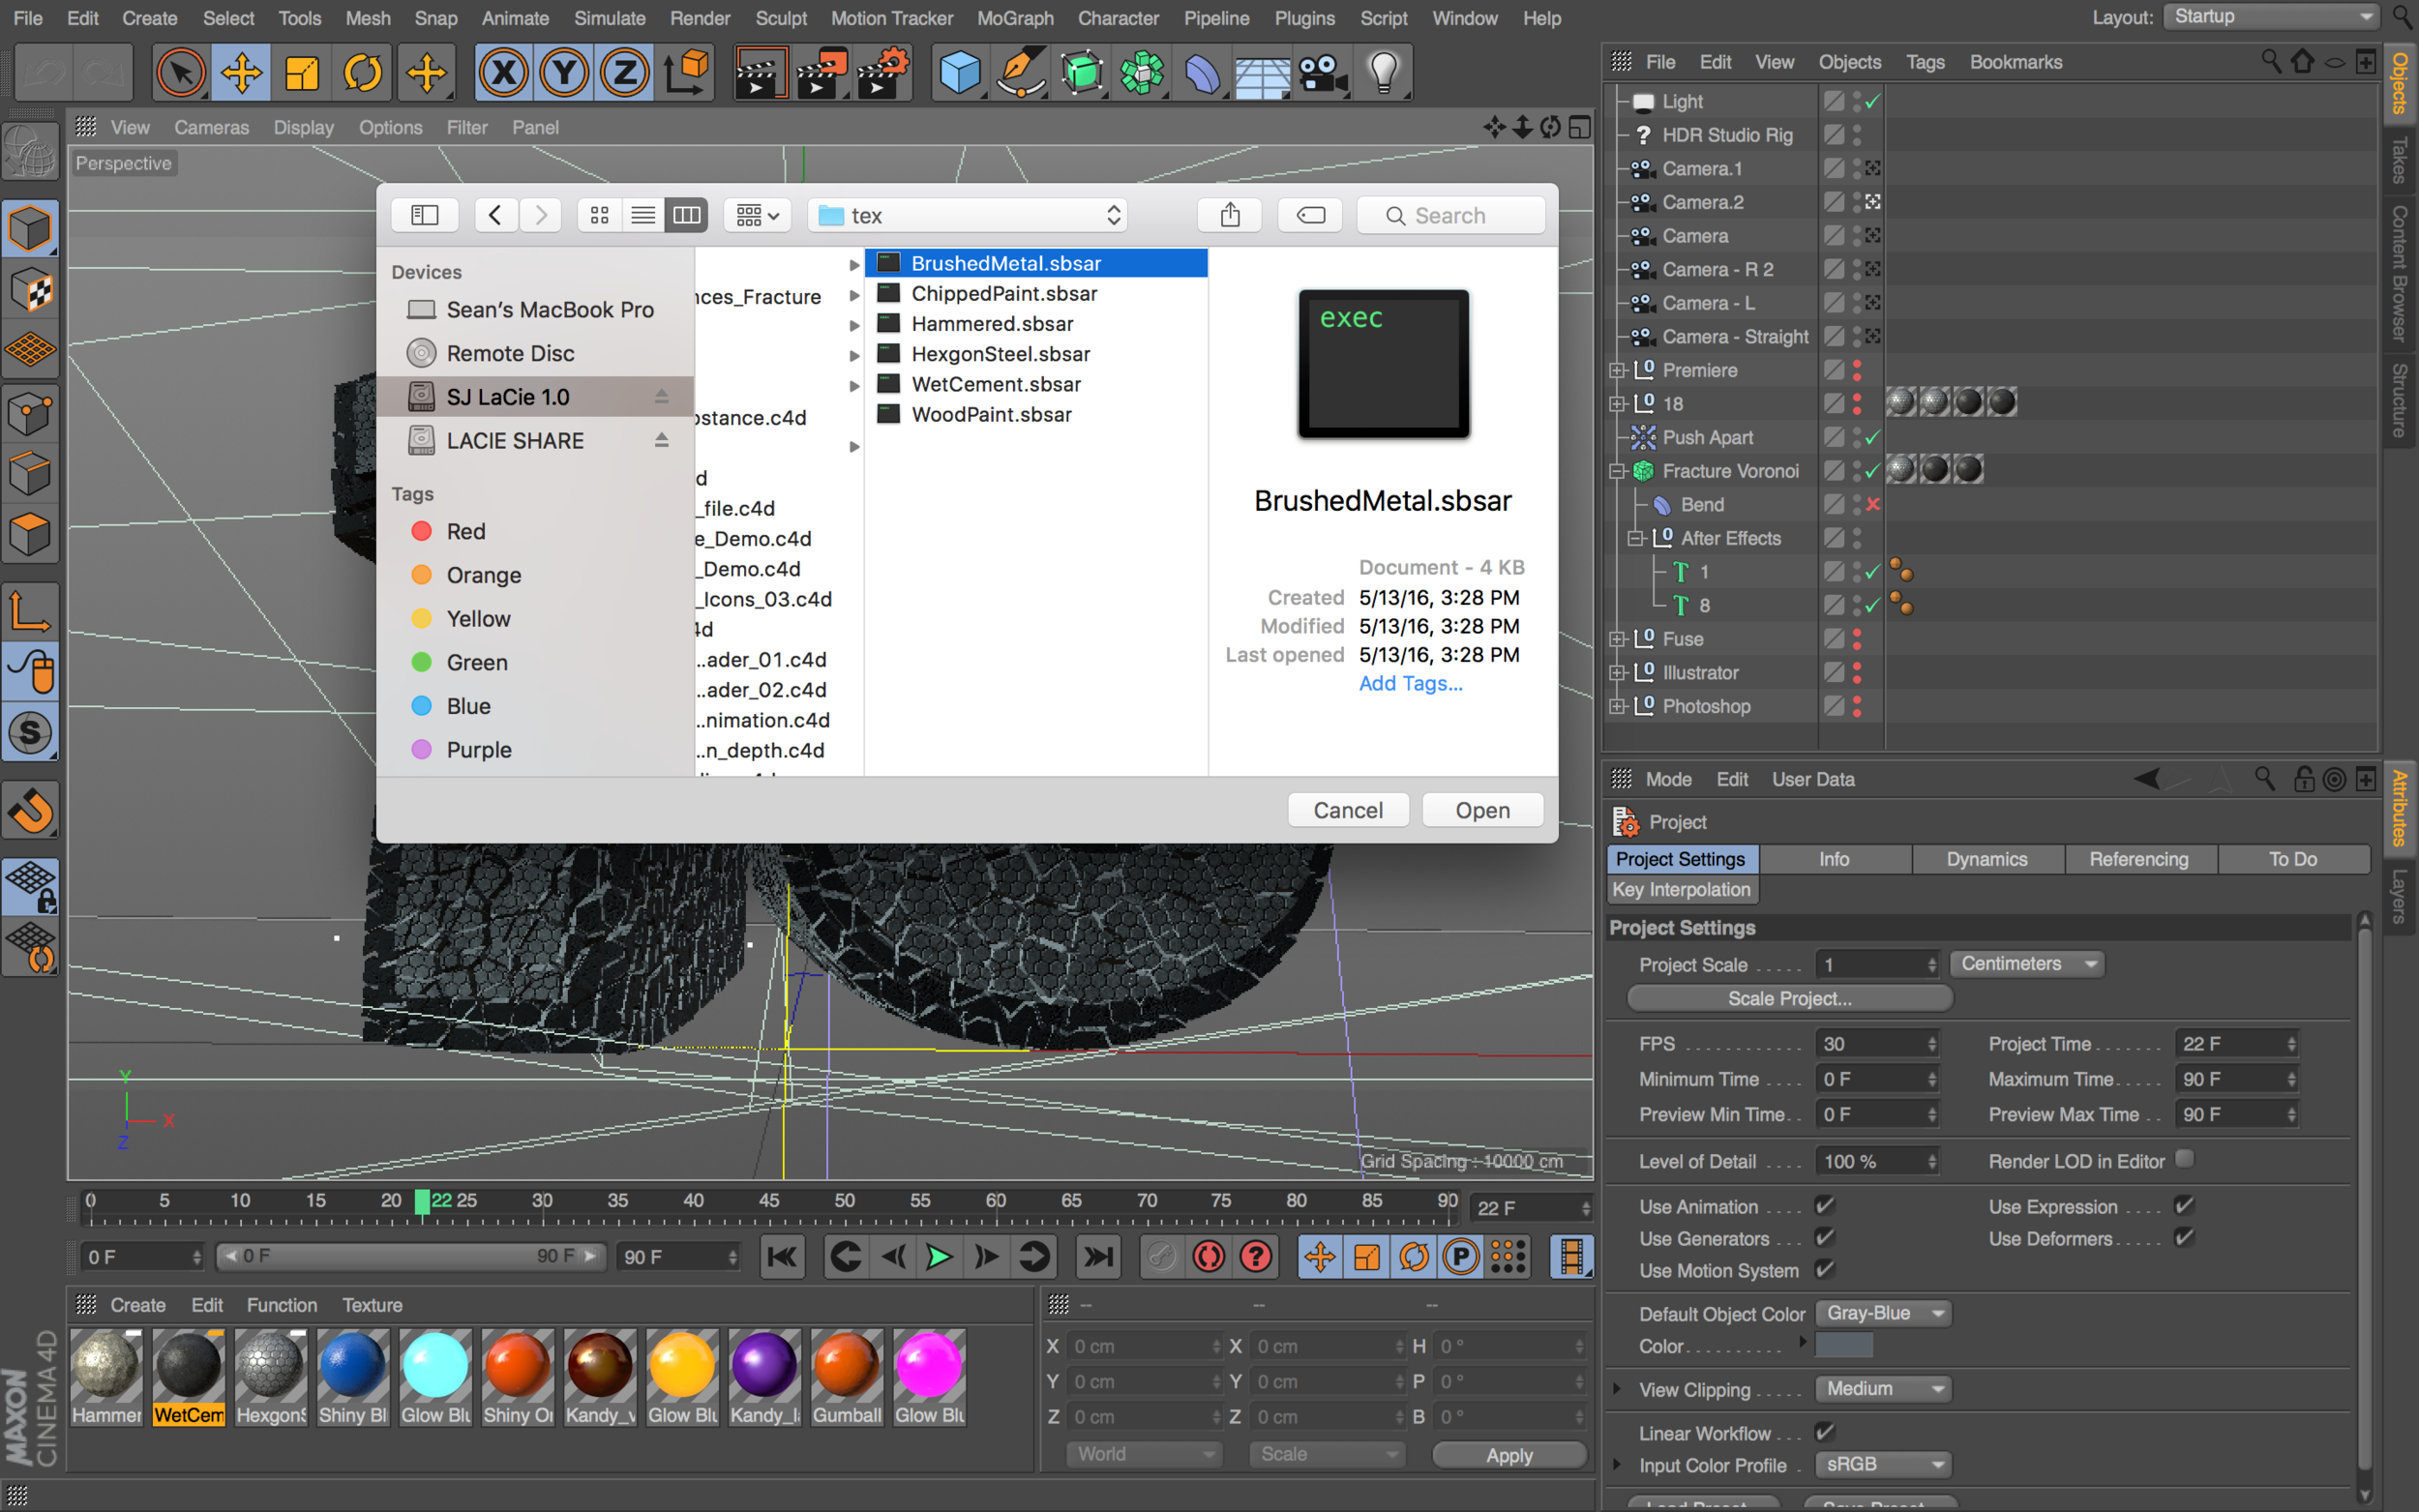
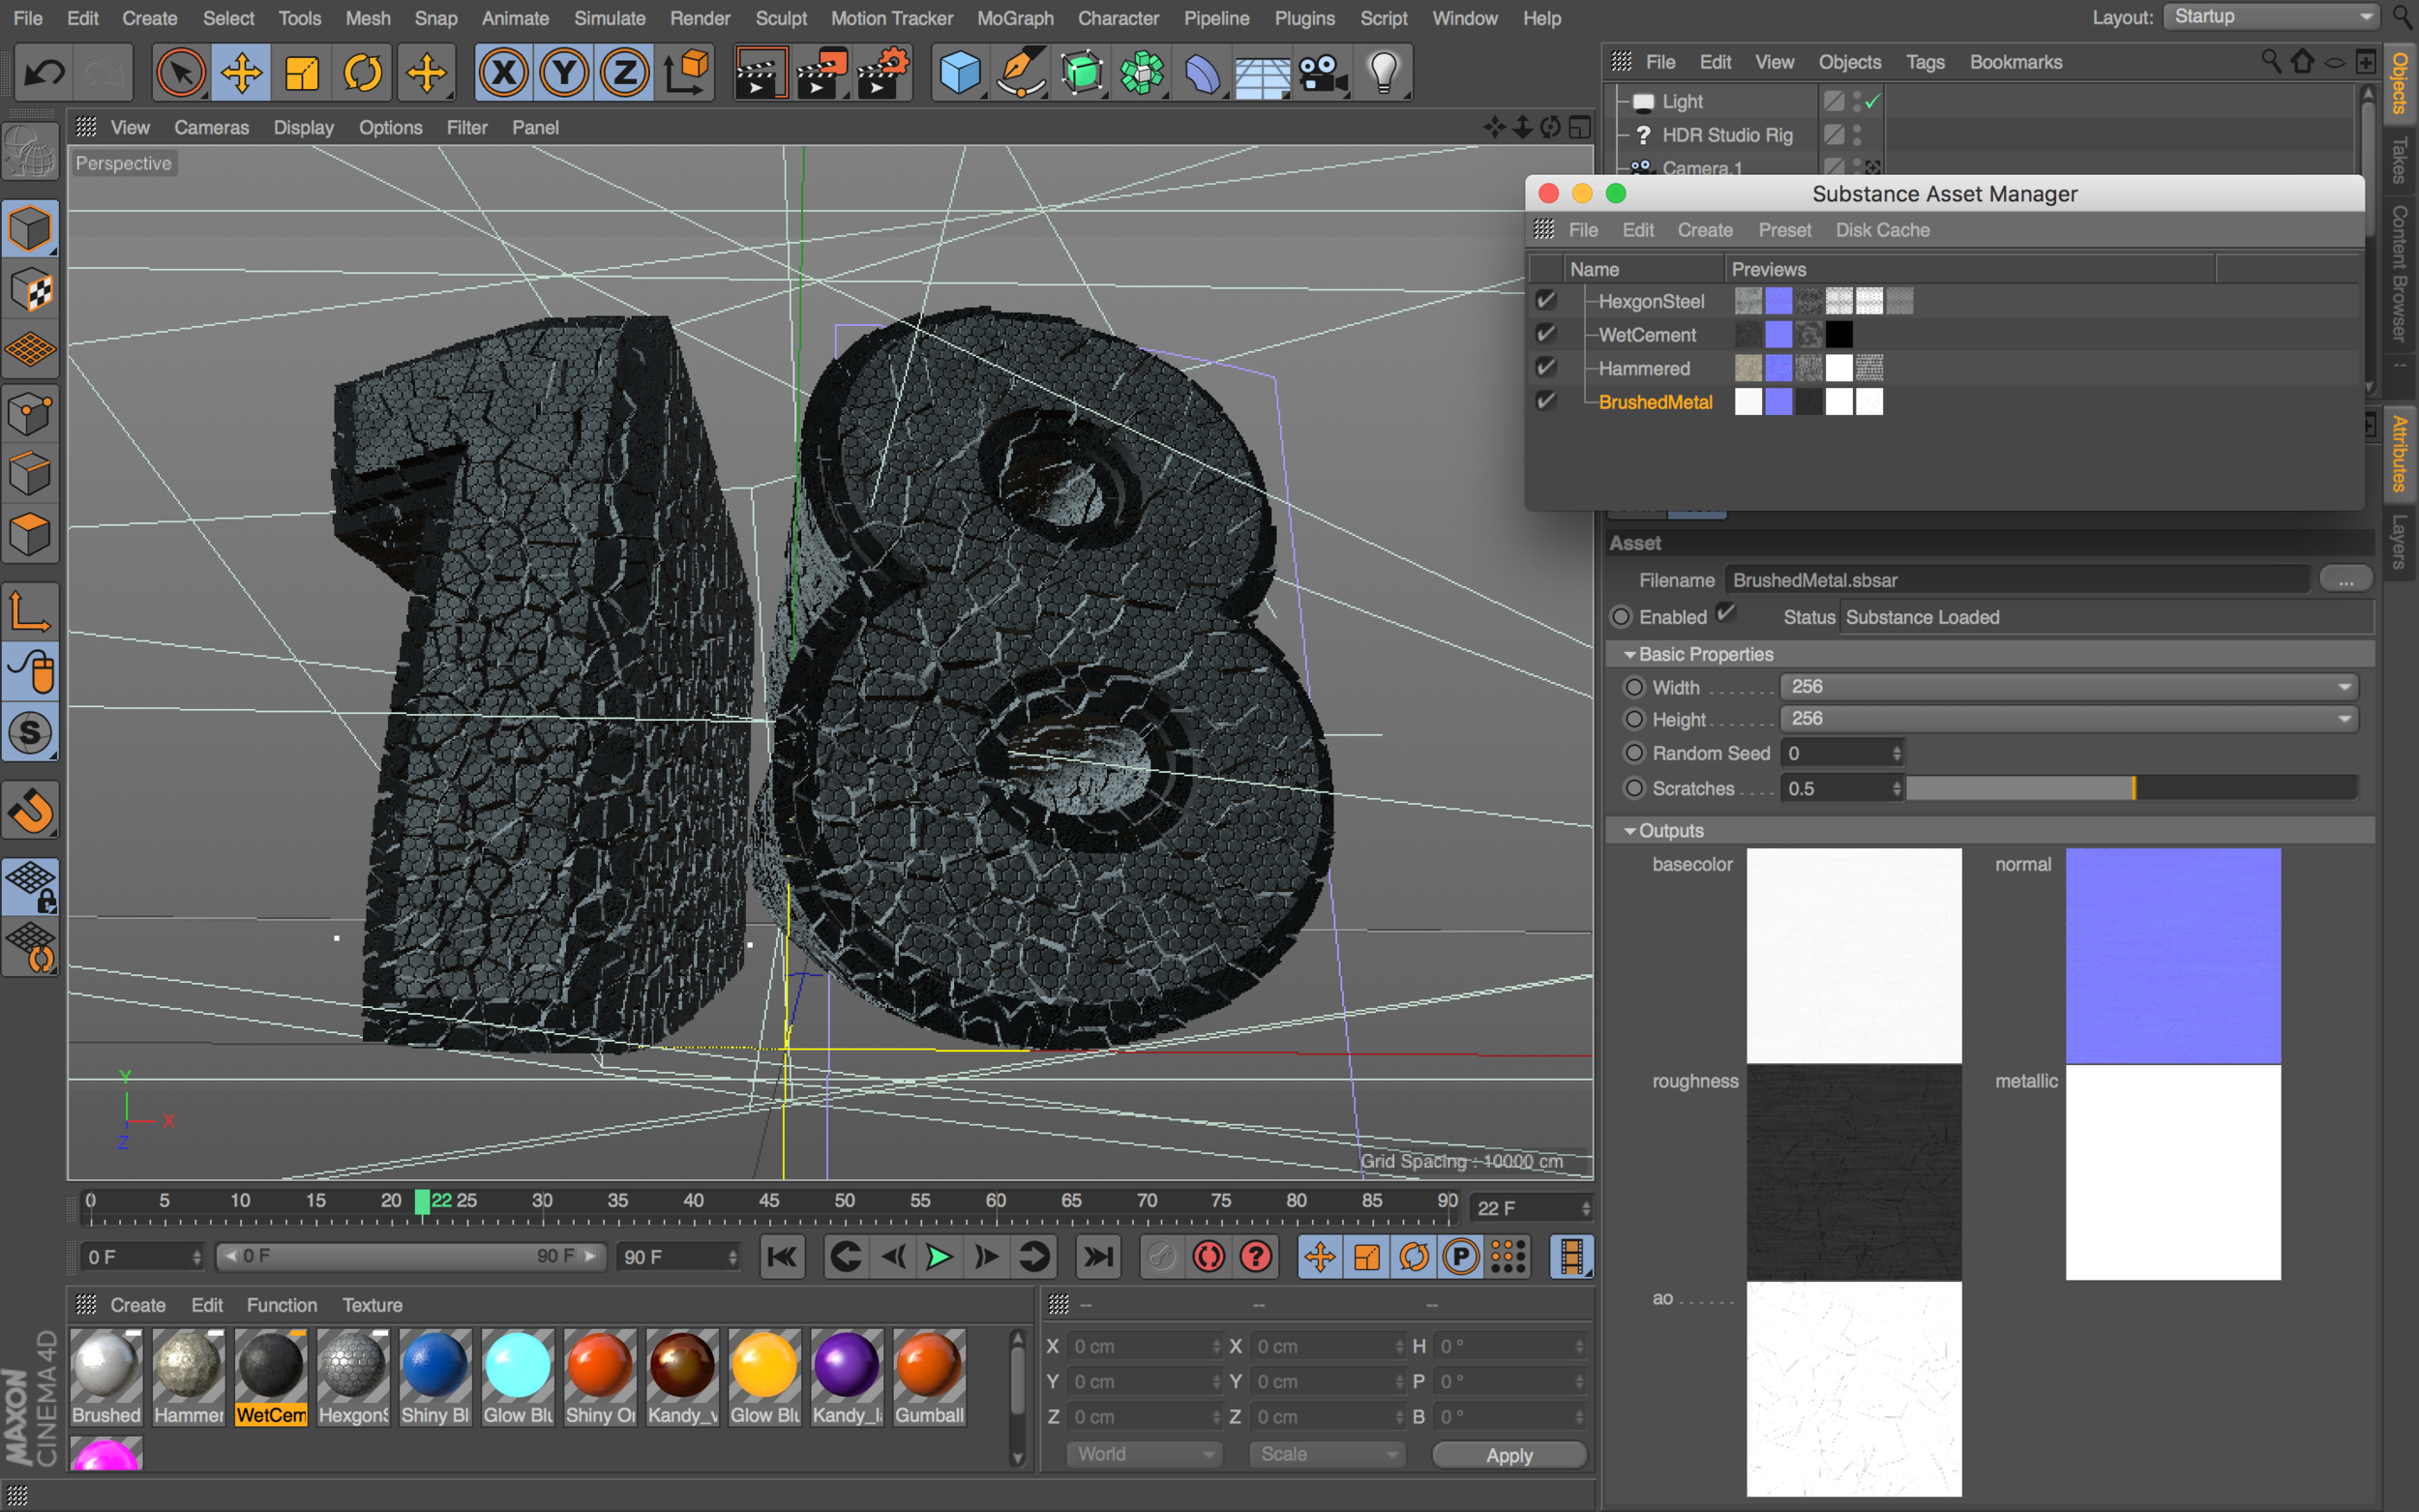
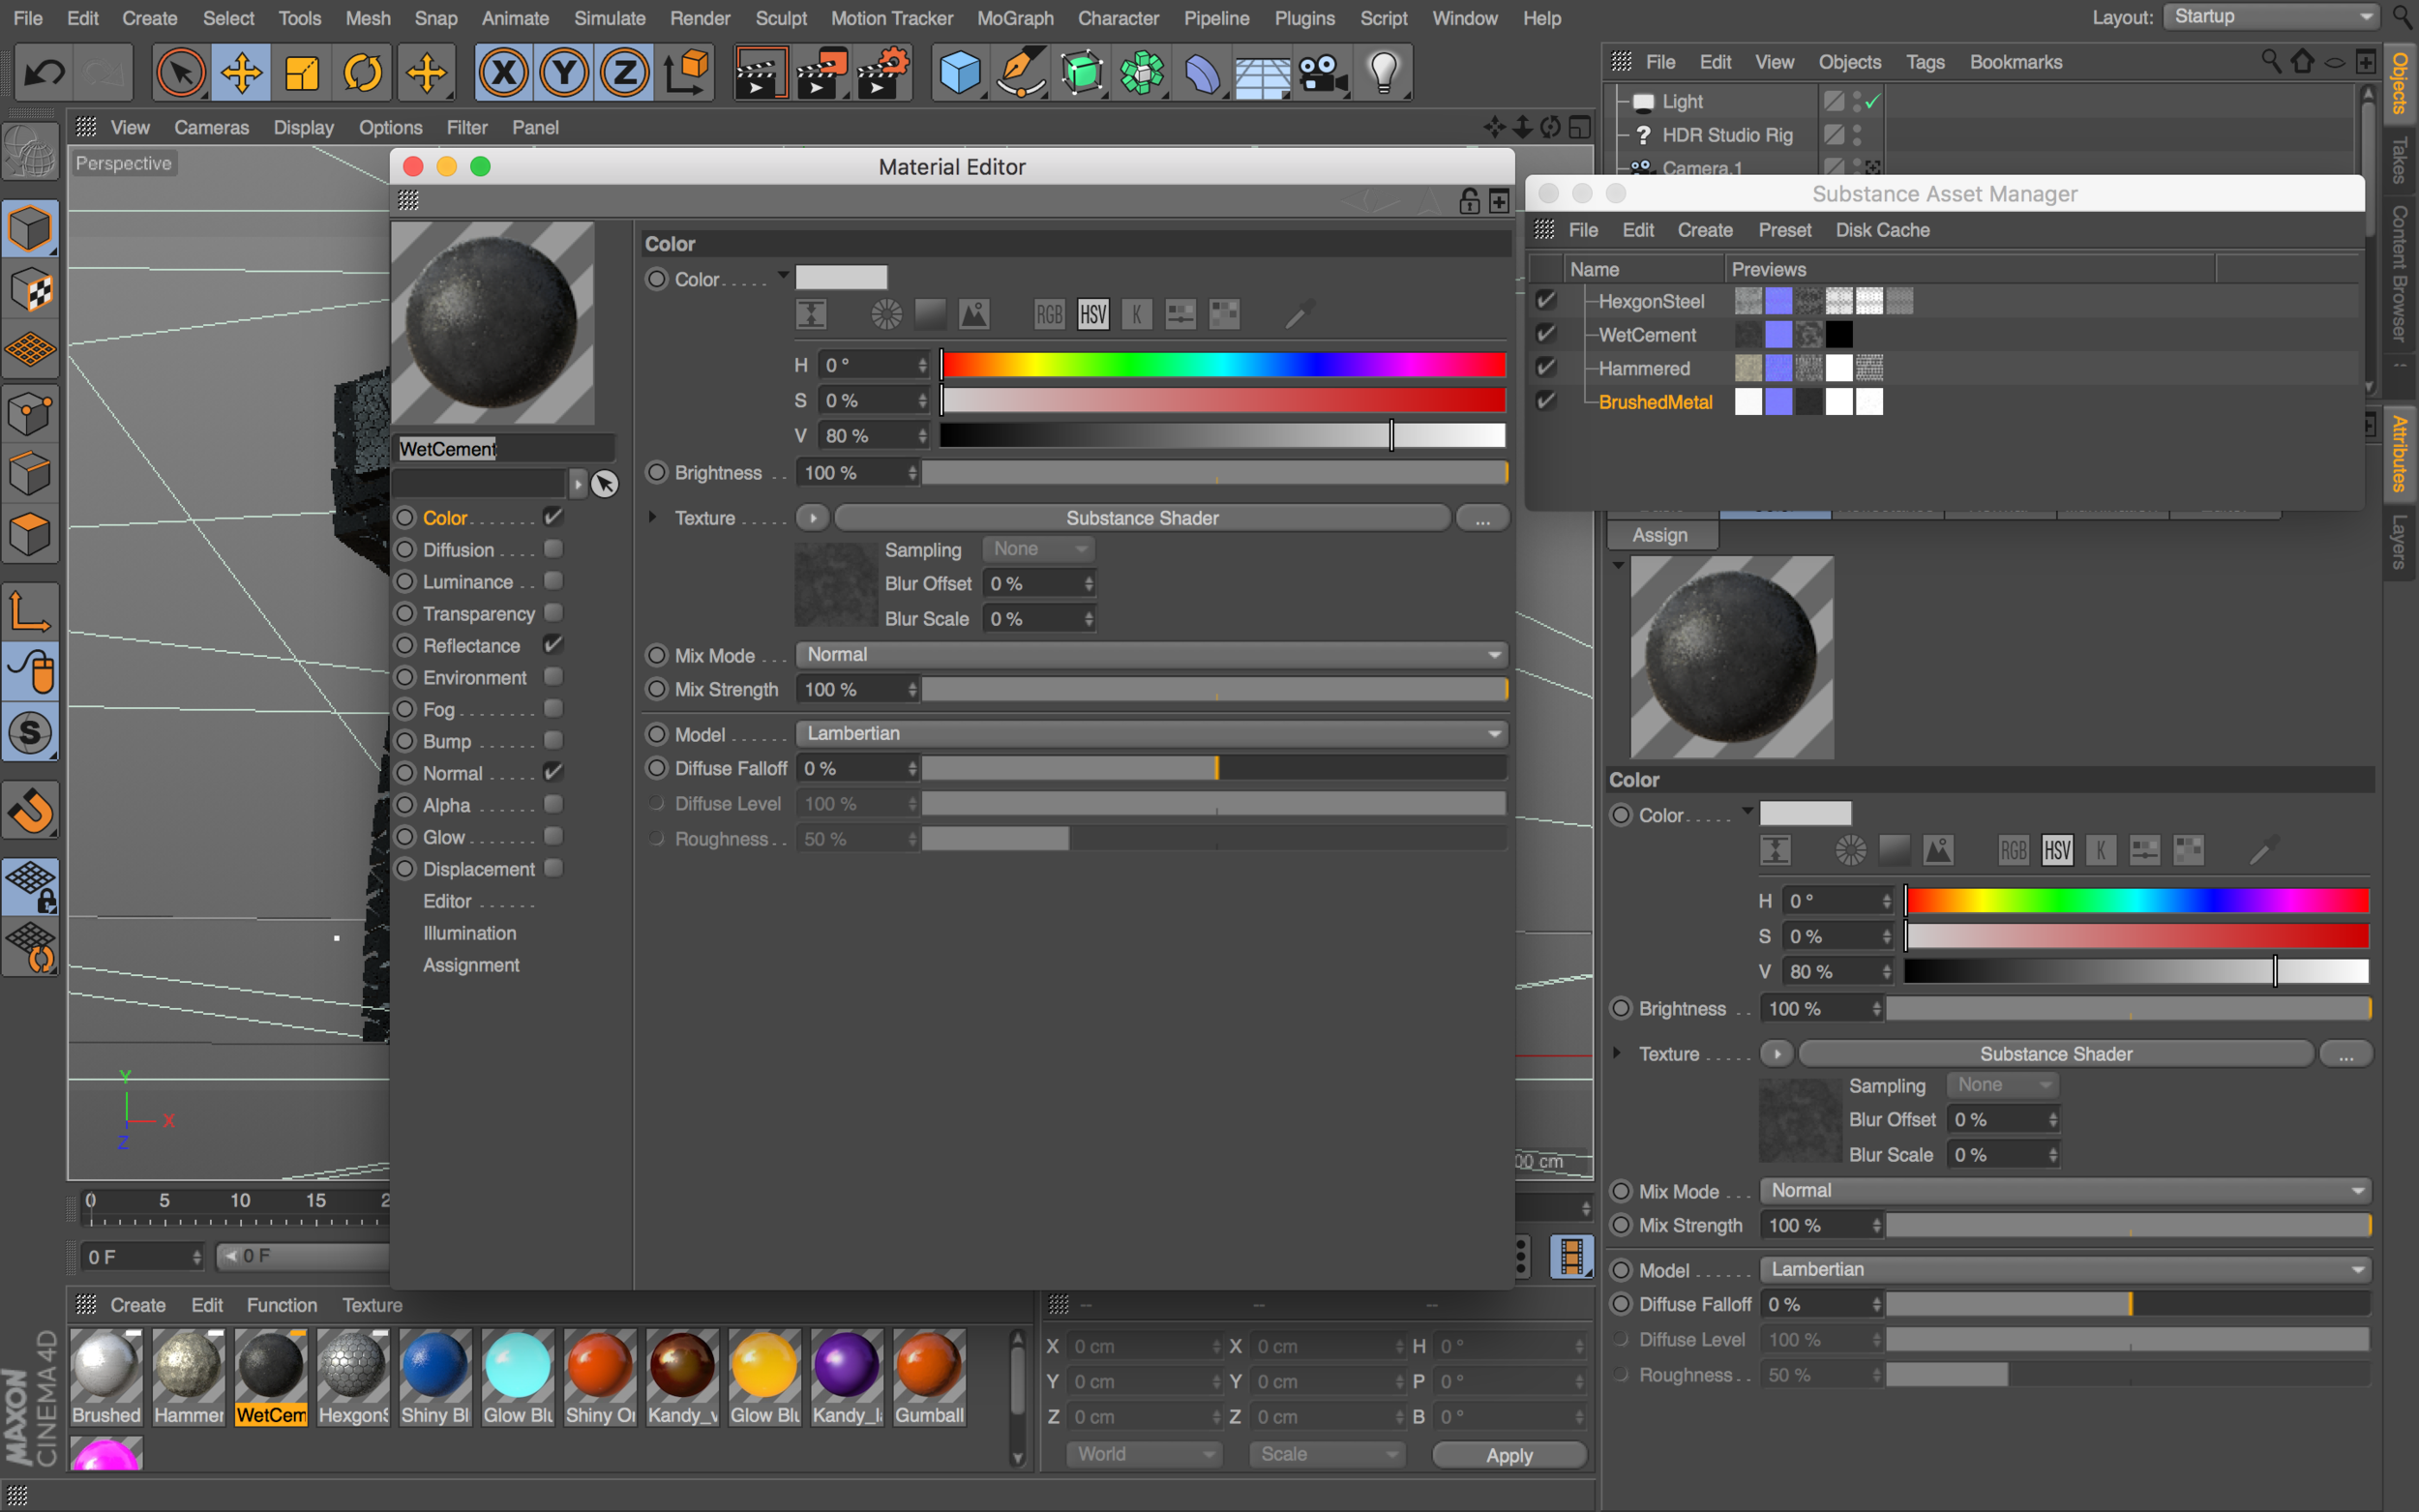
If you are a user of Substance Materials by Allegorithmic, or want to take advantage of a library of really great 3D materials, there is now a direct pipeline to get Substance Materials into Cinema 4D R18. By using substance materials, you can create new materials or download existing materials from Substance Share, and easily integrate them into your Cinema 4D R18 projects. All you have to do go to the menu Pipeline > Substance Engine > Load Substance and locate a Substance .sbsar file. That's it, and then you'll have Substance Materials available directly in Cinema 4D R18 using the new Workflow. 

Substance Materials used in combination with the new MoGraph Voronoi Fracture Tool

Substance Materials used on different parts of 3D extruded text and caps

Substance Materials used on different parts of 3D extruded text and caps

Want to make Lighting & Reflections in Cinema 4D a snap?

Take a look at 360° Environment Maps Pro for Cinema 4D & Cinema 4D Lite to quickly and easily add lighting and rendering options to your scene. You can also save over 25% on bundle packs!

To take a deeper look at new features in Cinema 4D R18, be sure to check out some of these additional articles focusing on other updates and new features for R18:

• Top 5 New Features of R18
• MoGraph updates and new Effectors for R18
• Voronoi Fracture, a New MoGraph Feature
• Inverted Ambient Occlusion
• Working with the new Thinfilm Shader
• How to use the new Parallax Bump Map Feature
• Using the new Shadow Catcher for 3D Compositing

Like this tutorial? Consider becoming a Patron at Patreon.com/SeanFrangella to get additional benefits such as project files and more! 

To get weekly Motion Graphics, VFX, and 3D animation tutorials be sure to subscribe to the show on YouTube!


How to use Cinema 4D Object Buffers to create Masks and Track Mattes for Post-Production

Using Object Buffers in Cinema 4D makes it easy to create masks and track mattes for individual objects. Haven't heard of object buffers? What you can do is use the Compositing Tag to assign an object buffer to individual 3D objects, then when you render out a multi-pass render, you'll also render out a black and white version of the frame, with the selected object in white.

What's the point of that? Well, you can use this as a selection in Photoshop or as a Track Matte in After Effects. This way, you can add adjustments to individual elements of an animation wihtout needing to rotoscope or mask out the object. This can also be a huge time saver if you need to make an adjustment after you've already rendered the project.

An example of a 3D Render, rendered out as a PNG sequence from Cinema 4D

An example of a 3D Render, rendered out as a PNG sequence from Cinema 4D

A corresponding Multi-Pass render with an Object Buffer set to the word "object"

A corresponding Multi-Pass render with an Object Buffer set to the word "object"


Want to greatly improve your 3D Renders?

Check out 360° Environment Maps Pro for Cinema 4D

Like this tutorial? Consider becoming a Patron at Patreon.com/SeanFrangella to get additional benefits such as project files and more! 

To get weekly Motion Graphics, VFX, and 3D animation tutorials be sure to subscribe to the show on YouTube!


Cinema 4D Dynamics Simulation Tips & Tricks

Setting up Dynamics Simulations in Cinema 4D is one of the most fun things you can do with 3D animation. By creating Dynamics Simulations, you can use gravity, force, and physics to have objects move and interact in realistic ways without having to add any keyframes. Getting Dynamics set up is simple enough if you only have one or two objects, but things can get a little more complex if you have cloners, hierarchies of objects, or complex geometry. In this Cinema 4D tutorial, I go over lots of tips and tricks for working with dynamics, including tips on both rigid body and soft body settings.

Want the project files used in this tutorial? You can get them in the store for only $1!

Want to learn more about Dynamics in Cinema 4D? Check out another tutorial on combining dynamics with mograph cloners to create an exploding brick wall.

Like this tutorial? Consider becoming a Patron at Patreon.com/SeanFrangella to get additional benefits such as project files and more! 

To get weekly Motion Graphics, VFX, and 3D animation tutorials be sure to subscribe to the show on YouTube!


Create Captain America's Shield in 3D using Cinema 4D

I'm always looking for new ideas for tutorials from my favorite movies and films, and with the release of Captain America: Civil War, I had the idea to see how accurately I could create a 3D model for Captain America's shield in Cinema 4D. In this tutorial I get into how to build out 3D model, and as an added bonus this week, I am giving the 3D model away if you follow me on Facebook or Twitter. Just follow me on either site and hit me up with a message, and I'll send you a download link to get the 3D model for FREE!

captain-america-3d-shield

Want to see more Marvel inspired tutorials? Check out the next one on how to recreate the Avengers: Age of Ultron title using After Effects!


Like this tutorial? Consider becoming a Patron at Patreon.com/SeanFrangella to get additional benefits such as project files and more! 

To get weekly Motion Graphics, VFX, and 3D animation tutorials be sure to subscribe to the show on YouTube!


Adobe Creative Graphic Design on Twitch.TV - Creating a 3D Logo in Photoshop 3D or Cinema 4D

I had the pleasure of popping in on Adobe's Twitch channel over at Twitch.tv/Adobe, where I talked with Adobe's Paul Trani about the different options for taking a 3D logo from illustrator and creating a 3D image out of it. We talk about the differences between 3D in Photoshop and a full 3D package such as Cinema 4D. In the first half of this live stream recording, Paul gets into some fun ways you can bring a vector logo from Illustrator into Photoshop, and in the second portion I get into cracking opening Cinema 4D or Cinema 4D Lite (included in After Effects CC) to create a 3D logo out of the "Creativity 360" illustration that we started with.

Whether you're completely new to working in 3D animation in either Photoshop or Cinema 4D, or a seasoned pro, this live show is packed with tons of tips for working in 3D.

Here is a still render of what we worked up during the live show:

When in doubt, add a bunch of colorful glows around the edges. Instant pop!

When in doubt, add a bunch of colorful glows around the edges. Instant pop!

You can also now follow me on Twitch for live videos tutorials, Q&A sessions, and the occasional Fallout 4 webcast at Twitch.tv/SeanFrangella


Like this tutorial? Consider becoming a Patron at Patreon.com/SeanFrangella to get additional benefits such as project files and more! 

To get weekly Motion Graphics, VFX, and 3D animation tutorials be sure to subscribe to the show on YouTube!


Create Letter-by-Letter Text Animations in Cinema 4D using MoGraph, MoText, and Effectors

In Cinema 4D, you can use MoGraph and Effectors to do all sorts of cool animation. The MoGraph and Cloner system is one of the biggest unique features of working in Cinema 4D. In this 3D Animation tutorial, I go over how to use MoGraph Effectors on MoText objects, in order to create letter-by-letter Text animations. I've gotten a couple questions lately on how I put together the intro sequence for my Tutorials, and this tutorial gets into just that!

This tutorial covers the process of applying MoGraph Effectors to MoText, as well as setting up the Effector Properties, animating strength, and adjusting and animating the falloff. Digging into the falloff settings for each Effector is really where you can push what you can do with MoGraph Effectors and create modular, re-useable animation systems.

To learn about setting up the custom materials on the Text Caps, check out this tutorial.

Be sure to also learn about the second part of this process of linking Optical Flares to Cinema 4D Animations in After Effects using Cineware.

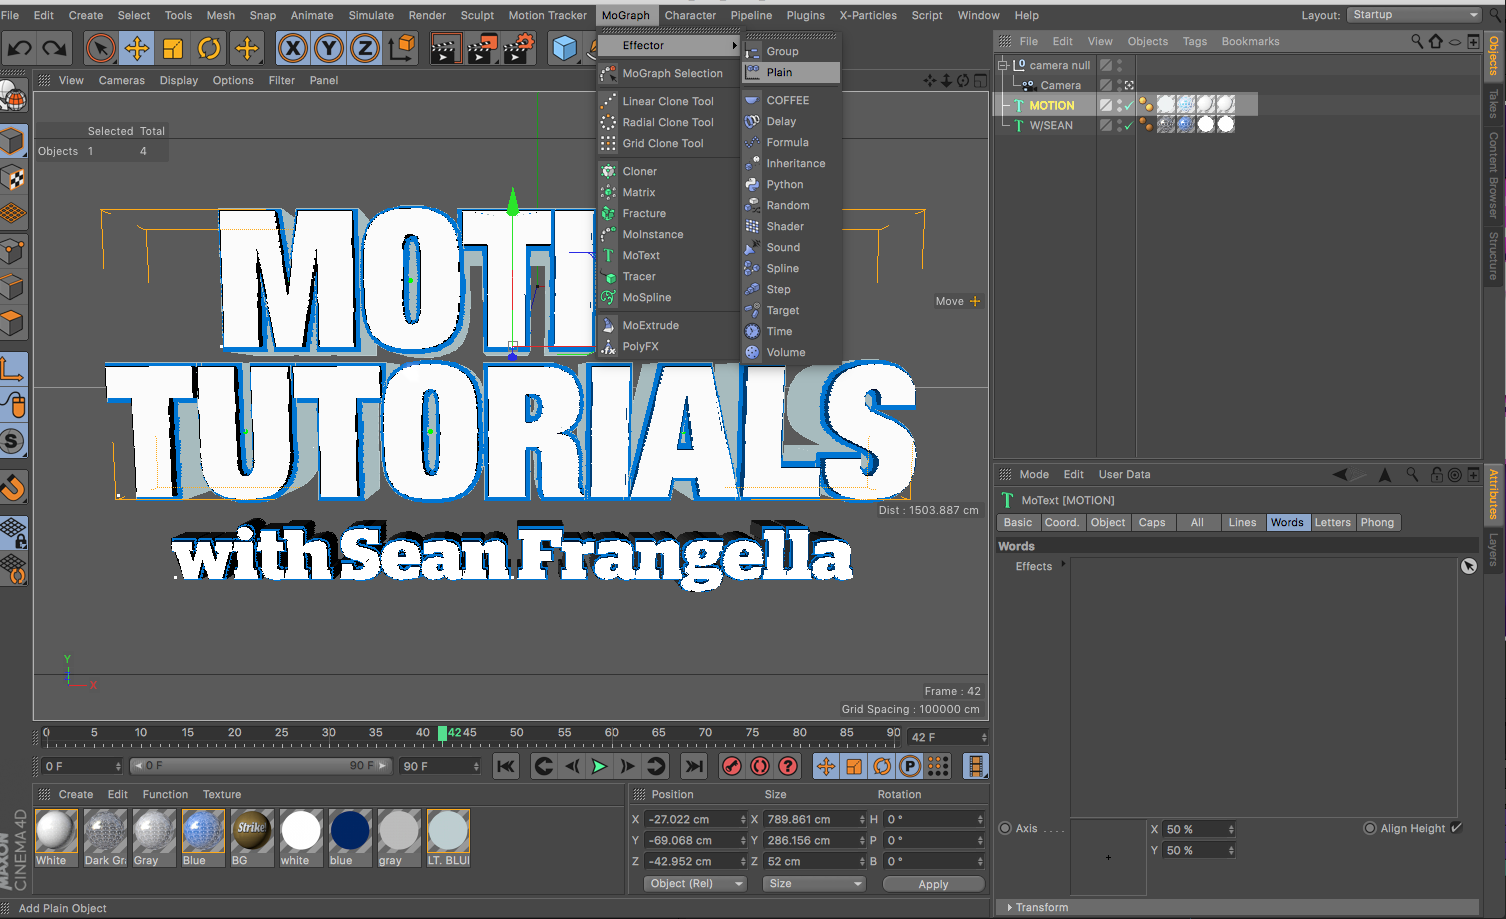
To set up the letter-by-letter animation, first go to MoGraph > Effector, and choose an effector. If you do this with the MoText selected in Cinema 4D, it will automatically be applied to the letters of the text.

Look at alllll those fancy effectors.

Look at alllll those fancy effectors.

If you added the Effector to the scene without the MoText object selected, you can grab the Effector and drag it into "Letters."

On the Effector under "Parameters," you can adjust position, scale, and rotation. This will adjust the properties of each letter individually. If you want to adjust the scale uniformly, be sure to check "uniform scale."

I don't even want to know what happens if you don't check "uniform scale." I wouldn't chance it.

I don't even want to know what happens if you don't check "uniform scale." I wouldn't chance it.

After adjusting Parameters, if you go to the Effector Tab, you can animate the strength on and off. You can also go beyond 100%, or below 0% to create overshoot and follow through.

Ohhhh, so that's why we're doing all this.

Ohhhh, so that's why we're doing all this.

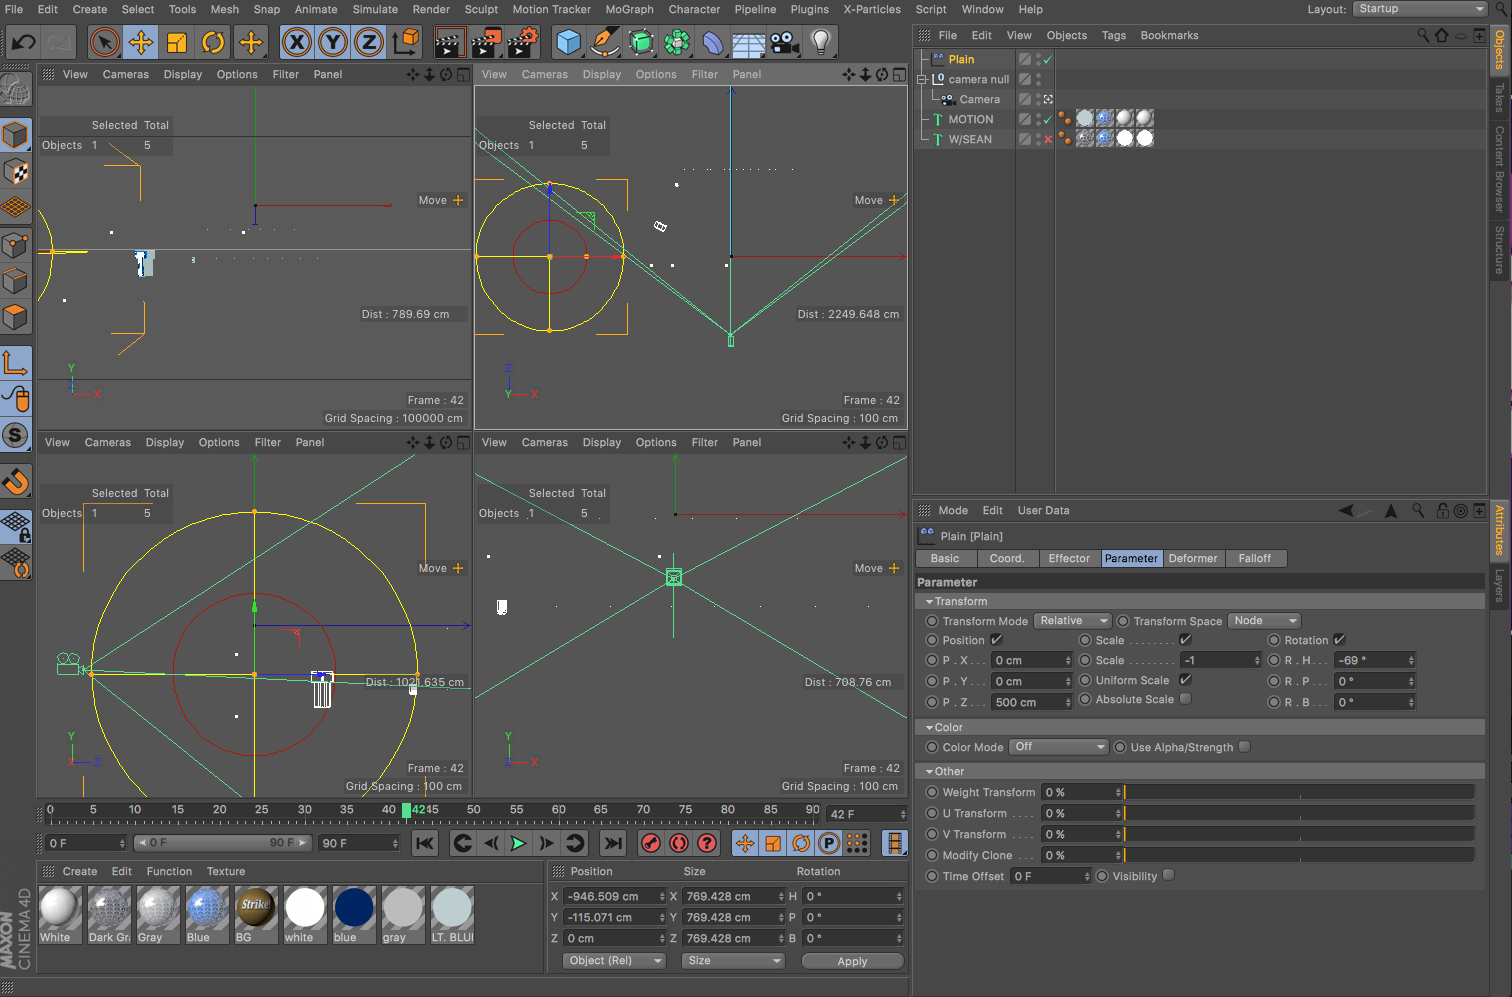
Adjusting the strength is great and all, but animating the falloff in the Falloff Tab is when things really get interesting. If you go to the Falloff Tab and change it from Infinite to Sphere, you can then move, scale, and just the shape of the falloff to create the animation. Now you don't even need to bother with the strength!

You can animate with a Torus, but now we're just getting crazy.

You can animate with a Torus, but now we're just getting crazy.

Check it out from different views. Taking a look from the top, you can see how moving and scaling the falloff affects groups of letters. Because the falloff is gradual, the letters will smoothly animate as you move and scale the falloff. 

Now we're definitely in the Matrix. 

Now we're definitely in the Matrix. 

Here's where the magic happens. If you invert the falloff by checking the invert button, now you can animate the sphere from out of frame onto the letters, and they will sequentially animate. 

There's always one tiny checkbox that makes all the difference!

There's always one tiny checkbox that makes all the difference!

If you change scale to a value of -1, the letters will also scale into existence. 

Check out this awesome screenshot where you can't see anything.

Check out this awesome screenshot where you can't see anything.

To create the animation, you can set a keyframe on the Position Coordinates with the spherical falloff over to the left, and 30 or 45 frames later set another keyframe with the falloff covering the letters.

Now we're talking, animation time!

Now we're talking, animation time!

Like this tutorial? Consider becoming a Patron at Patreon.com/SeanFrangella to get additional benefits such as project files and more! 

To get weekly Motion Graphics, VFX, and 3D animation tutorials be sure to subscribe to the show on YouTube!


Create Looping Animations in Cinema 4D using the Animation Track Properties

Looking to create looping animations in Cinema 4D, and end up just copying the keyframes over and over? Well no more! If you're familiar with After Effects Expressions, you can loop animations using the loopOut expression. If you're looking to do something similar in Cinema 4D, you might want to just create a bunch of copied keyframes, or look to writing some crazy Xpresso scripts to handle the looping. But by using the animation track properties in the attributes window, you can loop animations a set number of times using the Oscillate setting in the Track Properties, under attributes.

This technique can be utilized in both the full Studio version of Cinema 4D, as well as the After Effects version, Cinema 4D Lite.

Want to learn more about Cinema 4D Lite to get off the ground in 3D?
 

Learn how to Create a 3D extruded logo in Cinema 4D or Cinema 4D Lite.

Then learn how to Work with Materials and Reflectance textures in Cinema 4D.

Next learn about 3D Lighting and HDRI Sky images in Cinema 4D.

And then learn about Creating Animation, working with Keyframes, and the Cinema 4D Timeline.

To get started with this technique of creating looping animations in Cinema 4D, all you need to do is create 2 keyframes. Here we have the top and bottom points of a sphere animating vertically, in order to create the bouncing look.

Look at that smooooth curve.

Look at that smooooth curve.

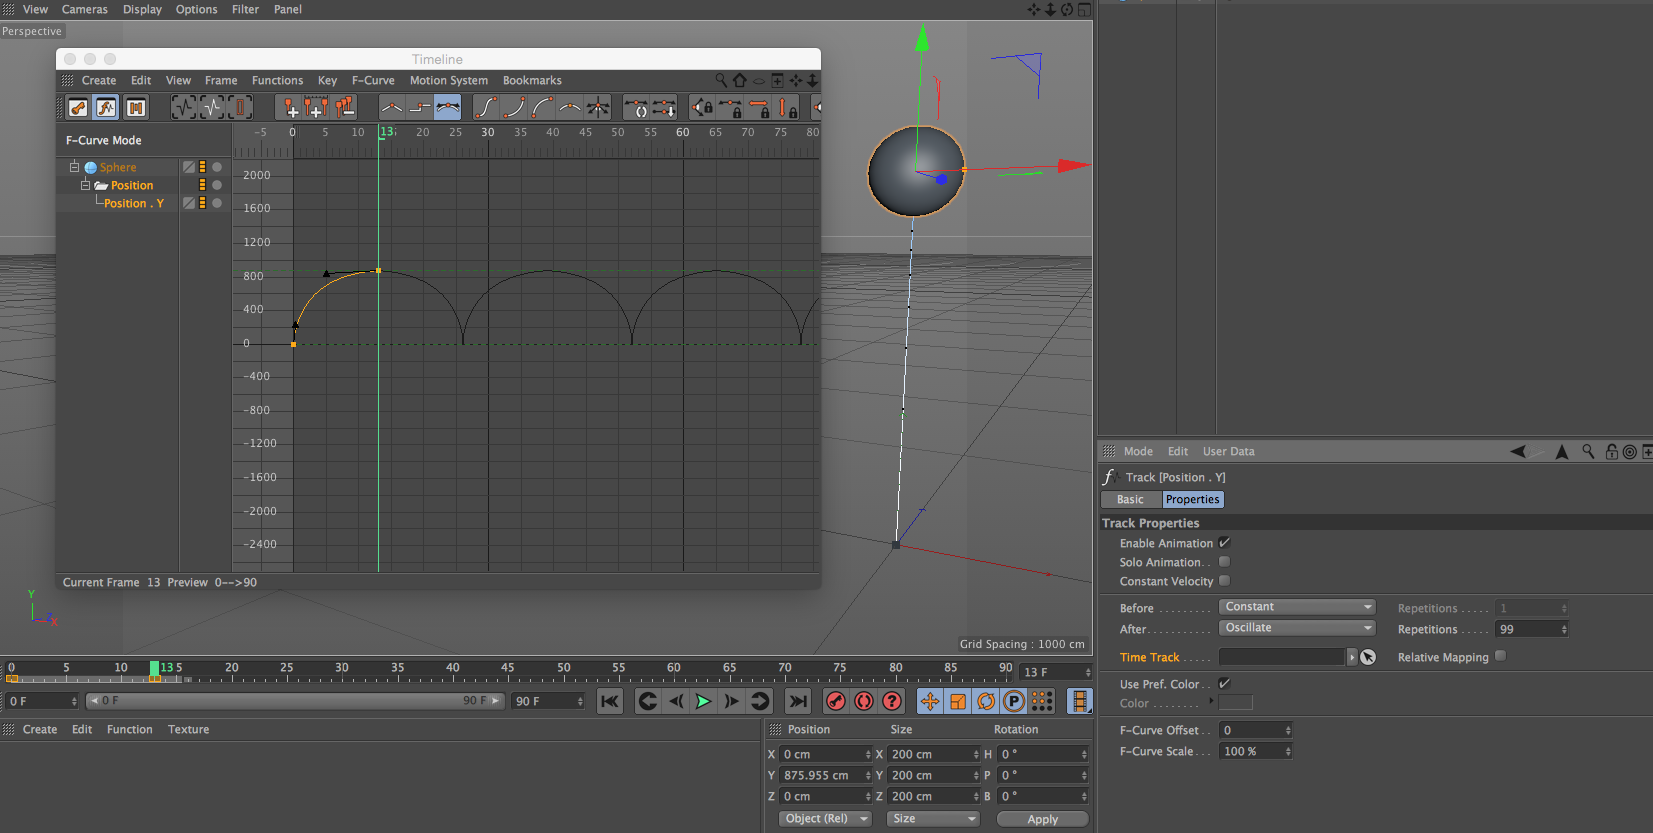
With the full Cinema 4D timeline open (accessible via Window > Timeline), when you click on the track, it'll open up the Track Properties under attributes. This is where you can adjust what happens before and after the two keyframes.

Houston, we have looping!

Houston, we have looping!

By changing the "After" dropdown to "Oscillate," the animation will repeat. This way all you have to adjust is that one animation curve, and it will change the entire animation. If you want it to loop infinitely, you can change the number of repetitions. Now that's a nice loop!

When will it end?!?!?! Oh, after 99 times.

When will it end?!?!?! Oh, after 99 times.

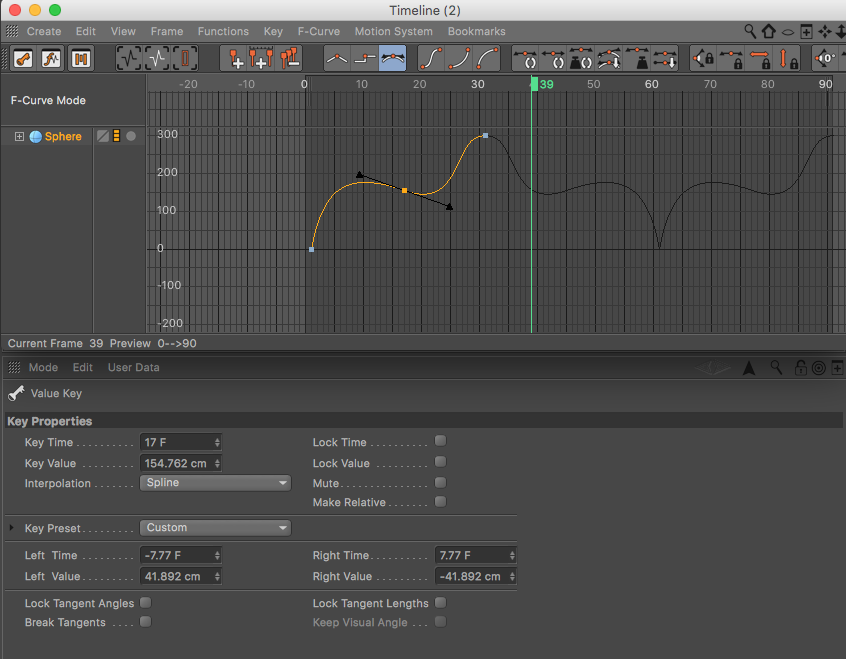
If you want to go further with this technique, you can add additional keyframes and loop keyframe animations beyond two. After adding in an additional keyframe in the center, as an example, it will loop the full set. Getting a bit deeper into f-Curve animations in the Cinema 4D timeline, you can hold SHIFT to adjust online one side of the tangent, ALT/OPTION to adjust only the VALUE, and COMMAND to adjust only what is happening over TIME.

BoooooOOOOooo. Urns.

BoooooOOOOooo. Urns.


Like this tutorial? Consider becoming a Patron at Patreon.com/SeanFrangella to get additional benefits such as project files and more! 

To get weekly Motion Graphics, VFX, and 3D animation tutorials be sure to subscribe to the show on YouTube!


How to link Optical Flares to Cinema 4D Animations in After Effects

One of the the best things about the newer integration between Cinema 4D and After Effects CC is the Cineware integration, which allows you to bring Cinema 4D or Cinema 4D Lite files into After Effects directly, without needing to render them out. Additionally, you can use Cineware to extract elements out of Cinema 4D and bring them into After Effects, and have everything perfectly line up. 

In this video, we'll talk about taking an animated logo from Cinema 4D into After Effects, and use Cineware to link up Video Copilot's Optical Flares plug-in, and have everything work in alignment. We'll also talk about using Cineware to rip out a depth pass, in order to occlude certain parts of a scene.

Want to learn more about Cinema 4D Lite to get off the ground in 3D?

Learn how to Create a 3D extruded logo in Cinema 4D or Cinema 4D Lite.

Then learn how to Work with Materials and Reflectance textures in Cinema 4D.

Next learn about 3D Lighting and HDRI Sky images in Cinema 4D.

And then learn about Creating Animation, working with Keyframes, and the Cinema 4D Timeline.

Finally, learn some Fancy post-production effects like linking Optical Flares to Cinema 4D Animations.


Like this tutorial? Consider becoming a Patron at Patreon.com/SeanFrangella to get additional benefits such as project files and more! 

To get weekly Motion Graphics, VFX, and 3D animation tutorials be sure to subscribe to the show on YouTube!


Working with Animation, the Timeline, and Keyframes in Cinema 4D

Creating animation using Keyframes and the Timeline is one of the core skills when working in Cinema 4D, or any animation program for that matter. If you are coming from After Effects CC, the Cinema 4D system of animation can have some slight differences. Once you understand these differences on how the timeline and keyframes work, you'll be an animation pro in no time.

In this video, learn how to create Position, Scale, and Rotation keyframes in Cinema 4D Lite. Once we have that down, we'll talk about the full timeline, and how to manipulate timing uses eases and animation curves. We'll also talk about concepts like creating overshoot, and other animation principles. 

Want to learn more about Cinema 4D Lite to get off the ground in 3D?

Learn how to Create a 3D extruded logo in Cinema 4D or Cinema 4D Lite.

Then learn how to Work with Materials and Reflectance textures in Cinema 4D.

Next learn about 3D Lighting and HDRI Sky images in Cinema 4D.

And then learn about Creating Animation, working with Keyframes, and the Cinema 4D Timeline.

Finally, learn some Fancy post-production effects like linking Optical Flares to Cinema 4D Animations.


Like this tutorial? Consider becoming a Patron at Patreon.com/SeanFrangella to get additional benefits such as project files and more! 

To get weekly Motion Graphics, VFX, and 3D animation tutorials be sure to subscribe to the show on YouTube!