CINEMA 4D R21 - TOP 5 NEW FEATURES

Cinema 4D R21 releases in 2019 with some great new features that greatly build on C4D features used for motion graphics, Visual Effects, and more.

The new version of Cinema 4D includes updates to the subscription model of purchasing, a modernized and updated UI, new bevels, force fields for update Mograph and dynamics animation, and much more! Check out the video above to learn about my Top 5 new features in Cinema 4D R21!

Prefer quicker, shorter tutorials on each feature?
Check out these videos!


Want to make Lighting & Reflections in Cinema 4D a snap?

Take a look at 360° Environment Maps Pro for Cinema 4D & Cinema 4D Lite to quickly and easily add lighting and rendering options to your scene. You can also save over 25% on bundle packs!

To see more new features in Cinema 4D, be sure to check out new features in Cinema 4D R19.

And don’t forget to learn about all the new features and updates from Cinema 4D R18.

• Top 5 MoGraph updates and new Effectors for R18
• Voronoi Fracture, a New MoGraph Feature
• Inverted Ambient Occlusion
• Working with the new Thinfilm Shader
• How to use the new Parallax Bump Map Feature
• Using the new Shadow Catcher for 3D Compositing
• Working with the new Substance Materials Workflow

Like this tutorial? Consider becoming a Patron at Patreon.com/SeanFrangella to get additional benefits such as project files and more! 

To get weekly Motion Graphics, VFX, and 3D animation tutorials be sure to subscribe to the show on YouTube!


Create Facebook 3D Posts using 3D Objects from Cinema 4D

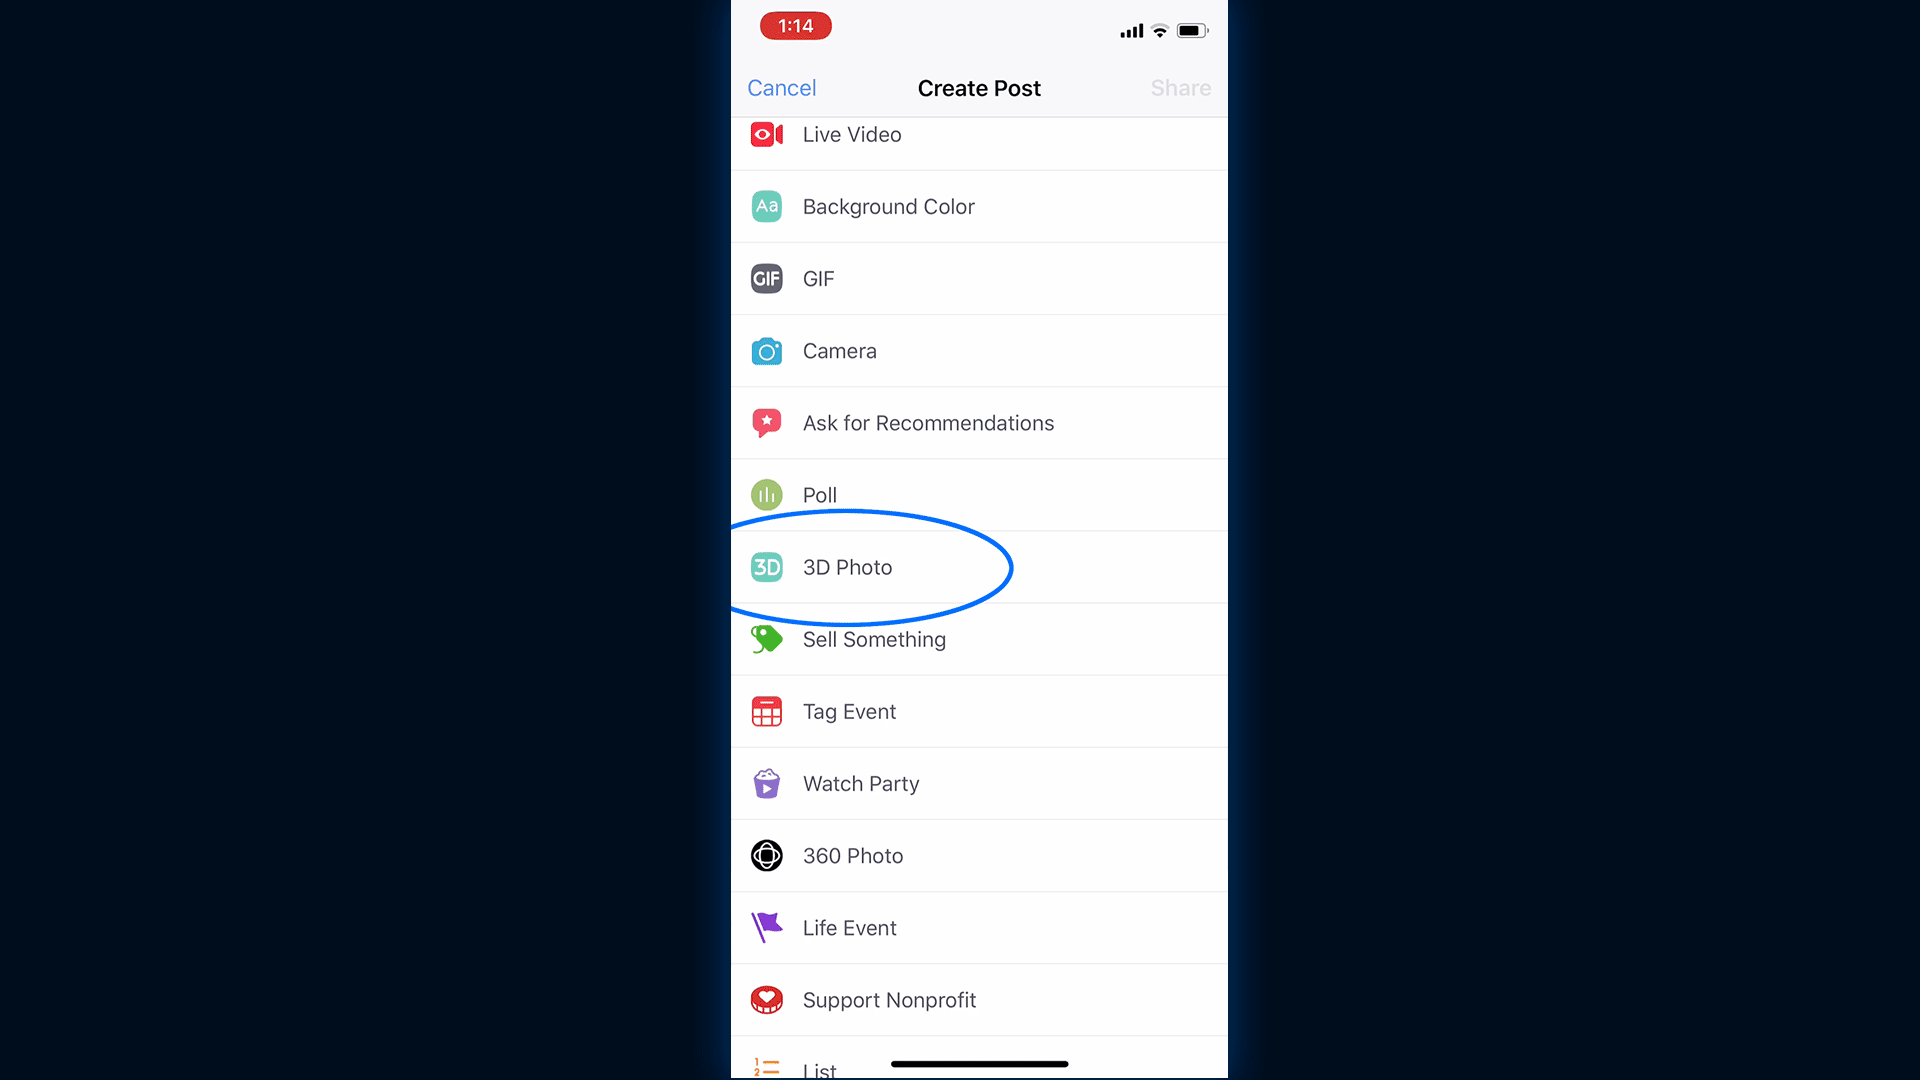
In this tutorial, learn how to create 3D Facebook Posts with 3D objects exported from Cinema 4D. By creating 3D posts on Facebook, users are able to move and rotate an object in full 3D.

When using Cinema 4D, to start, export your 3D object as an OBJ. Once you have an OBJ and the accompanying MTL file, you need to convert those to the GLB file format, which is what Facebook currently uses for 3D posts.

To convert the OBJ to a GLB file, use this website: http://52.4.31.236/convertmodel.html

Check out Facebook’s developer tutorials on 3D posts here: https://developers.facebook.com/docs/...


Want to make Lighting & Reflections in Cinema 4D a snap?

Take a look at 360° Environment Maps Pro for Cinema 4D & Cinema 4D Lite to quickly and easily add lighting and rendering options to your scene. You can also save over 25% on bundle packs!


Looking to create 3D photos using portrait mode on your iPhone and Adobe Photoshop? Check out this quick video below!

To see more features of Cinema 4D, be sure to check out new features in Cinema 4D R18.

• Top 5 MoGraph updates and new Effectors for R18
• Voronoi Fracture, a New MoGraph Feature
• Inverted Ambient Occlusion
• Working with the new Thinfilm Shader
• How to use the new Parallax Bump Map Feature
• Using the new Shadow Catcher for 3D Compositing
• Working with the new Substance Materials Workflow

Like this tutorial? Consider becoming a Patron at Patreon.com/SeanFrangella to get additional benefits such as project files and more! 

To get weekly Motion Graphics, VFX, and 3D animation tutorials be sure to subscribe to the show on YouTube!


Create Facebook 3D Photos using Photoshop and an iPhone

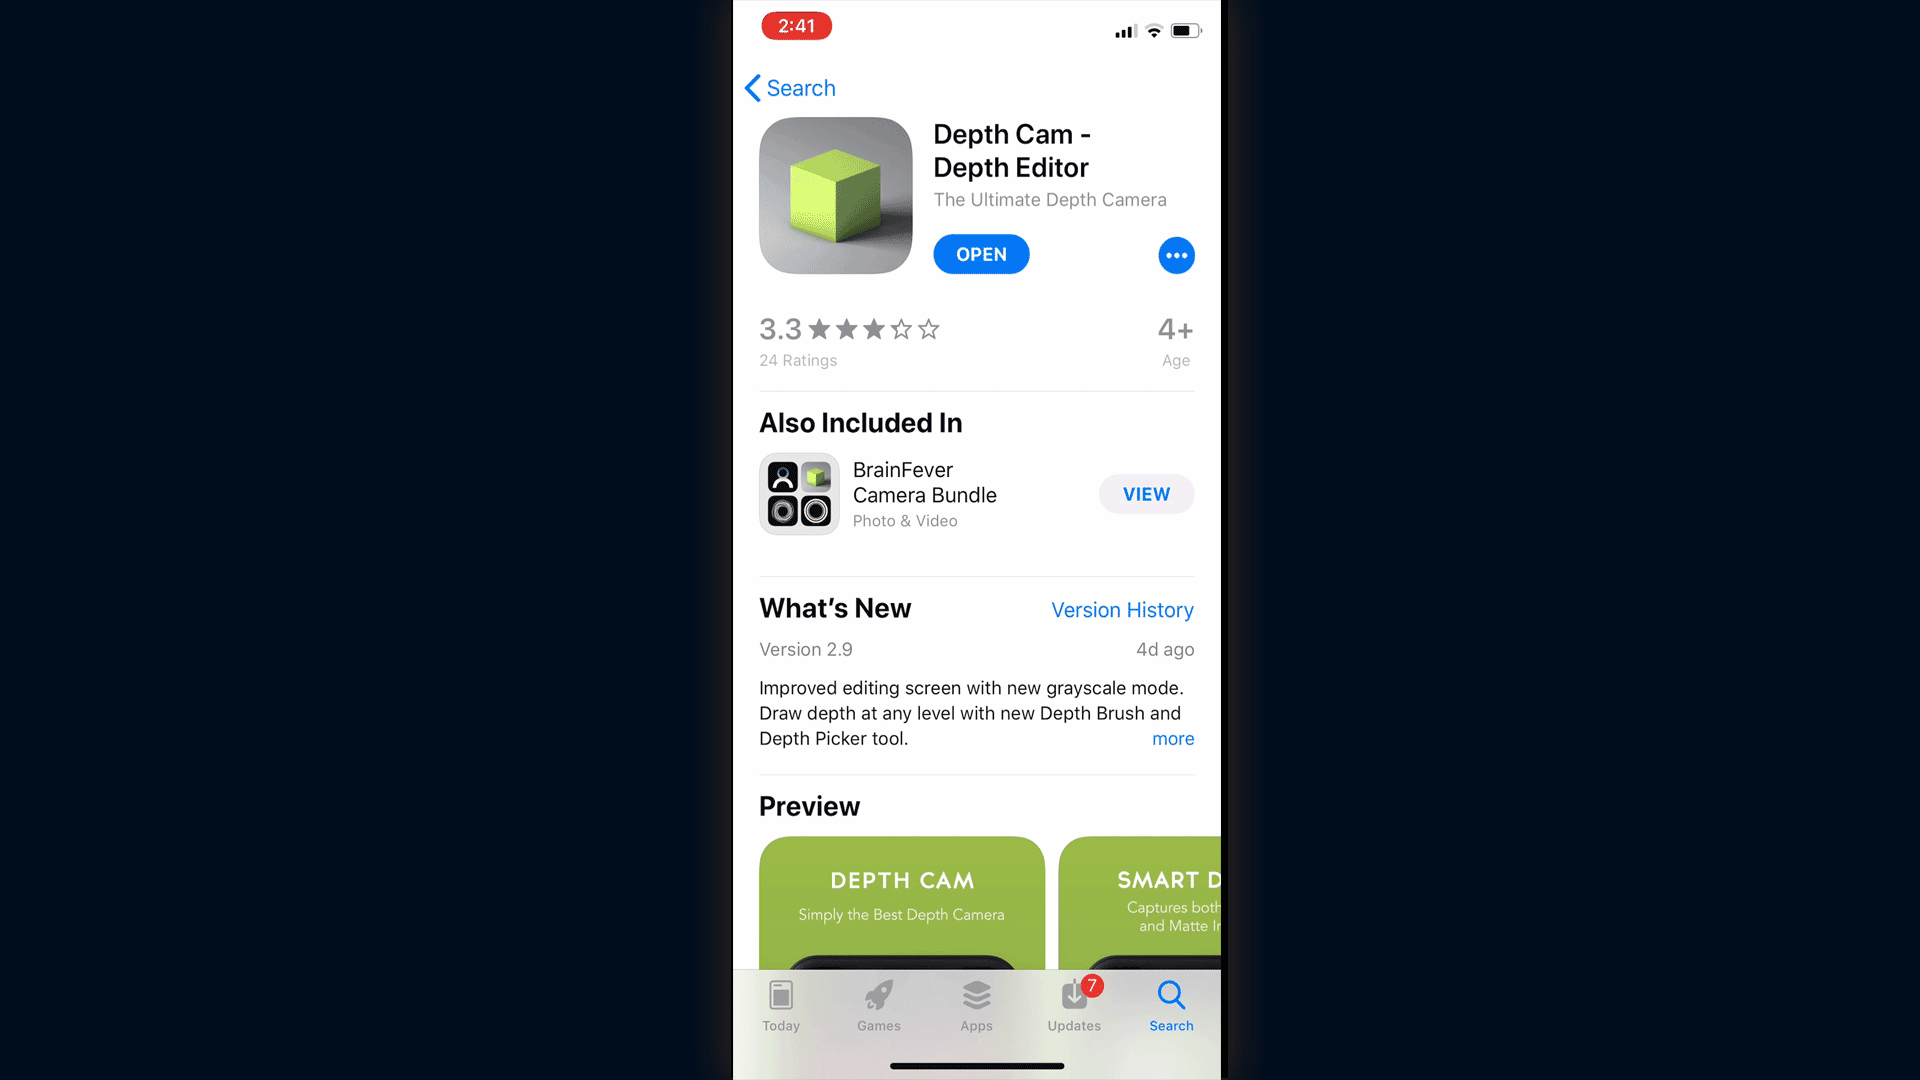
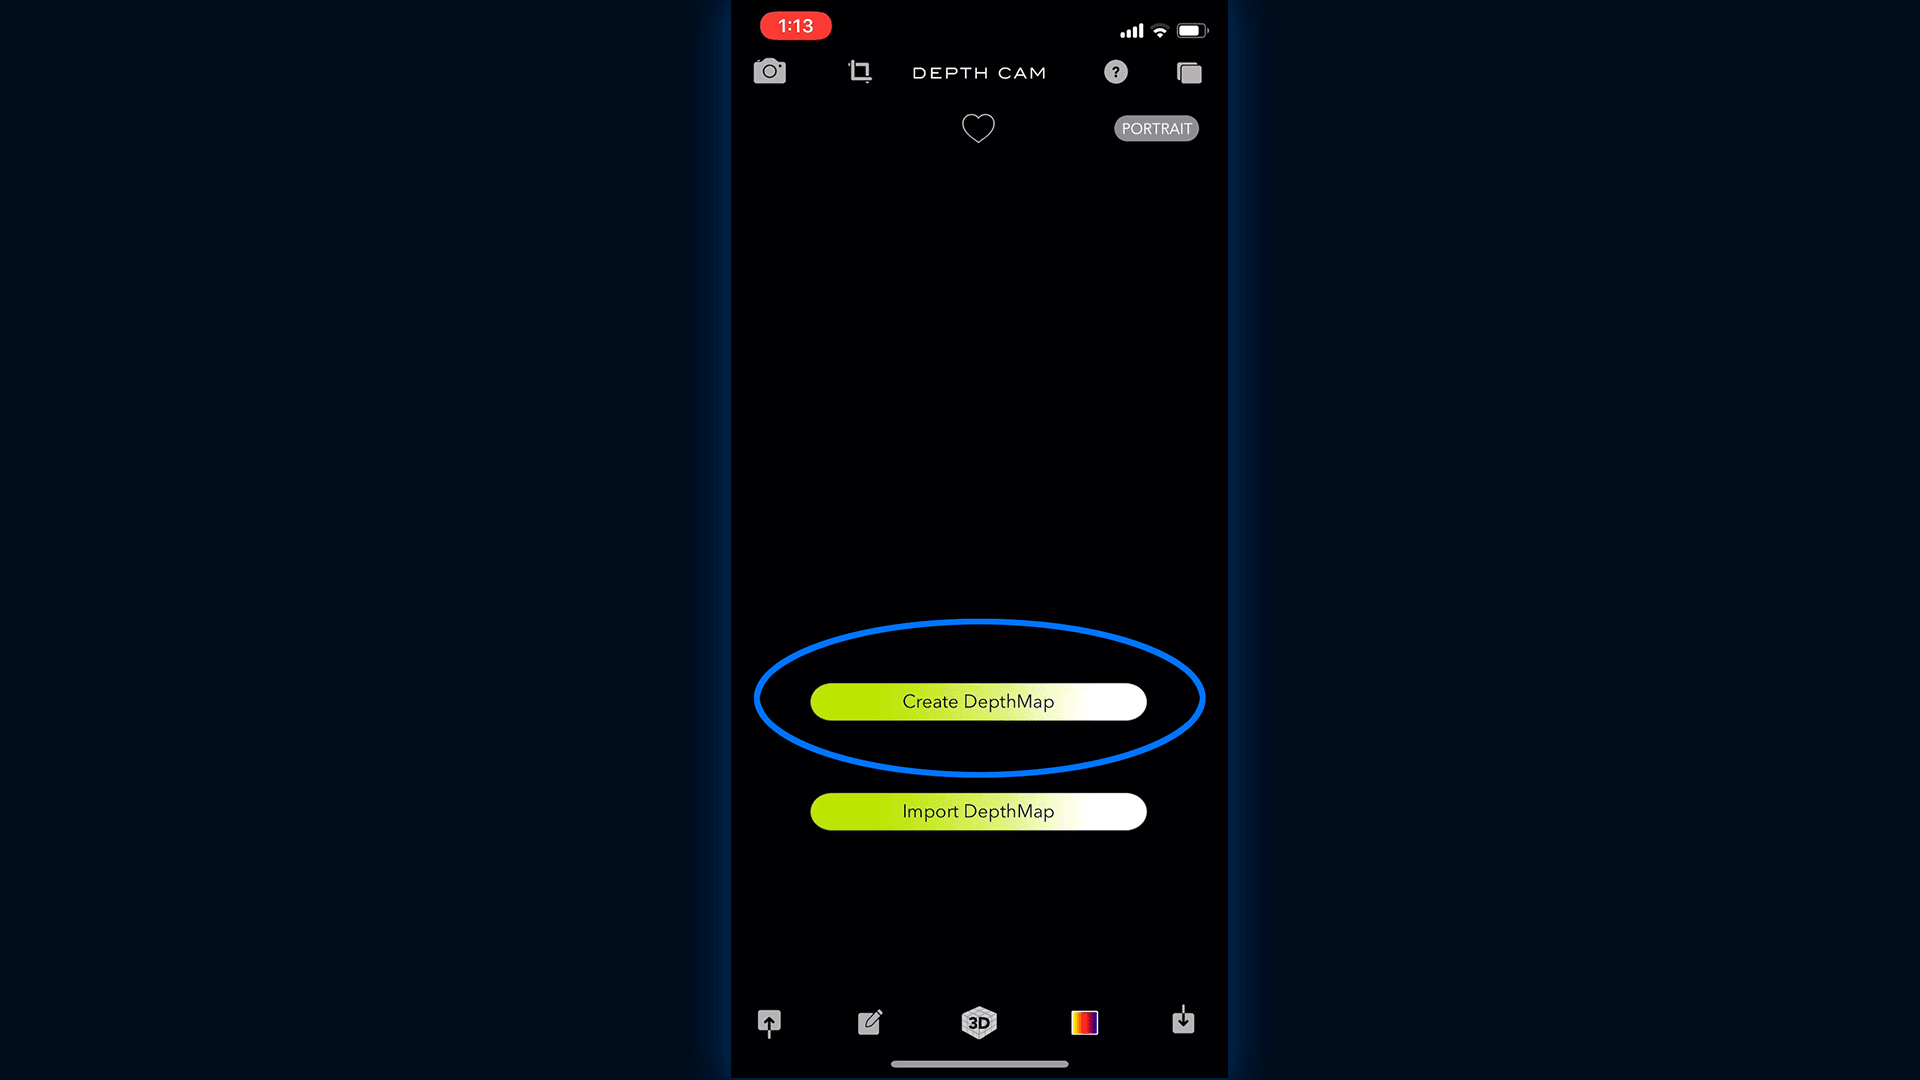
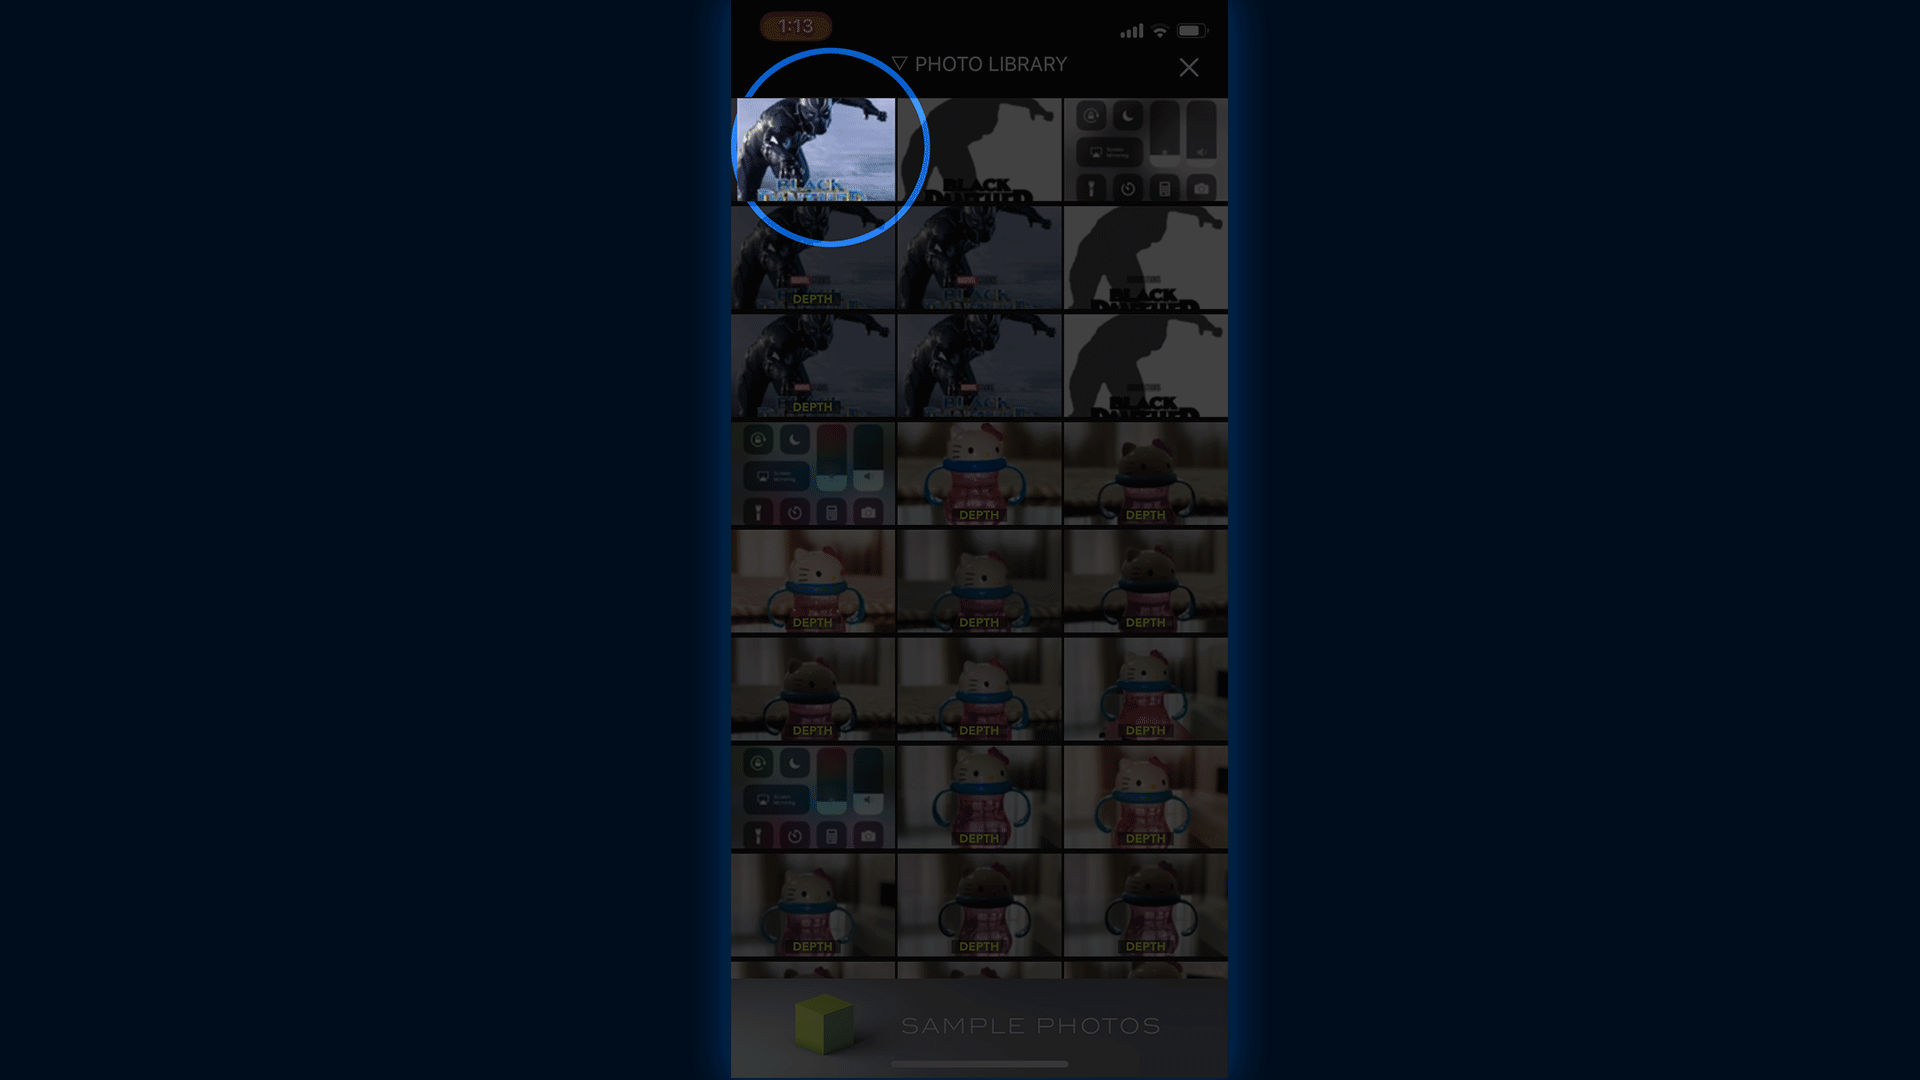
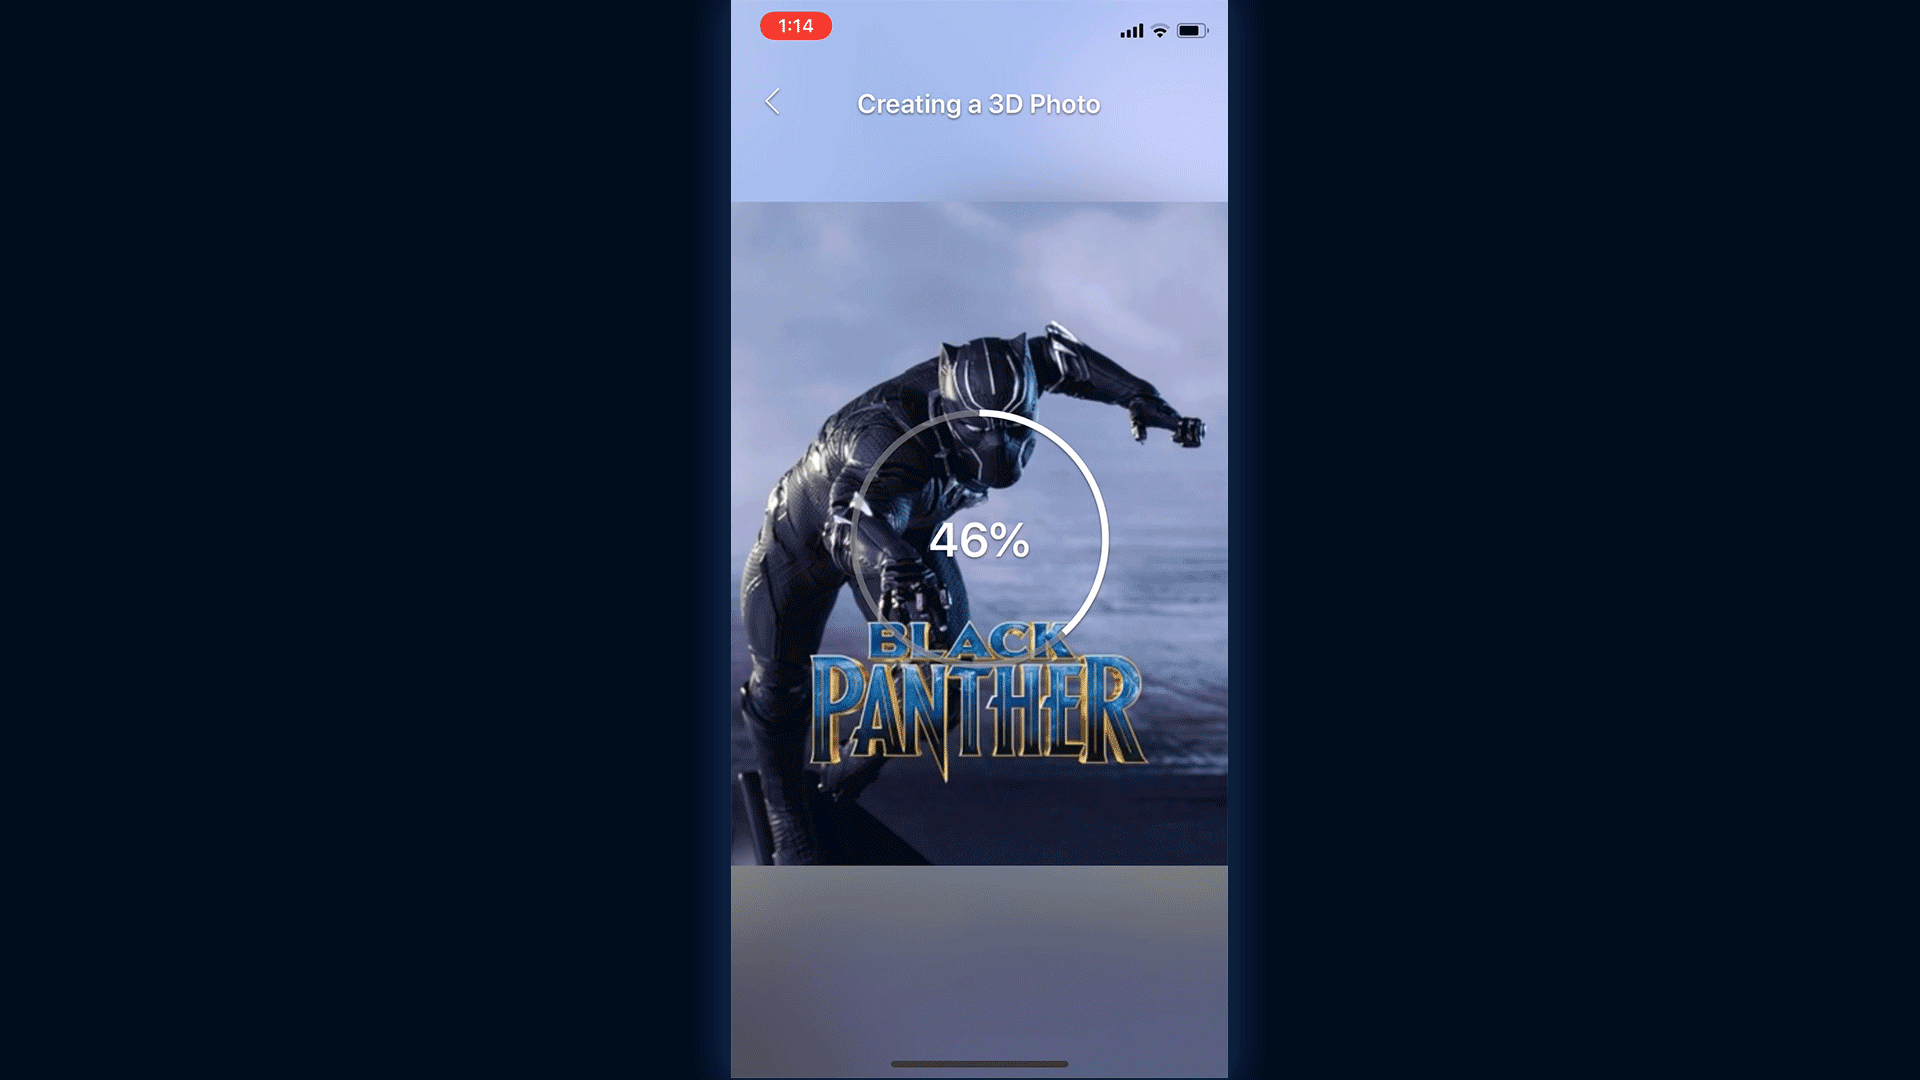
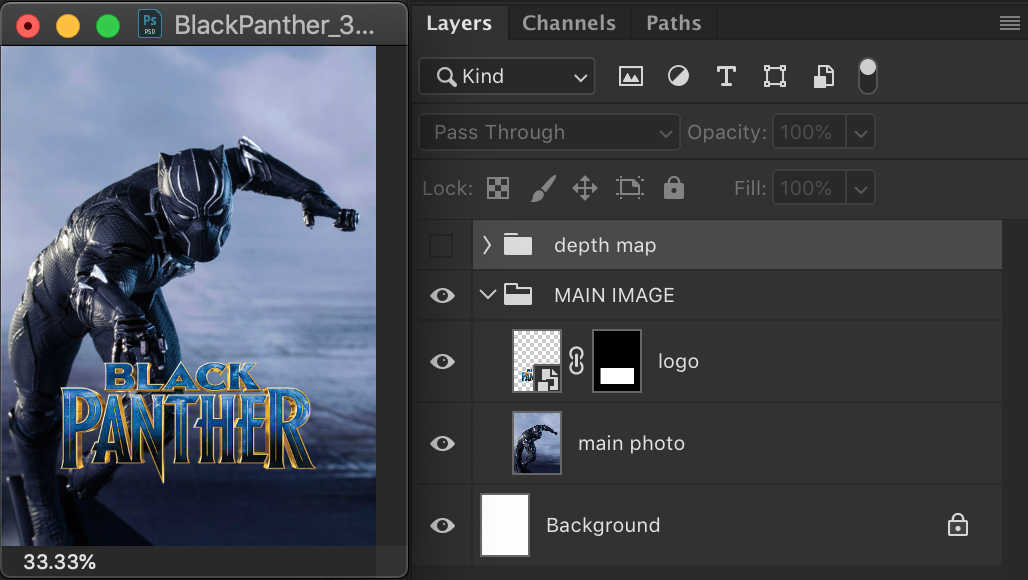
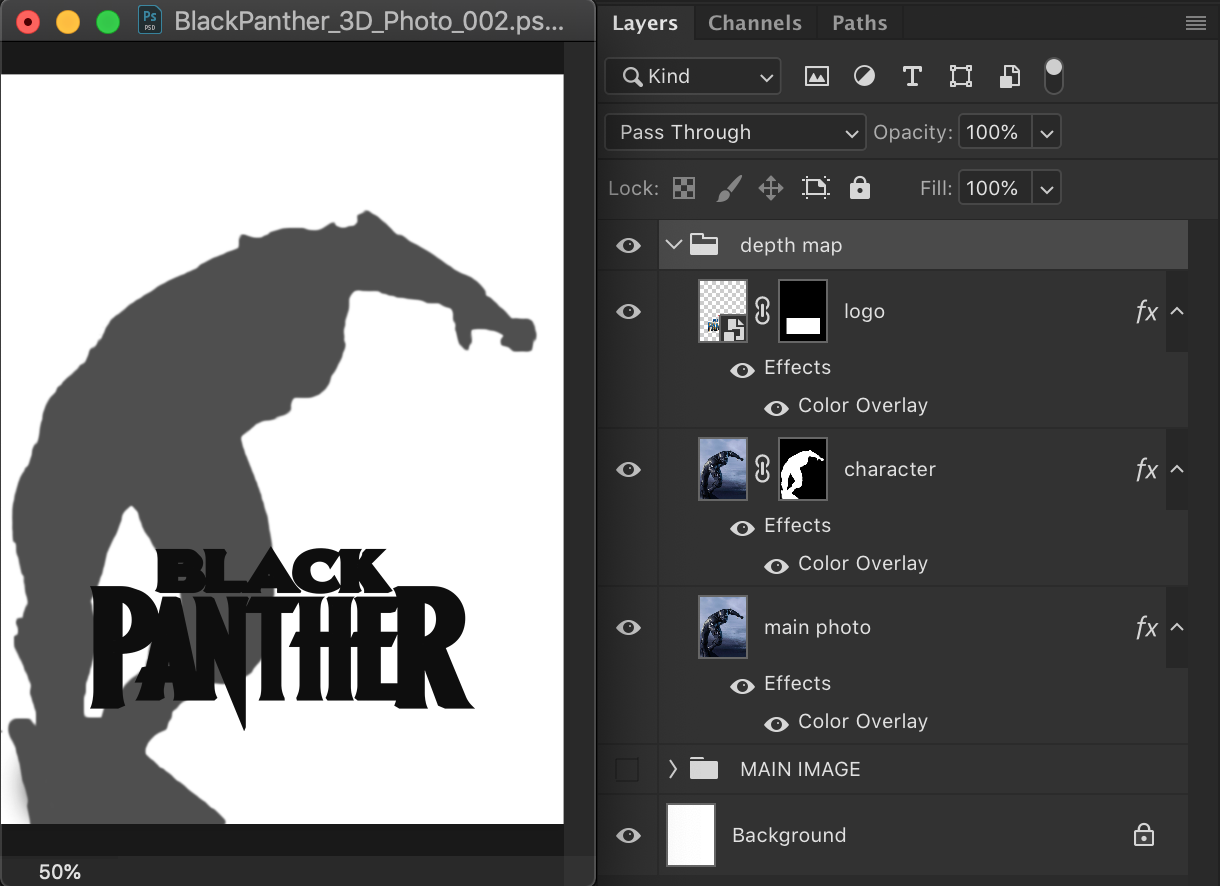
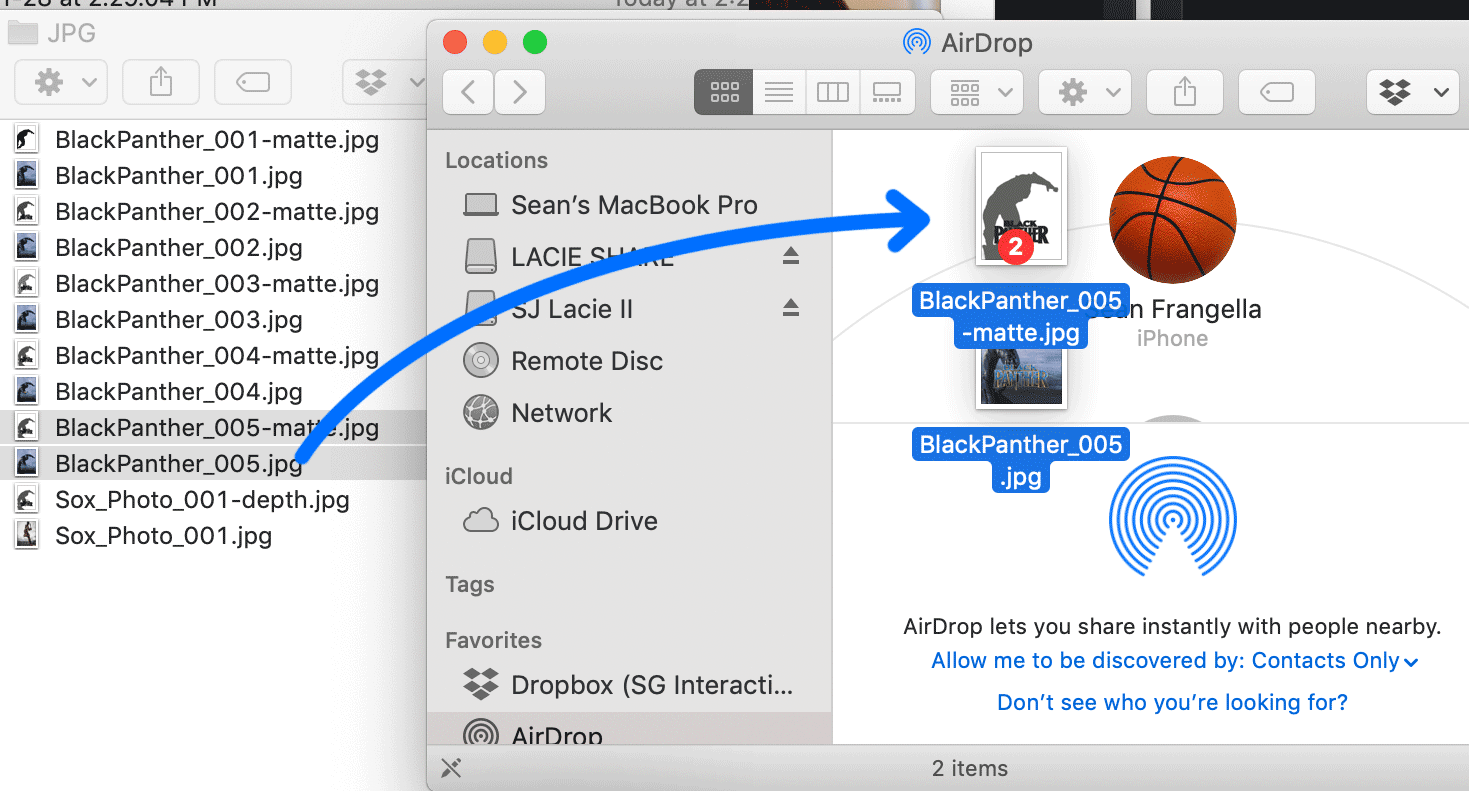
In this tutorial, learn how to create 3D Facebook Photos with layered graphics, using Adobe Photoshop, the Depth Cam iPhone app, and Facebook.

By using Portrait Mode on the iPhone, you can upload photos to Facebook and have them appear as 3D photos, creating an eye-catching parallax effect when users scroll through your feed. But did you know you can create them using graphics, photos, and layered images?

Follow these quick steps to create and upload your own 3D photos to Facebook!


Looking to simply create 3D photos using portrait mode on your iPhone? Check out this quick video below!

Want to make Lighting & Reflections in Cinema 4D a snap?

Take a look at 360° Environment Maps Pro for Cinema 4D & Cinema 4D Lite to quickly and easily add lighting and rendering options to your scene. You can also save over 25% on bundle packs!


Want more info on New Features in Photoshop? Learn more about:

• New Layer Styles in Photoshop CC
• Quick Export to PNG and updates to Save for Web

• New 3D Filter to create bump maps and normal maps for 3D

• Working with Creative Cloud Libraries in Photoshop and other Adobe Apps

To get weekly Motion Graphics, VFX, and 3D animation tutorials be sure to subscribe to the show on YouTube!


CINEMA 4D R19 - TOP 5 NEW FEATURES

Cinema 4D R19 releases in 2017 with some great new features that greatly build on C4D features used for motion graphics, Visual Effects, and 360 Virtual Reality rendering.

This includes major updates to the Voronoi Fracture, a spherical camera for creating 360 VR scenes, scene reconstruction for help with 3D motion tracking, and more! Check out the video above to learn about my Top 5 new features in Cinema 4D R19!

Fracture 2.0 - Gluing fractured pieces

Viewing Depth of Field in the Viewport!

Scene Reconstruction for 3D Tracking helps you composite 3D elements into live action footage

Custom falloff and gluing for Voronoi Fracture in R19

Adjusting falloff for glued fracture pieces

Using a Spherical Camera for 360 VR Renders

The new Sound Effector creating some Musical Mograph Animation

Voronoi Fracturing combined with MoGraph and Dynamics


Want to make Lighting & Reflections in Cinema 4D a snap?

Take a look at 360° Environment Maps Pro for Cinema 4D & Cinema 4D Lite to quickly and easily add lighting and rendering options to your scene. You can also save over 25% on bundle packs!

To see more new features in Cinema 4D, be sure to check out new features in Cinema 4D R18.

• Top 5 MoGraph updates and new Effectors for R18
• Voronoi Fracture, a New MoGraph Feature
• Inverted Ambient Occlusion
• Working with the new Thinfilm Shader
• How to use the new Parallax Bump Map Feature
• Using the new Shadow Catcher for 3D Compositing
• Working with the new Substance Materials Workflow

Like this tutorial? Consider becoming a Patron at Patreon.com/SeanFrangella to get additional benefits such as project files and more! 

To get weekly Motion Graphics, VFX, and 3D animation tutorials be sure to subscribe to the show on YouTube!


3D wireframe animations with Cinema 4D & After Effects

In this Cinema 4D & After Effects CC 2017 Tutorial, learn how to create 3D wireframe animations, beginning with Cinema 4D R18 and adding effects in After Effects. By using this technique you can create the 3d wireframe look seen in film and on TV, and create your own 3D object animations with Cinema 4D and After Effects. This technique also utilizes new techniques for After Effects CC 2017 as well as working with Cinema 4D R18 Studio. This After Effects CC 2017 tutorial is also a great stepping stone to get into 3D animation and motion graphics for After Effects users.

Get Cinema 4D products used in this tutorial:

Want learn more about 3D animation in After Effects? Check out these other tutorials

Use Element 3D V2 in After Effects to create a 3D Logo

Create a 3D extruded logo in After Effects with Cinema 4D Lite


Like this tutorial? Consider becoming a Patron at Patreon.com/SeanFrangella to get additional benefits such as project files and more! 

To get weekly Motion Graphics, VFX, and 3D animation tutorials be sure to subscribe to the show on YouTube!

Looking for the next Tutorial to watch?

Check out the Top 5 Features of Element 3D V2 for After Effects!

Learn about the new 3D Character Creator app, Adobe Fuse!

Learn about the Top 5 new features of Cinema 4D R17!

Learn the Top 5 After Effects Expressions!

Learn how to Recreate the Agengers: Age of Ultron 3D Title Animation!

See how to Combine Element 3D with the new Saber Plug-in!

Learn about the Top 5 Hidden Features of Illustrator CC!

See how to bring Animated 3D Characters into Element 3D!

To check out new features added to Cinema 4D R16!

Check out the Top 5 Tips for Better Camera Animation in After Effects!

Using Expression Effects to Connect Effects in After Effects

In this After Effects CC 2017 Tutorial, learn how to use expressions to connect effects and effect parameters. By using expression linking in After Effects CC 2017, you can easily update multiple layers of animation and effects with one simple change. This technique builds on using the expresions pickwhip to enable connection of effects and parameters, as well as covers using the wiggle expression and other expression techniques.

Get the Element 3D products used in tutorials:

Want learn more about 3D animation in After Effects? Check out these other tutorials

Use Element 3D V2 in After Effects to create a 3D Logo

Create a 3D extruded logo in After Effects with Cinema 4D Lite


Like this tutorial? Consider becoming a Patron at Patreon.com/SeanFrangella to get additional benefits such as project files and more! 

To get weekly Motion Graphics, VFX, and 3D animation tutorials be sure to subscribe to the show on YouTube!

Looking for the next Tutorial to watch?

Check out the Top 5 Features of Element 3D V2 for After Effects!

Learn about the new 3D Character Creator app, Adobe Fuse!

Learn about the Top 5 new features of Cinema 4D R17!

Learn the Top 5 After Effects Expressions!

Learn how to Recreate the Agengers: Age of Ultron 3D Title Animation!

See how to Combine Element 3D with the new Saber Plug-in!

Learn about the Top 5 Hidden Features of Illustrator CC!

See how to bring Animated 3D Characters into Element 3D!

To check out new features added to Cinema 4D R16!

Check out the Top 5 Tips for Better Camera Animation in After Effects!

Create a Bendy Text Animation in After Effects with Element 3D

Element 3D V2 for After Effects added deformers such as bend, taper, and twist, which can be added to any 3D models or extrusions. Check out this new tutorial to learn how to create a bendy text animation using this new feature, as well as other Element 3D tips and tricks.

Get the Element 3D products used in this tutorial:

Want learn more about 3D animation in After Effects? Check out these other tutorials

Use Element 3D V2 in After Effects to create a 3D Logo

Create a 3D extruded logo in After Effects with Cinema 4D Lite


Like this tutorial? Consider becoming a Patron at Patreon.com/SeanFrangella to get additional benefits such as project files and more! 

To get weekly Motion Graphics, VFX, and 3D animation tutorials be sure to subscribe to the show on YouTube!

Looking for the next Tutorial to watch?

Check out the Top 5 Features of Element 3D V2 for After Effects!

Learn about the new 3D Character Creator app, Adobe Fuse!

Learn about the Top 5 new features of Cinema 4D R17!

Learn the Top 5 After Effects Expressions!

Learn how to Recreate the Agengers: Age of Ultron 3D Title Animation!

See how to Combine Element 3D with the new Saber Plug-in!

Learn about the Top 5 Hidden Features of Illustrator CC!

See how to bring Animated 3D Characters into Element 3D!

To check out new features added to Cinema 4D R16!

Check out the Top 5 Tips for Better Camera Animation in After Effects!

Create a 3D Logo in After Effects CC 2017 with the new Cinema 4D Renderer

With the release of Creative Cloud 2017, After Effects introduces yet another option to create 3D extrusions and 3D logos. As a quick alternative to jumping into Cinema 4D Lite and creating a full 3D logo and 3D scene, you can now create extrusions from shape layers right in After Effects CC 2017 using the new Cinema 4D Render engine. This new features lets you extrude shape layers and text, add materials, and create environment layers, without needing to leave After Effects. 

Check out more new features for Creative Cloud 2017

3D Titles in After Effects CC 2017 with the Cinema 4D Renderer

Live Text Templates in After Effects CC 2017 for Premiere Pro

To easily create 3D reflections in After Effects, check out these 360° Environment Map Products!


Want another way to work in 3D in After Effects? Check out these other tutorials

Create a 3D extruded logo in After Effects with Cinema 4D Lite

Use Element 3D V2 in After Effects to create a 3D Logo


Like this tutorial? Consider becoming a Patron at Patreon.com/SeanFrangella to get additional benefits such as project files and more! 

To get weekly Motion Graphics, VFX, and 3D animation tutorials be sure to subscribe to the show on YouTube!

Looking for the next Tutorial to watch?

Check out the Top 5 Features of Element 3D V2 for After Effects!

Learn about the new 3D Character Creator app, Adobe Fuse!

Learn about the Top 5 new features of Cinema 4D R17!

Learn the Top 5 After Effects Expressions!

Learn how to Recreate the Agengers: Age of Ultron 3D Title Animation!

See how to Combine Element 3D with the new Saber Plug-in!

Learn about the Top 5 Hidden Features of Illustrator CC!

See how to bring Animated 3D Characters into Element 3D!
To check out new features added to Cinema 4D R16!

Check out the Top 5 Tips for Better Camera Animation in After Effects!

Create 3D Titles in After Effects CC 2017 with the Cinema 4D Renderer

After Effects CC 2017 introduces the new Cinema 4D renderer natively in After Effects, allowing you to create 3D extruded text and shape layers, without needing to leave After Effects. This new feature replaces the legacy ray-traced renderer, utilizing Cinema 4D to render 3D elements under the hood. This new system allows you to extrude vector & text assets, create basic 3D materials, and create environment layers to add to 3D reflections.


Check out more new features for Creative Cloud 2017

Create a 3D Logo in After Effects CC 2017 with the Cinema 4D Renderer

Live Text Templates in After Effects CC 2017 for Premiere Pro
 

To easily create 3D reflections in After Effects, check out these 360° Environment Map Products!


Like this tutorial? Consider becoming a Patron at Patreon.com/SeanFrangella to get additional benefits such as project files and more! 

To get weekly Motion Graphics, VFX, and 3D animation tutorials be sure to subscribe to the show on YouTube!

Looking for the next Tutorial to watch?

Check out the Top 5 Features of Element 3D V2 for After Effects!

Learn about the new 3D Character Creator app, Adobe Fuse!

Learn about the Top 5 new features of Cinema 4D R17!

Learn the Top 5 After Effects Expressions!

Learn how to Recreate the Agengers: Age of Ultron 3D Title Animation!

See how to Combine Element 3D with the new Saber Plug-in!

Learn about the Top 5 Hidden Features of Illustrator CC!

See how to bring Animated 3D Characters into Element 3D!
To check out new features added to Cinema 4D R16!

Check out the Top 5 Tips for Better Camera Animation in After Effects!

Live Text Templates with After Effects & Premiere Pro CC 2017

With the update to Creative Cloud 2017 comes a really cool new feature for After Effects and Premiere Pro: Live Text Templates. With live text templates, you can create text animations in After Effects, and then import the project as a template in Premiere Pro, where you can easily replace text fields. This allows you to create re-useable templates for an entire editing project, without needing to re-render each text animation separately. Check out the video above to learn how this new feature for After Effects CC 2017 works!

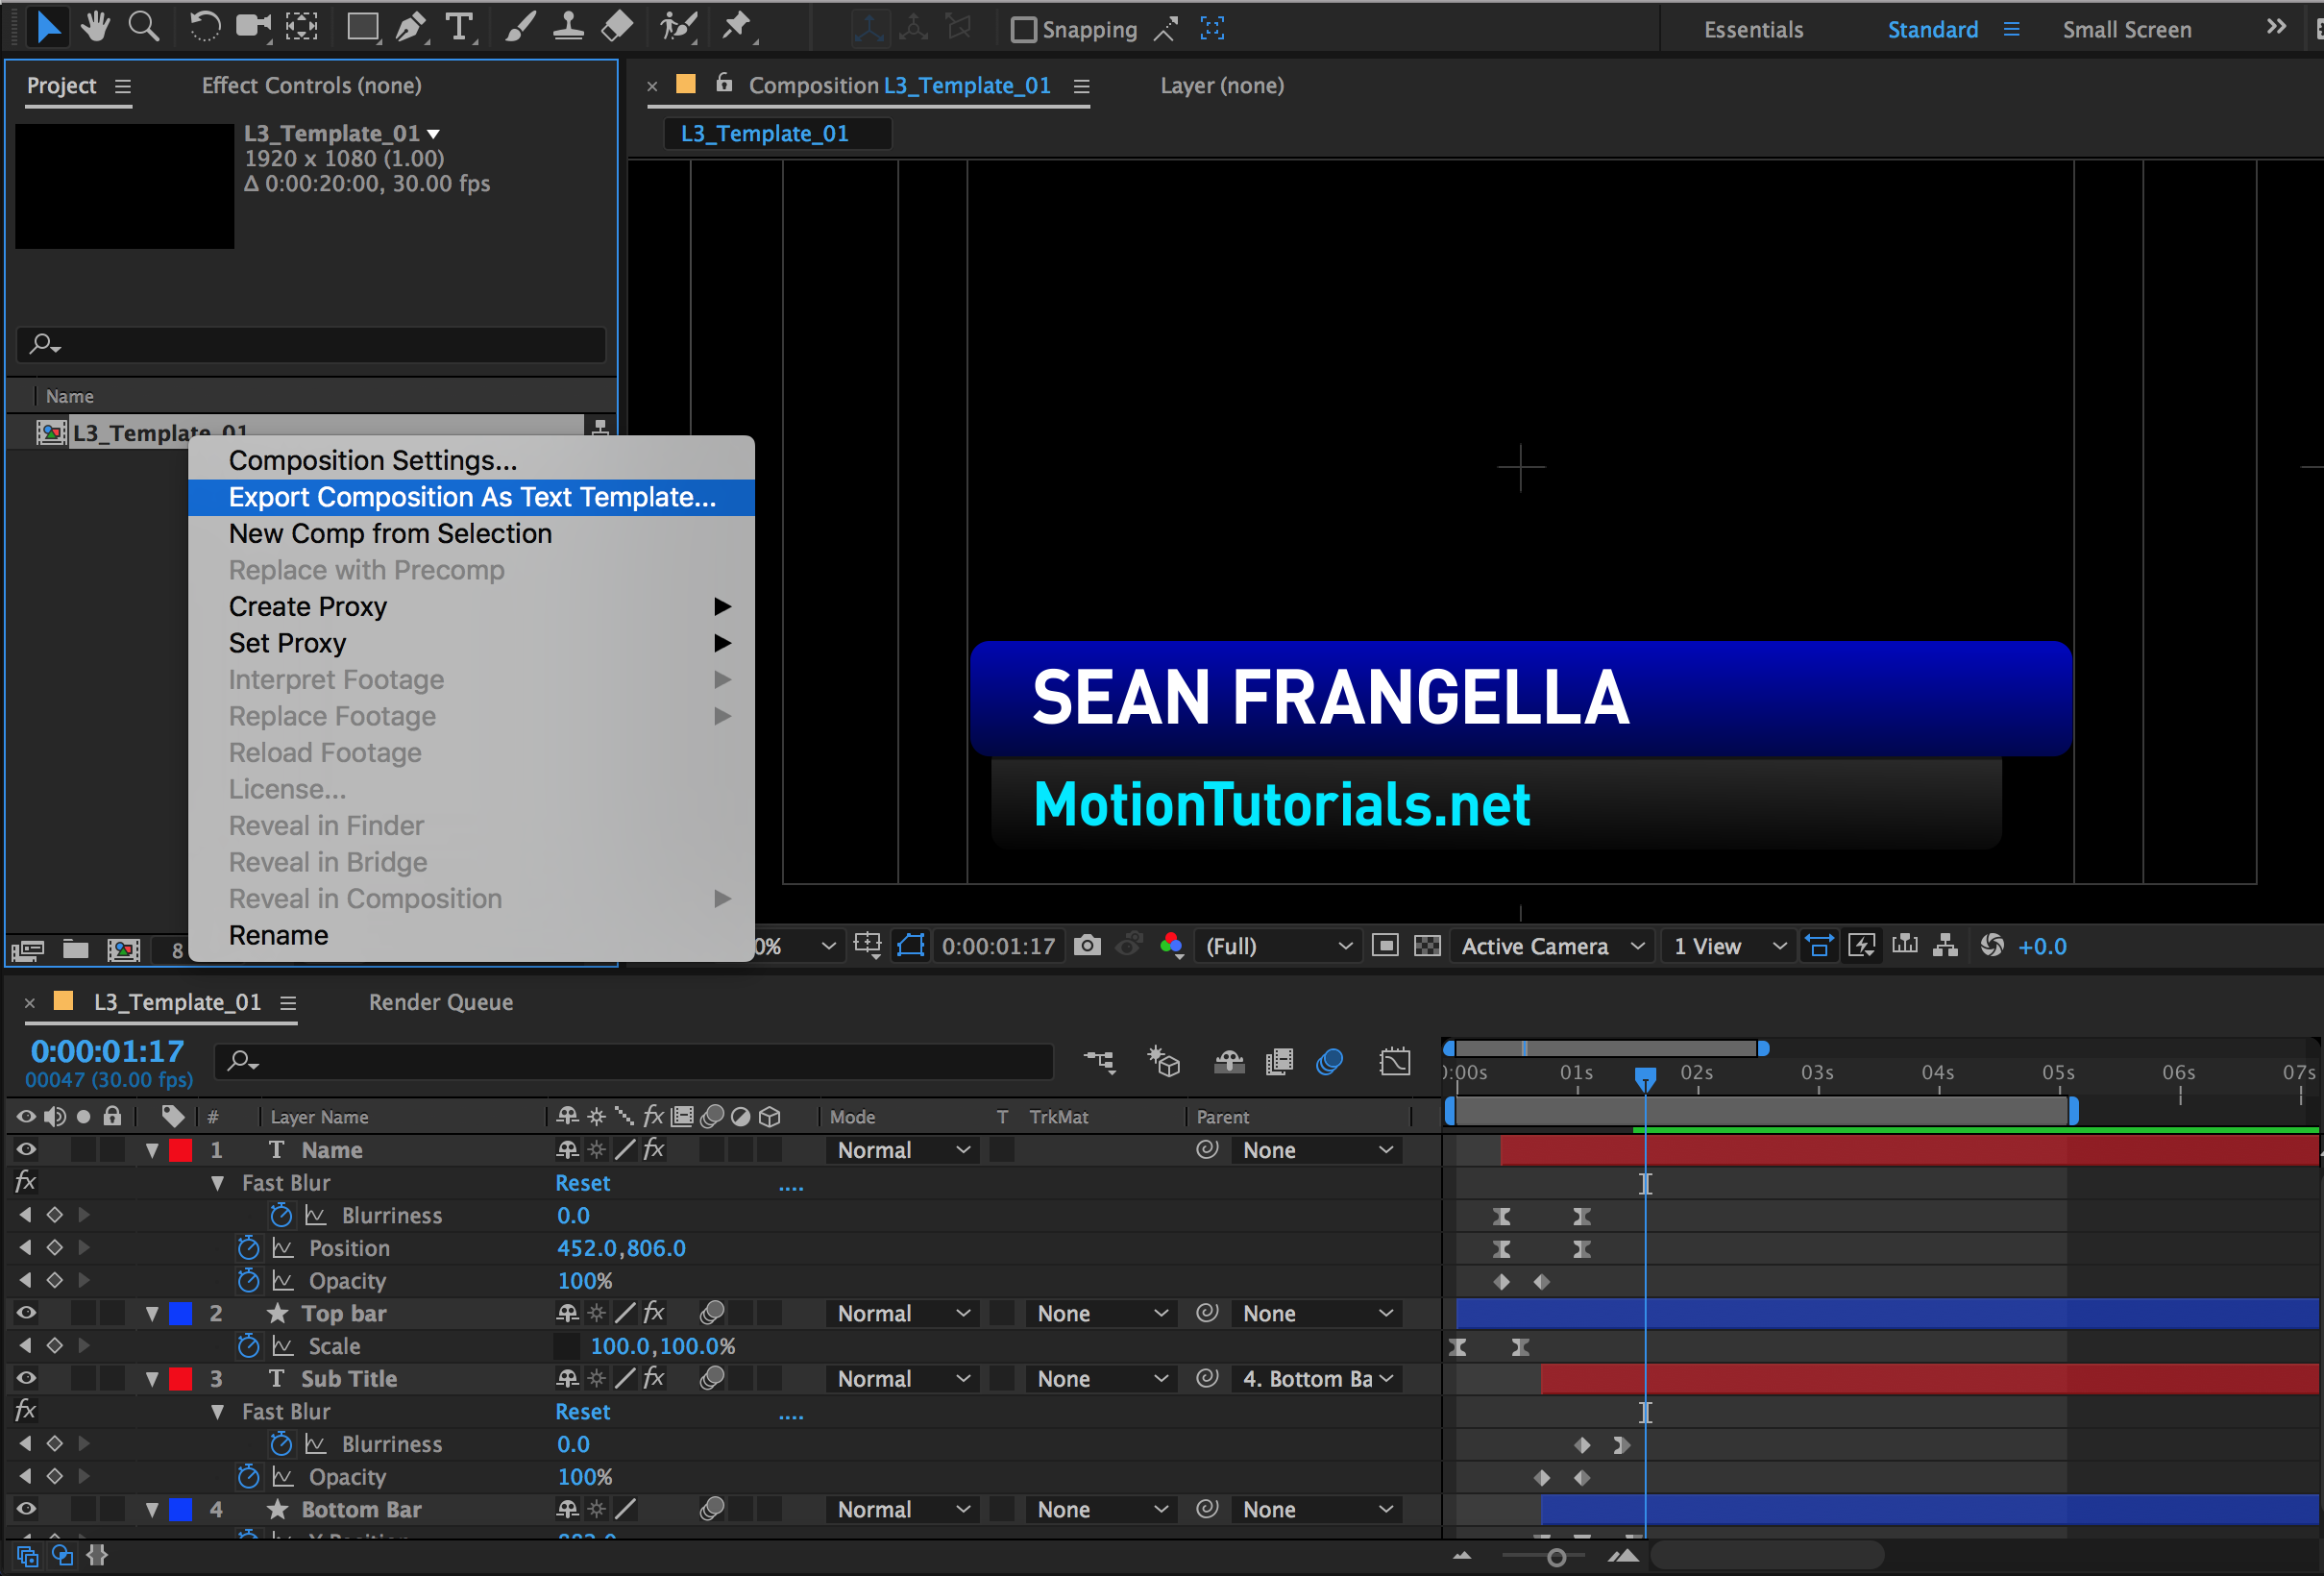
In the After Effects Project window, right-click a composition and selection "Export Composition as Text Template."

In the After Effects Project window, right-click a composition and selection "Export Composition as Text Template."

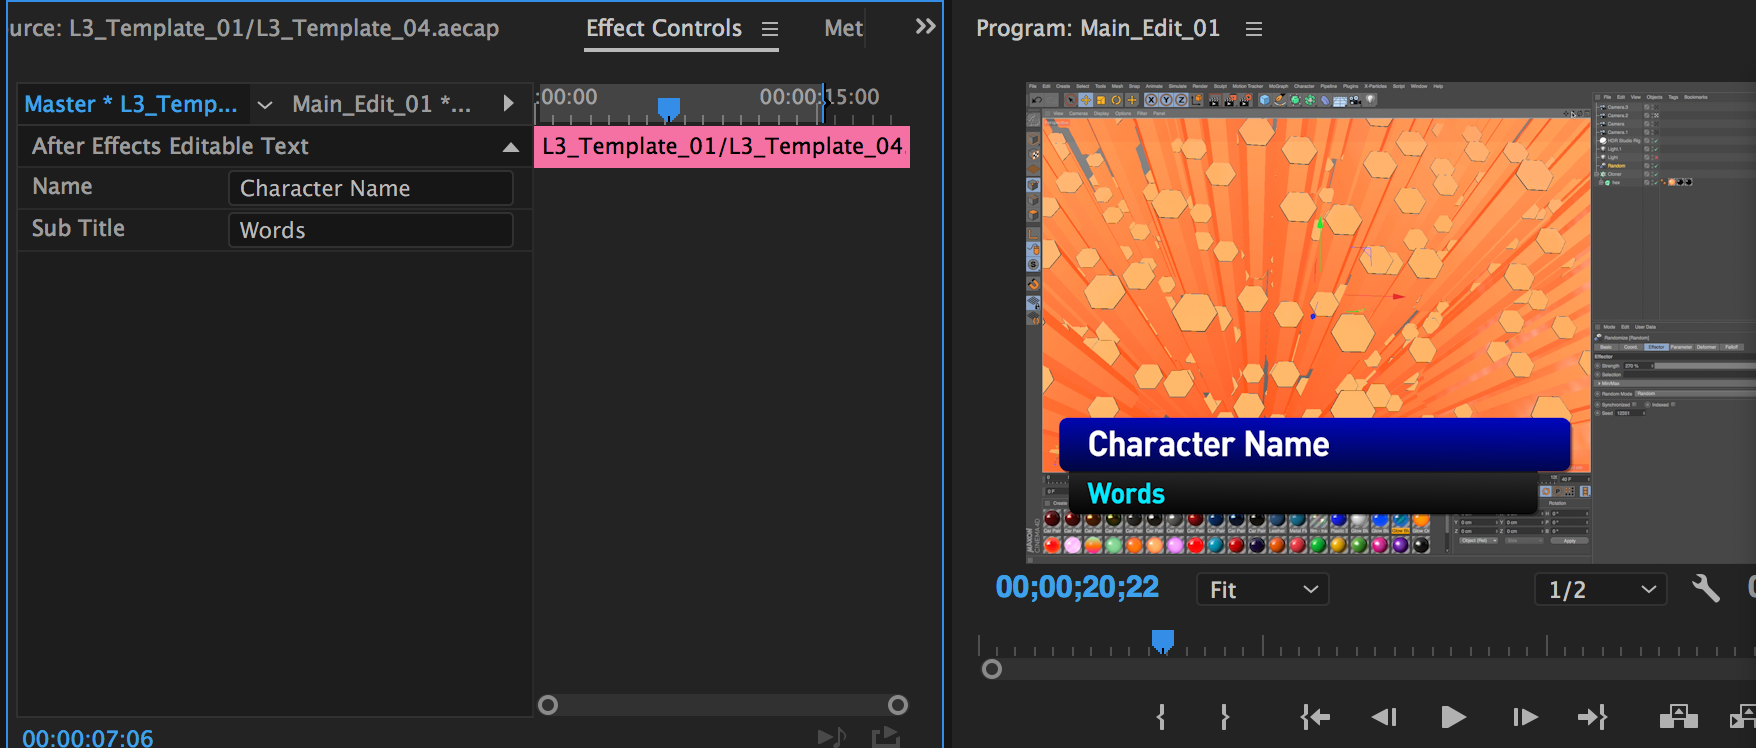
In the Source Monitor within Premiere Pro, select "Master" under the Effects Controls tab, and you can replace editable text fields.

In the Source Monitor within Premiere Pro, select "Master" under the Effects Controls tab, and you can replace editable text fields.


Check out more new features for Creative Cloud 2017

3D Titles in After Effects CC 2017 with the Cinema 4D Renderer

Create a 3D Logo in After Effects CC 2017 with the Cinema 4D Renderer

Speed up your Motion Graphics work with these After Effects 3D Products!


Like this tutorial? Consider becoming a Patron at Patreon.com/SeanFrangella to get additional benefits such as project files and more! 

To get weekly Motion Graphics, VFX, and 3D animation tutorials be sure to subscribe to the show on YouTube!

Looking for the next Tutorial to watch?

Check out the Top 5 Features of Element 3D V2 for After Effects!

Learn about the new 3D Character Creator app, Adobe Fuse!

Learn about the Top 5 new features of Cinema 4D R17!

Learn the Top 5 After Effects Expressions!

Learn how to Recreate the Agengers: Age of Ultron 3D Title Animation!

See how to Combine Element 3D with the new Saber Plug-in!

Learn about the Top 5 Hidden Features of Illustrator CC!

See how to bring Animated 3D Characters into Element 3D!
To check out new features added to Cinema 4D R16!
Check out the Top 5 Tips for Better Camera Animation in After Effects!

Cinema 4D R18 - Top 5 New Features

One of the most exciting times of the year for working in the 3D graphics industry is the release of new software and getting to play around with all of the new features. With the update to Cinema 4D R18, there are a ton of fun new features to dive into, including a massive amount of MoGraph updates, the new Voronoi Fracture, the Thinfilm ShaderInverted Ambient OcclusionParallax Bump Mapping, and more! Check out the video above to get a quick rundown of some of the top new features, and be sure to get a deeper look at each new feature in the additional R18 articles below.

The new Thinfilm Shader applied to a cloner inside a MetaBall Object

The new Honeycomb Array Cloner applied to 3D objects textured with a Variation Shader

The Voronoi Fracture applied to 3D skulls, with a ThinFilm Shader added to a Reflectance material

The new Push-Apart Effector applied to 3D text in a Voronoi Fracture, rendered using Substance Materials


Want to make Lighting & Reflections in Cinema 4D a snap?

Take a look at 360° Environment Maps Pro for Cinema 4D & Cinema 4D Lite to quickly and easily add lighting and rendering options to your scene. You can also save over 25% on bundle packs!

To take a deeper look at new features in Cinema 4D R18, be sure to check out some of these additional articles focusing on other updates and new features for R18:

• Top 5 MoGraph updates and new Effectors for R18
• Voronoi Fracture, a New MoGraph Feature
• Inverted Ambient Occlusion
• Working with the new Thinfilm Shader
• How to use the new Parallax Bump Map Feature
• Using the new Shadow Catcher for 3D Compositing
• Working with the new Substance Materials Workflow

Like this tutorial? Consider becoming a Patron at Patreon.com/SeanFrangella to get additional benefits such as project files and more! 

To get weekly Motion Graphics, VFX, and 3D animation tutorials be sure to subscribe to the show on YouTube!


Cinema 4D R18 - Top 5 MoGraph Updates & New Features

One of the biggest updates to Cinema 4D R18 is all of the new MoGraph updates. These include the new Voronoi Fracture object, as well as the hexagon cloner setting, the push-apart effector and other effectors, new cloner features such as Scaling and Weight-Painting, and more! The new MoGraph updates are going to greatly improvement working with animation for R18, so be sure to check out the video to learn all about the Top 5 MoGraph updates, and check out the additional video on the new Voronoi Fracture Object. And check out the renders below to get an idea of what you can do with the new Mograph Tools for Cinema 4D R18!

The Hexagon Cloner setting combined with the Variation Shader

The Voronoi Fracture feature applied to extruded 3D text

The Hexagon Cloner setting combined with the Variation Shader

The Voronoi Fracture feature combined with Inverted Ambient Occlusion

Want to make Lighting & Reflections in Cinema 4D a snap?

Take a look at 360° Environment Maps Pro for Cinema 4D & Cinema 4D Lite to quickly and easily add lighting and rendering options to your scene. You can also save over 25% on bundle packs!

To take a deeper look at new features in Cinema 4D R18, be sure to check out some of these additional articles focusing on other updates and new features for R18:

• Top 5 New Features of R18
• Voronoi Fracture, a New MoGraph Feature
• Inverted Ambient Occlusion
• Working with the new Thinfilm Shader
• How to use the new Parallax Bump Map Feature
• Using the new Shadow Catcher for 3D Compositing
• Working with the new Substance Materials Workflow

Get an overview of each R18 MoGraph update individually in the videos below

Like this tutorial? Consider becoming a Patron at Patreon.com/SeanFrangella to get additional benefits such as project files and more! 

To get weekly Motion Graphics, VFX, and 3D animation tutorials be sure to subscribe to the show on YouTube!


Cinema 4D R18 - Voronoi Fracture, New MoGraph Feature

With the new Voronoi Fracture, you can fracture and break apart 3D objects, all in Cinema 4D R18, without the need for any external plug-ins. With the Voronoi Fracture, you can break objects into thousands of pieces, then use R18 MoGraph Effectors to displace, disperse, and animate the pieces. You can even apply the Voronoi Fracture to hierarchies of 3D objects, such as 3D extruded text with multiple materials. Check out the video above to learn all about this new feature, and take a look at the renders below to see the Voronoi Fracture used in combination with other updates to R18!

Voronoi Fracture applied to extruded 3D text with different Cap & Bevel Materials

Voronoi Fracture animated using R18 MoGraph Effectors with a smooth falloff

Voronoi Fracture with a Thinfilm Shader Material, rendered with Inverted AO

Fractured pieces randomized with a random effector and the new push-apart effector

Want to make Lighting & Reflections in Cinema 4D a snap?

Take a look at 360° Environment Maps Pro for Cinema 4D & Cinema 4D Lite to quickly and easily add lighting and rendering options to your scene. You can also save over 25% on bundle packs!

To take a deeper look at new features in Cinema 4D R18, be sure to check out some of these additional articles focusing on other updates and new features for R18:

• Top 5 New Features of R18
• MoGraph updates and new Effectors for R18
• Inverted Ambient Occlusion
• Working with the new Thinfilm Shader
• How to use the new Parallax Bump Map Feature
• Using the new Shadow Catcher for 3D Compositing
• Working with the new Substance Materials Workflow

Like this tutorial? Consider becoming a Patron at Patreon.com/SeanFrangella to get additional benefits such as project files and more! 

To get weekly Motion Graphics, VFX, and 3D animation tutorials be sure to subscribe to the show on YouTube!


Cinema 4D R18 - Working with the New Thinfilm Shader

The new Thinfilm shader is a new really colorful addition to materials in Cinema 4D R18. This new shader setting allows you to simulate a thin film on top of a material, which can result in a rainbow oil look, or soap bubbles when created with a transparent material.

The ThinFilm shader can be added with just a few steps, so check out the video above to learn the process to set it up, and be sure to take a look at the screenshots below for some examples on how the new ThinFilm shader can create amazing artwork in Cinema 4D R18.

Completely transparent thinFilm shaders applied to MetaBall Objects

ThinFilm Shader applied on top of a reflective material, combined with Voronoi Fracture

Want to make Lighting & Reflections in Cinema 4D a snap?

Take a look at 360° Environment Maps Pro for Cinema 4D & Cinema 4D Lite to quickly and easily add lighting and rendering options to your scene. You can also save over 25% on bundle packs!

To take a deeper look at new features in Cinema 4D R18, be sure to check out some of these additional articles focusing on other updates and new features for R18:

• Top 5 New Features of R18
• MoGraph updates and new Effectors for R18
• Voronoi Fracture, a New MoGraph Feature
• Inverted Ambient Occlusion
• How to use the new Parallax Bump Map Feature
• Using the new Shadow Catcher for 3D Compositing
• Working with the new Substance Materials Workflow

Like this tutorial? Consider becoming a Patron at Patreon.com/SeanFrangella to get additional benefits such as project files and more! 

To get weekly Motion Graphics, VFX, and 3D animation tutorials be sure to subscribe to the show on YouTube!


Cinema 4D R18 - Shadow Catcher, a new Material for 3D Compositing

When doing full 3D compositing with Cinema 4D, one of the trickiest things to achieve is casting shadows from 3D objects onto a background plate, in order to create the illusion that 3D objects are sitting on the surface and casting correct shadows. In the past, I've created other videos on how to achieve this, including using a Multi-Pass workflow with a separate pass for shadows, as well as Using the Composite Background in the Compositing Tag to achieve this result. The new Shadow Catcher in Cinema 4D R18 introduces another workflow to achieve this result.

The shadow catcher in C4D R18 is a new shader option in the materials manager. Once created, you can apply it to a ground plane, so when you render a 3D scene, shadows will be rendered on an alpha channel. You can also use the R18 Shadow Catcher to catch reflections. By using this method, 3D renders and footage can be composited together in Photoshop or After Effects, with shadows present in the Cinema 4D render.


Want to make Lighting & Reflections in Cinema 4D a snap?

Take a look at 360° Environment Maps Pro for Cinema 4D & Cinema 4D Lite to quickly and easily add lighting and rendering options to your scene. You can also save over 25% on bundle packs!

To take a deeper look at new features in Cinema 4D R18, be sure to check out some of these additional articles focusing on other updates and new features for R18:

• Top 5 New Features of R18
MoGraph updates and new Effectors for R18
• Voronoi Fracture, a New MoGraph Feature
• Inverted Ambient Occlusion
• Working with the new Thinfilm Shader
• How to use the new Parallax Bump Map Feature
• Using the Substance Materials Workflow

Like this tutorial? Consider becoming a Patron at Patreon.com/SeanFrangella to get additional benefits such as project files and more! 

To get weekly Motion Graphics, VFX, and 3D animation tutorials be sure to subscribe to the show on YouTube!


Cinema 4D R18 - Inverted Ambient Occlusion

With the new Inverted Ambient Occlusion setting in Cinema 4D R18, you can take a simple concept and get wildly different results. In the render settings, when you turn on Ambient Occlusion to get more realistic shadows, there is now a checkbox for "Invert Direction," which will push AO shadows inside of objects, instead of creating contact shadows outside of objects. This can be useful for mimicking sub-surface scattering without blowing up render time, and also to create some pretty unique results when you tweak the color and render settings.

Pink inverse AO combined with the new MoGraph Voronoi Fracture

Purple inverse AO combined with the new MoGraph Voronoi Fracture

Want to make Lighting & Reflections in Cinema 4D a snap?

Take a look at 360° Environment Maps Pro for Cinema 4D & Cinema 4D Lite to quickly and easily add lighting and rendering options to your scene. You can also save over 25% on bundle packs!

To take a deeper look at new features in Cinema 4D R18, be sure to check out some of these additional articles focusing on other updates and new features for R18:

• Top 5 New Features of R18
• MoGraph updates and new Effectors for R18
• Voronoi Fracture, a New MoGraph Feature
• Working with the new Thinfilm Shader
• How to use the new Parallax Bump Map Feature
• Using the new Shadow Catcher for 3D Compositing
• Working with the new Substance Materials Workflow

Like this tutorial? Consider becoming a Patron at Patreon.com/SeanFrangella to get additional benefits such as project files and more! 

To get weekly Motion Graphics, VFX, and 3D animation tutorials be sure to subscribe to the show on YouTube!


Cinema 4D R18 - How to use the new Parallax Bump Map Feature

Using bump maps in Cinema 4D Materials can be a great way create the illusion of bumps and roughness on a surface, without actually changing the geometry and therefore increasing the object's complexity. To achieve a fully believable render, you could use a displacement material and distort the geometry, however this can greatly increase render times. 

With the new Parallax Bump Map feature of Cinema 4D R18, you can create the illusion of height and depth depth in bump maps, without greatly increasing render time, as the original geometry is not actually distorted. Parallax bump maps are a great way to use materials to achieve create the illusion of displaced height and depth, without increasing render time.


Want to make Lighting & Reflections in Cinema 4D a snap?

Take a look at 360° Environment Maps Pro for Cinema 4D & Cinema 4D Lite to quickly and easily add lighting and rendering options to your scene. You can also save over 25% on bundle packs!

To take a deeper look at new features in Cinema 4D R18, be sure to check out some of these additional articles focusing on other updates and new features for R18:

• Top 5 New Features of R18
• MoGraph updates and new Effectors for R18
• Voronoi Fracture, a New MoGraph Feature
• Inverted Ambient Occlusion
• Working with the new Thinfilm Shader
• Using the new Shadow Catcher for 3D Compositing
Working with the new Substance Materials Workflow

Like this tutorial? Consider becoming a Patron at Patreon.com/SeanFrangella to get additional benefits such as project files and more! 

To get weekly Motion Graphics, VFX, and 3D animation tutorials be sure to subscribe to the show on YouTube!


Cinema 4D R18 - Working with the New Substance workflow for Materials

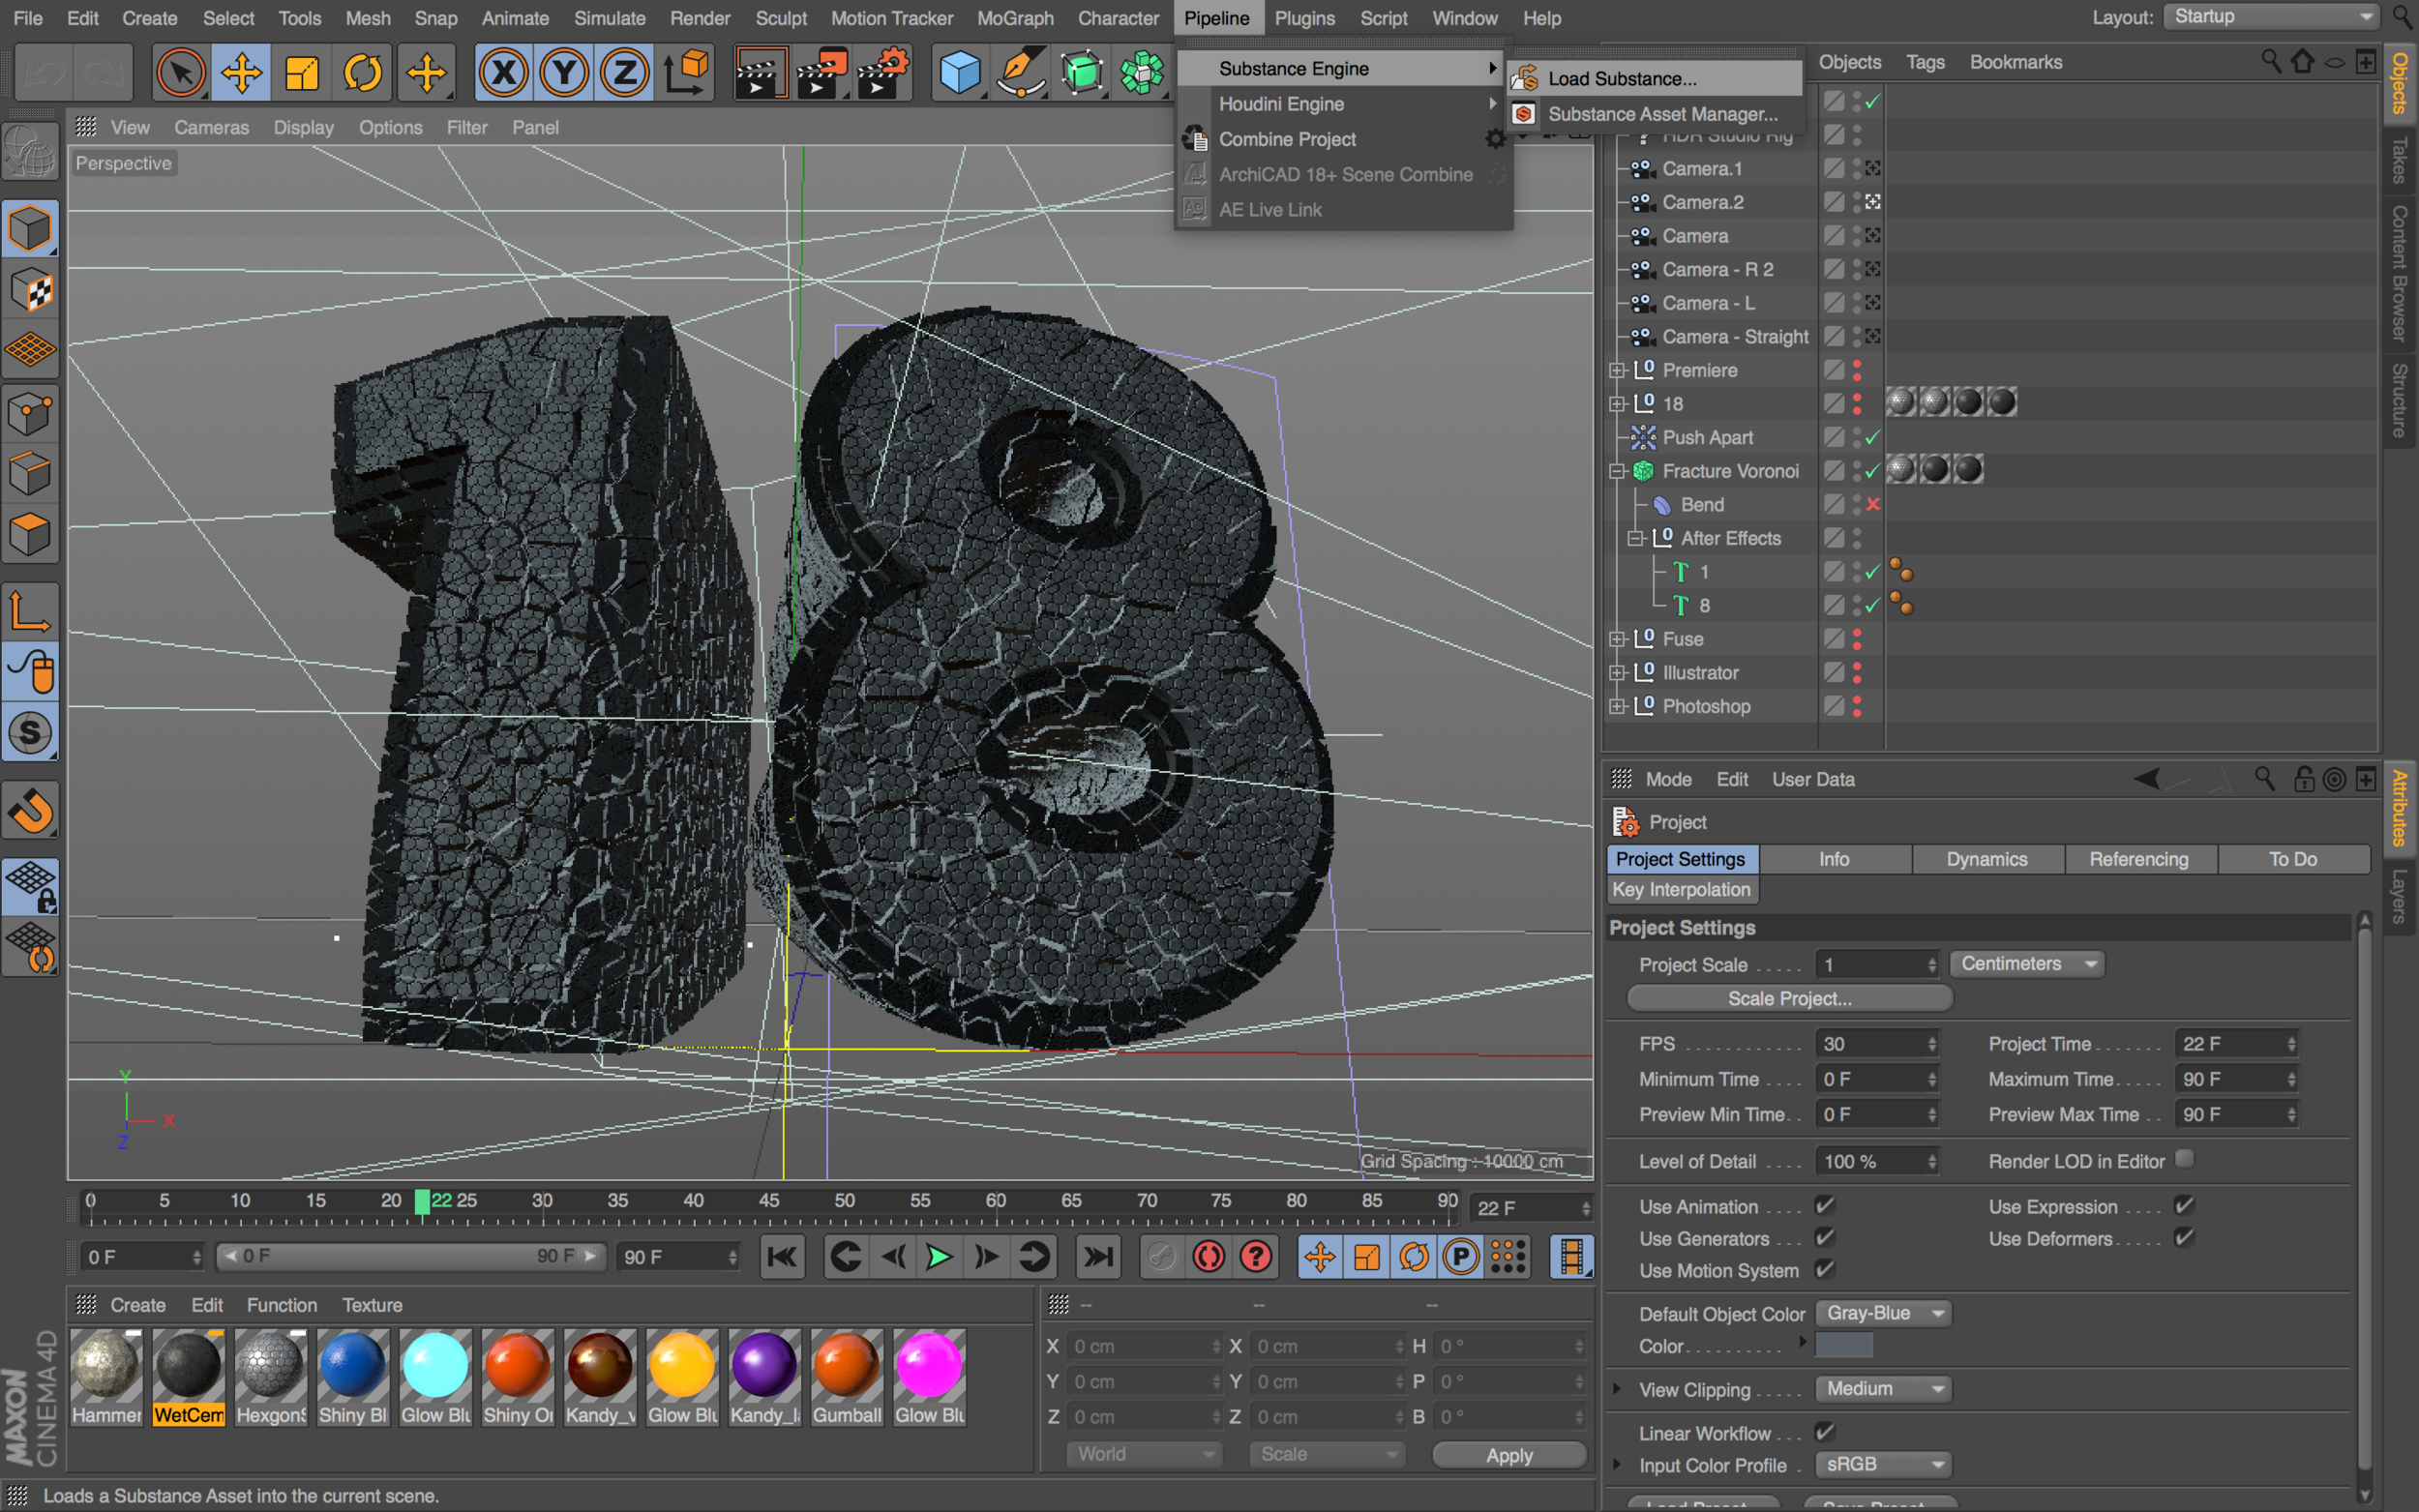
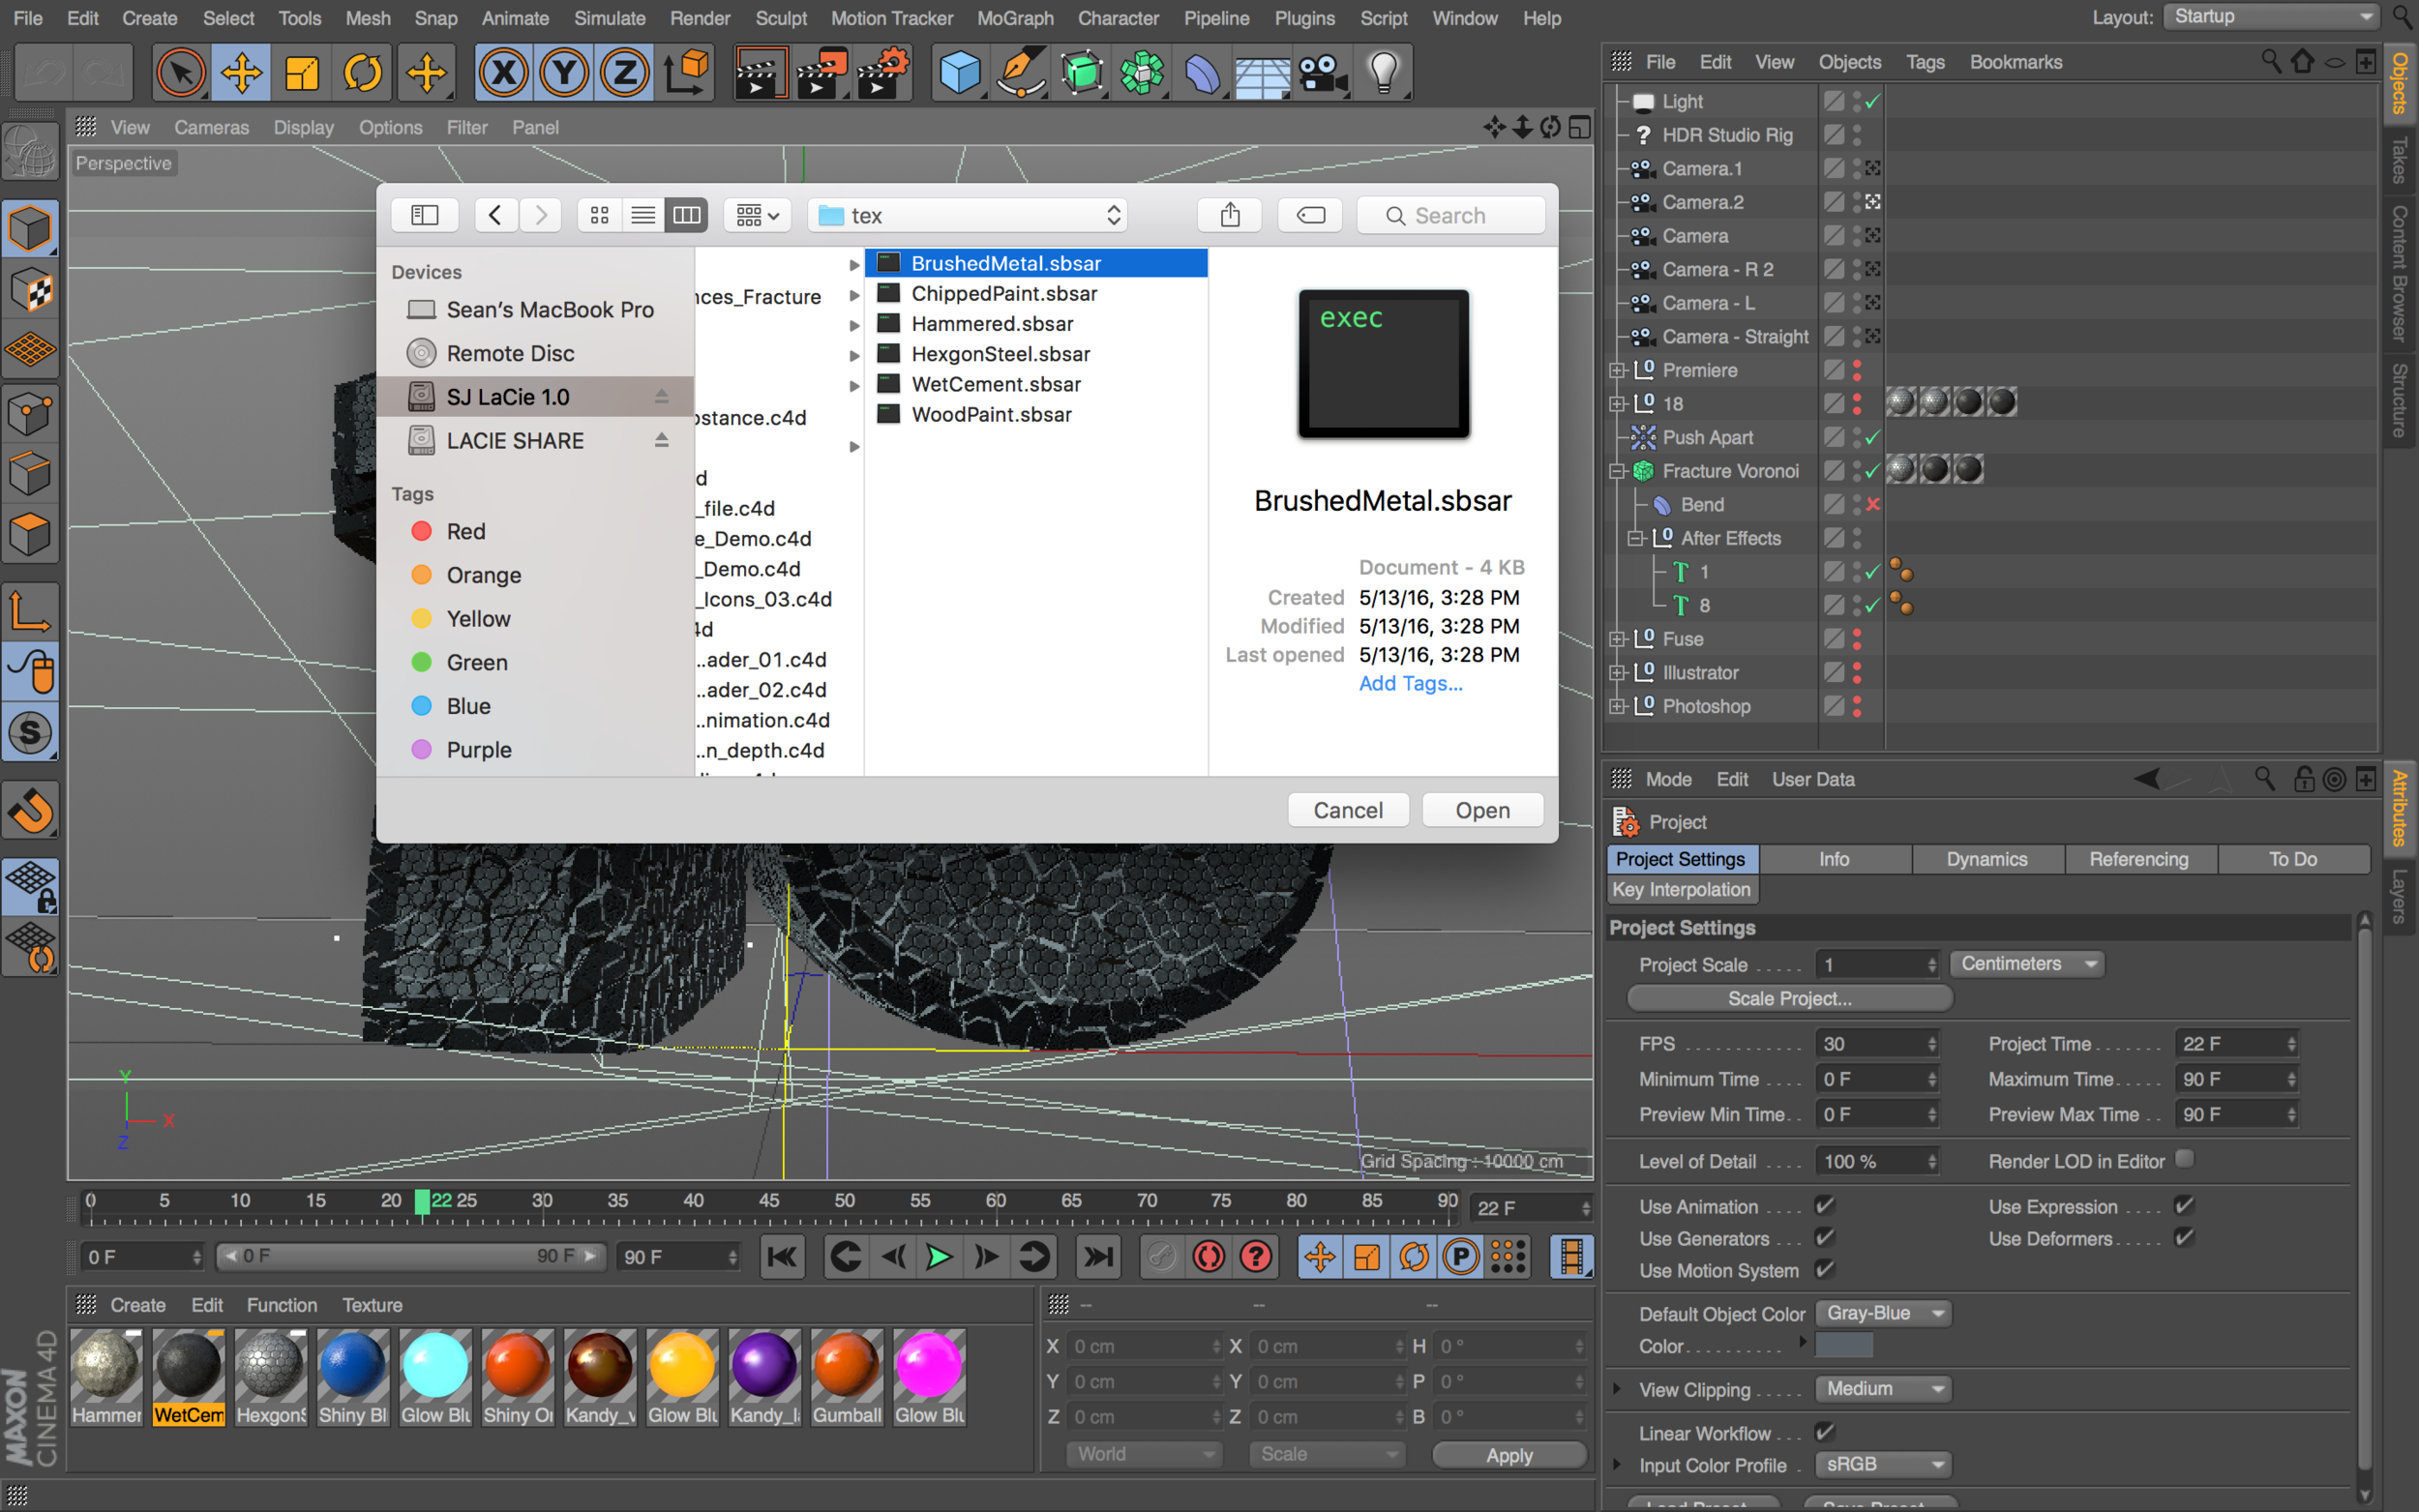
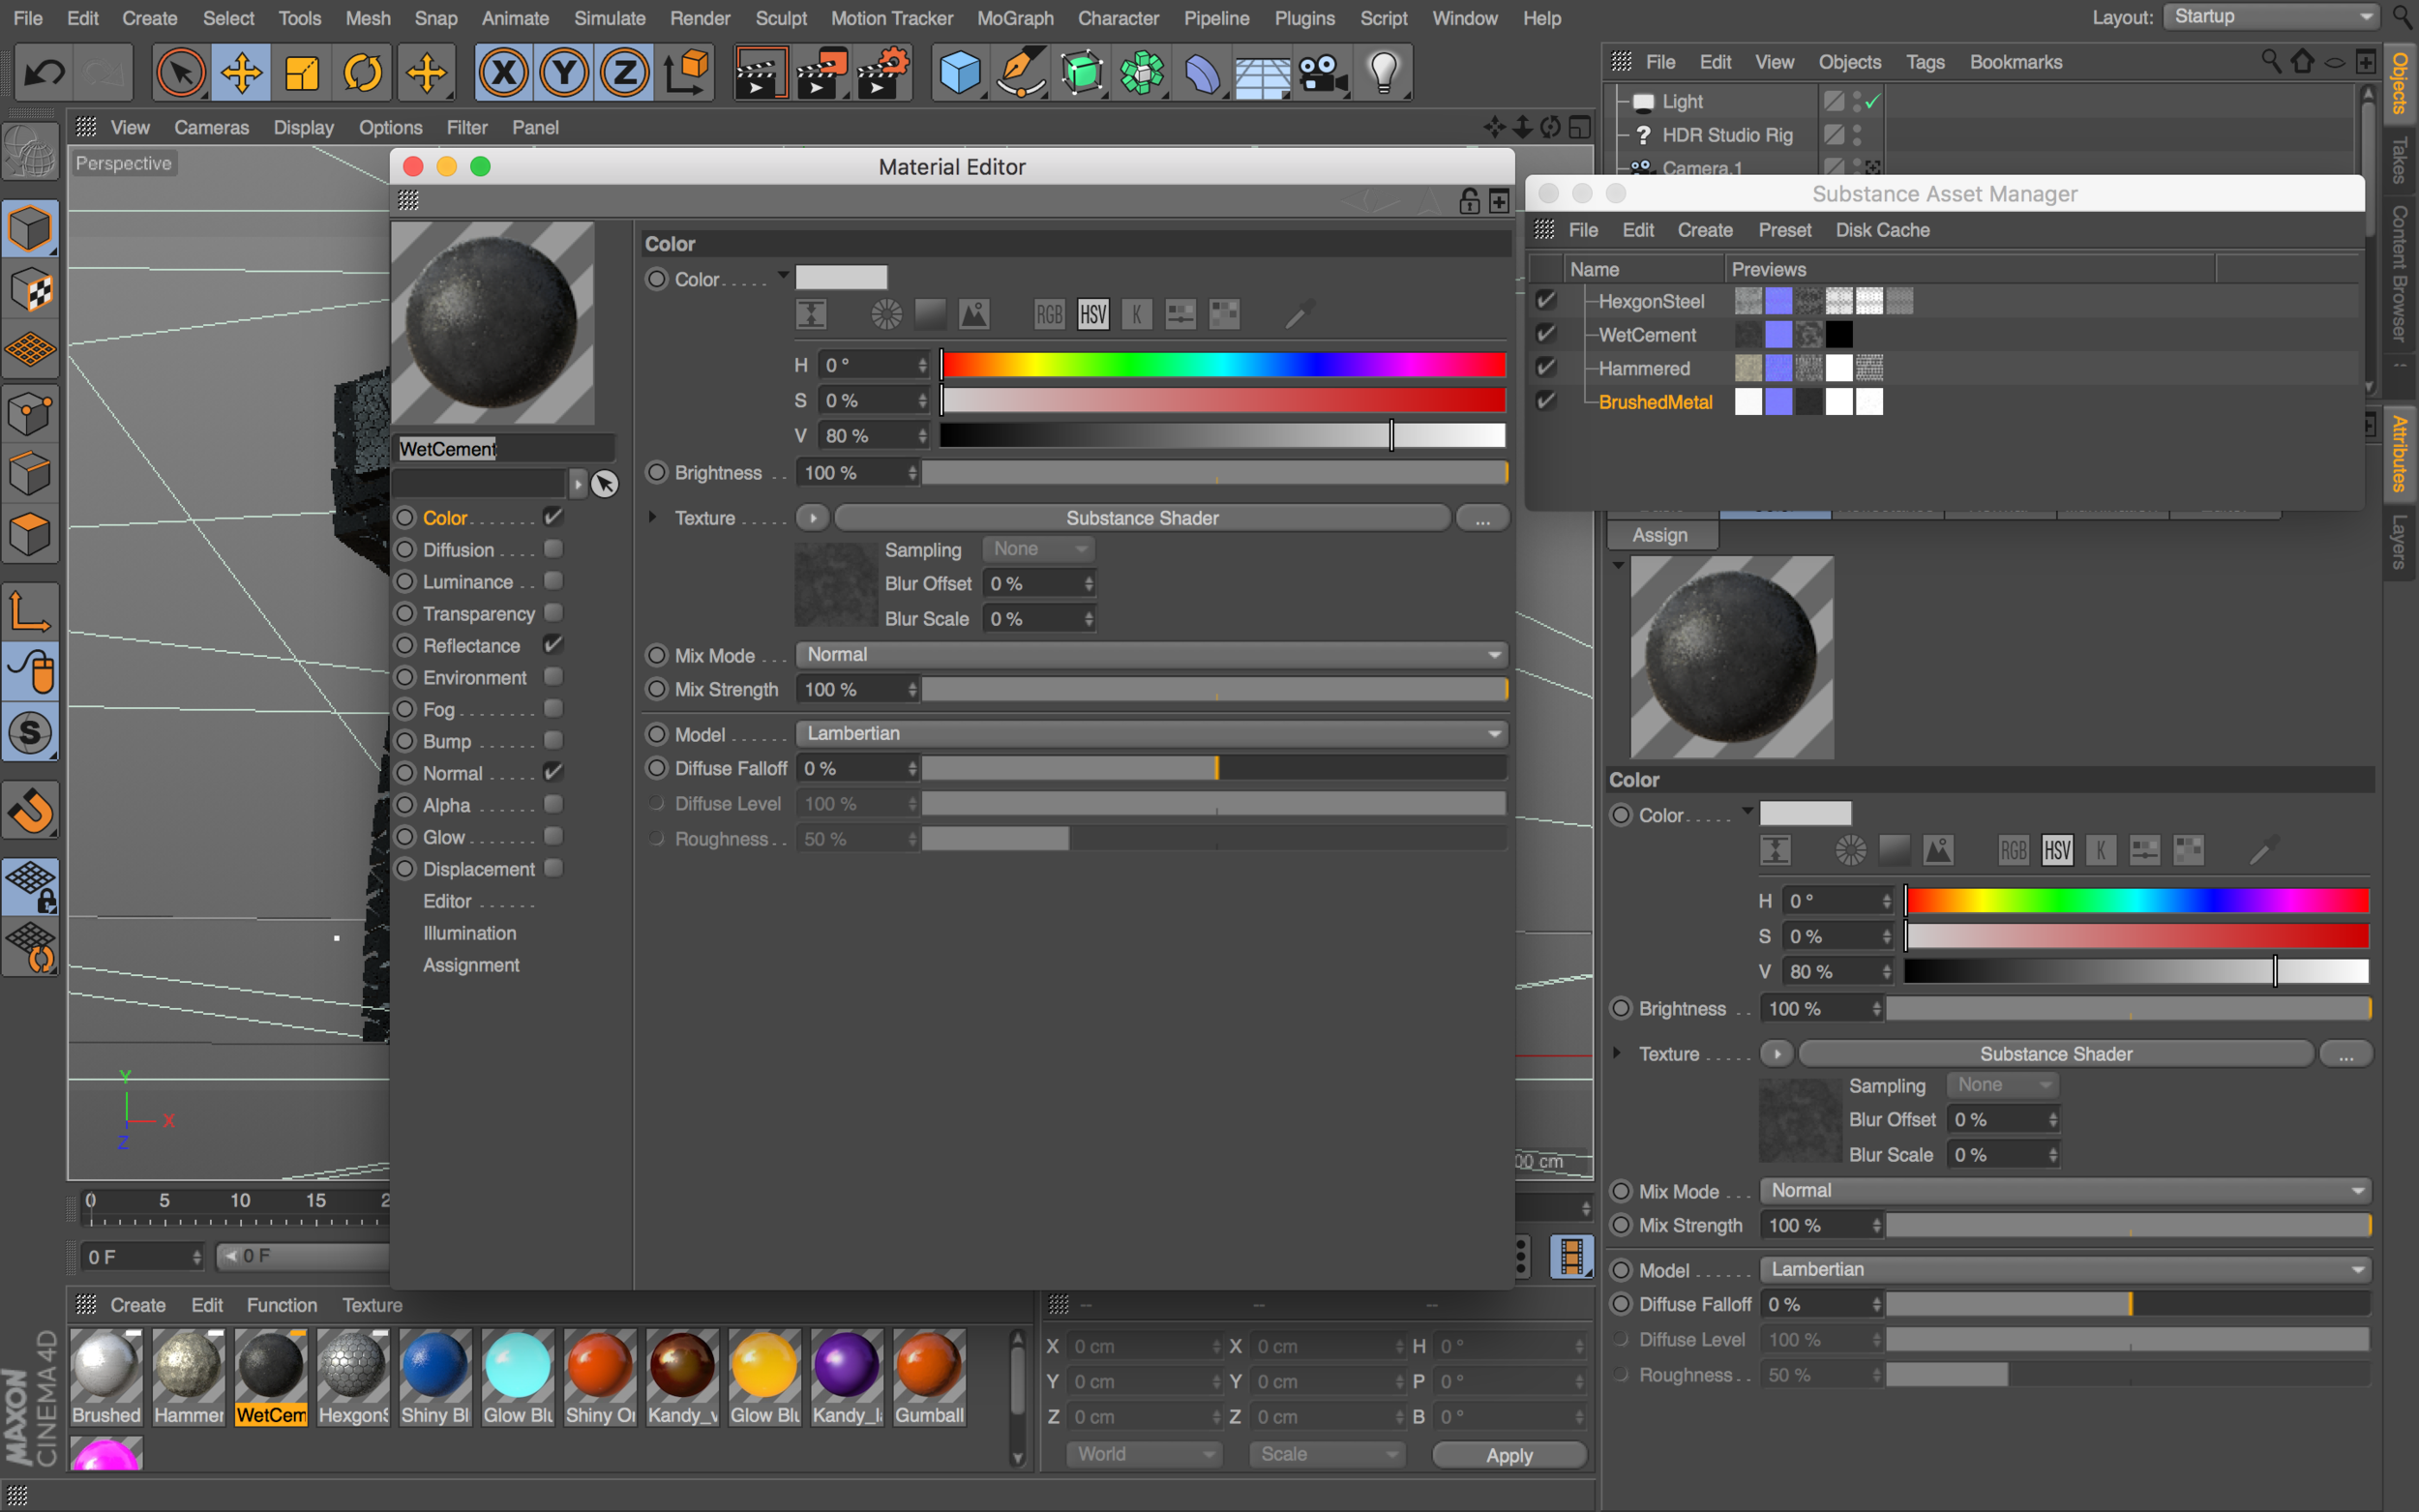
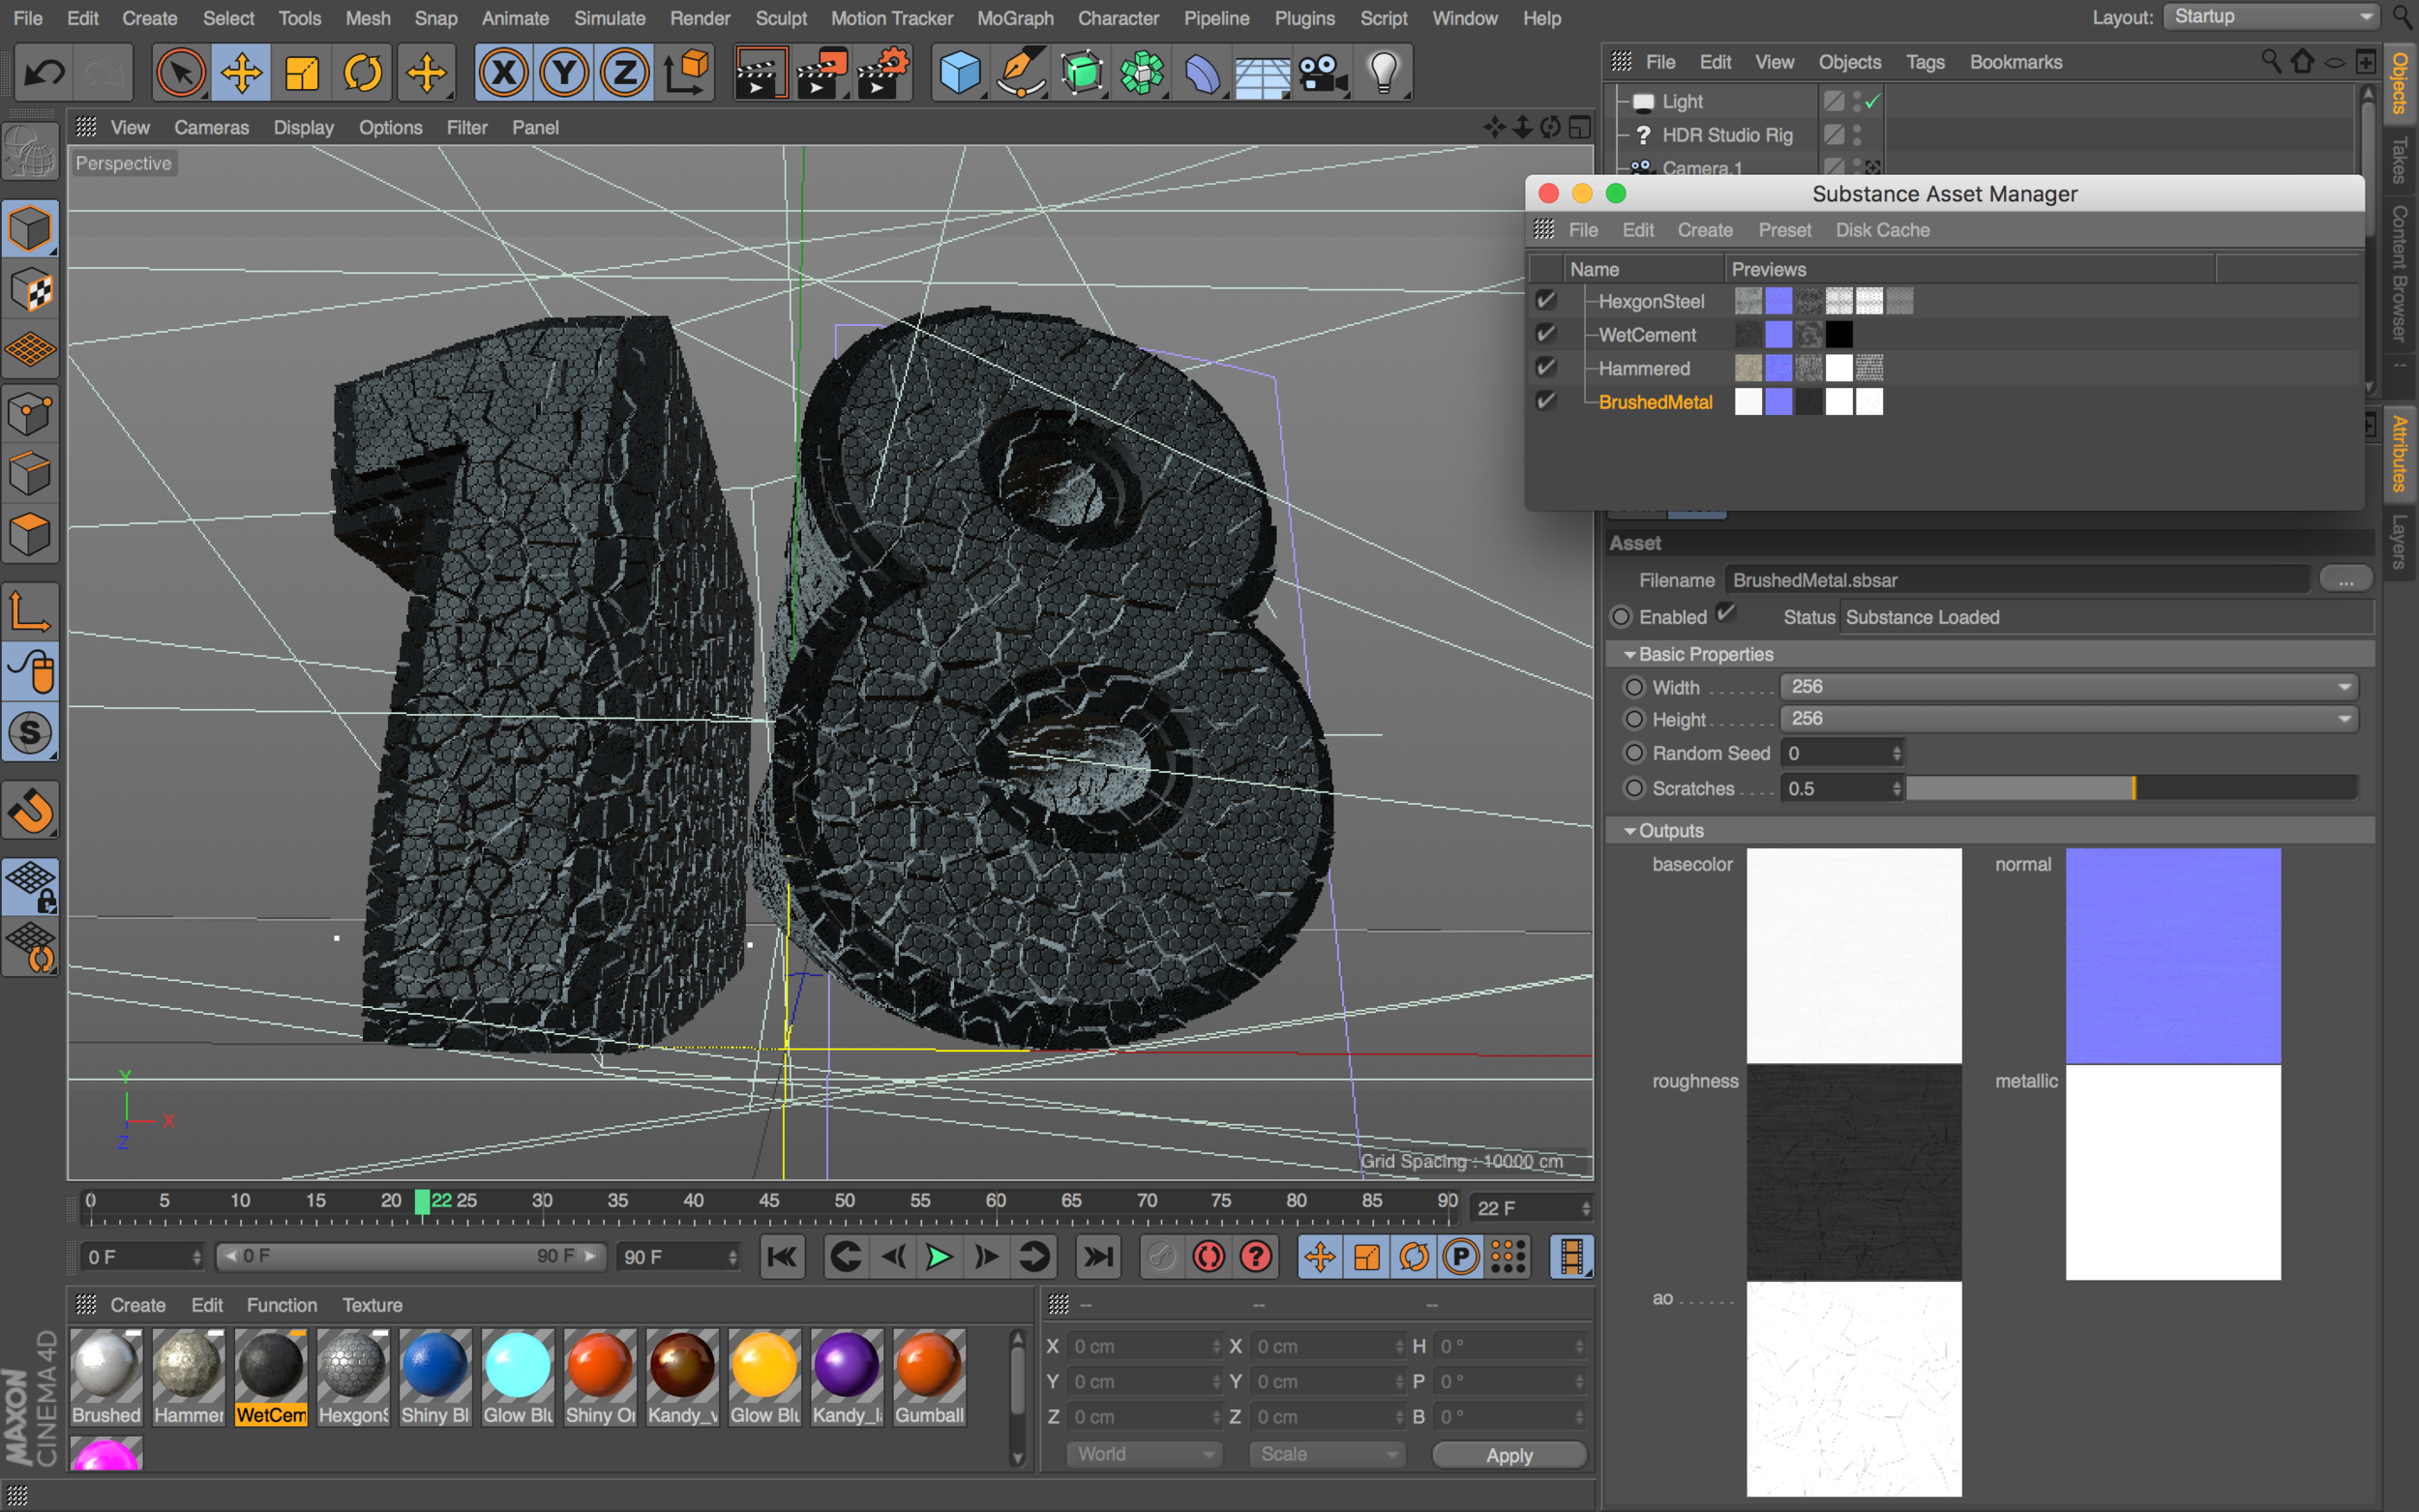
If you are a user of Substance Materials by Allegorithmic, or want to take advantage of a library of really great 3D materials, there is now a direct pipeline to get Substance Materials into Cinema 4D R18. By using substance materials, you can create new materials or download existing materials from Substance Share, and easily integrate them into your Cinema 4D R18 projects. All you have to do go to the menu Pipeline > Substance Engine > Load Substance and locate a Substance .sbsar file. That's it, and then you'll have Substance Materials available directly in Cinema 4D R18 using the new Workflow. 

Substance Materials used in combination with the new MoGraph Voronoi Fracture Tool

Substance Materials used on different parts of 3D extruded text and caps

Substance Materials used on different parts of 3D extruded text and caps

Want to make Lighting & Reflections in Cinema 4D a snap?

Take a look at 360° Environment Maps Pro for Cinema 4D & Cinema 4D Lite to quickly and easily add lighting and rendering options to your scene. You can also save over 25% on bundle packs!

To take a deeper look at new features in Cinema 4D R18, be sure to check out some of these additional articles focusing on other updates and new features for R18:

• Top 5 New Features of R18
• MoGraph updates and new Effectors for R18
• Voronoi Fracture, a New MoGraph Feature
• Inverted Ambient Occlusion
• Working with the new Thinfilm Shader
• How to use the new Parallax Bump Map Feature
• Using the new Shadow Catcher for 3D Compositing

Like this tutorial? Consider becoming a Patron at Patreon.com/SeanFrangella to get additional benefits such as project files and more! 

To get weekly Motion Graphics, VFX, and 3D animation tutorials be sure to subscribe to the show on YouTube!


Photoshop 3D Image Based Lighting - Using 360 Photos to light 3D scenes in Photoshop

When working in the 3D workspace in Adobe Photoshop, one of the key workflows to get a nice looking render is the use of Image Based Lighting. With image-based-lighting, or IBL, you can use a 360 Environment Map photo to light your scene, and show up in the reflections of your 3D objects.

In this tutorial, I go over how to set up IBL in the 3D workspace, using one of the photos from 360° Environment Maps Pro. You can create Environment Map photos using your phone, or be sure to check out the bundles in the online store where you can pick up affordable packs of up to 115 Environment Maps that can be used for Image Based Lighting in Photoshop, After Effects, and Cinema 4D.


Want to get 8K Environment Maps for Photoshop?

Check out 360° Environment Maps Pro, compatible with Photoshop


How to use Cinema 4D Object Buffers to create Masks and Track Mattes for Post-Production

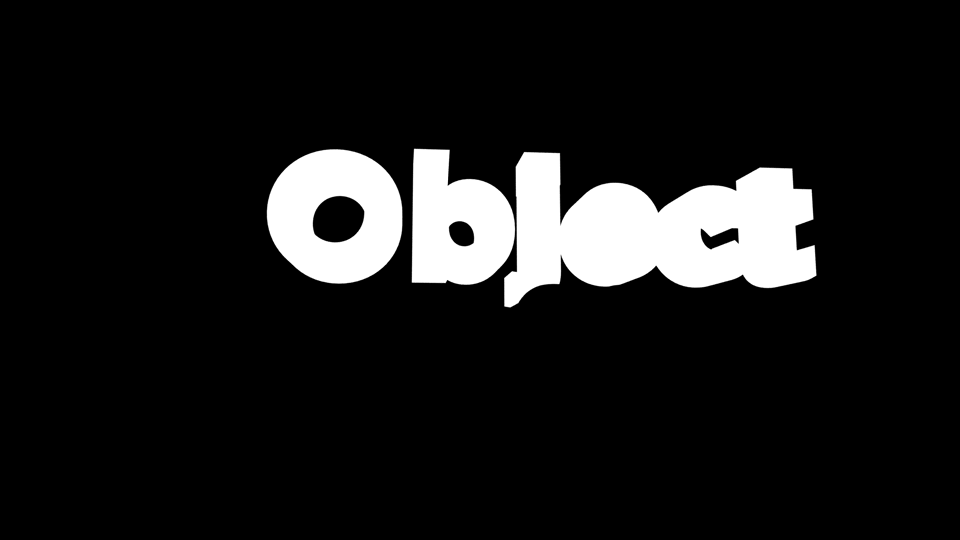
Using Object Buffers in Cinema 4D makes it easy to create masks and track mattes for individual objects. Haven't heard of object buffers? What you can do is use the Compositing Tag to assign an object buffer to individual 3D objects, then when you render out a multi-pass render, you'll also render out a black and white version of the frame, with the selected object in white.

What's the point of that? Well, you can use this as a selection in Photoshop or as a Track Matte in After Effects. This way, you can add adjustments to individual elements of an animation wihtout needing to rotoscope or mask out the object. This can also be a huge time saver if you need to make an adjustment after you've already rendered the project.

An example of a 3D Render, rendered out as a PNG sequence from Cinema 4D

An example of a 3D Render, rendered out as a PNG sequence from Cinema 4D

A corresponding Multi-Pass render with an Object Buffer set to the word "object"

A corresponding Multi-Pass render with an Object Buffer set to the word "object"


Want to greatly improve your 3D Renders?

Check out 360° Environment Maps Pro for Cinema 4D

Like this tutorial? Consider becoming a Patron at Patreon.com/SeanFrangella to get additional benefits such as project files and more! 

To get weekly Motion Graphics, VFX, and 3D animation tutorials be sure to subscribe to the show on YouTube!